Seriously no joke this is the best Classic Strawberry Shortcake recipe. It is the one my mom and before that my grandma has made for years. It is a classic recipe with simple delicious ingredients. Juicy strawberries are tossed with sugar then tucked into tender buttery shortcakes and finished with soft clouds of whipped cream.
Perfect for summer desserts or a sweet treat after dinner. A classic strawberry shortcake recipe is one of my go to easy desserts. Not only does it make for a super delicious bite but it feels light fresh and satisfying all at once. Also there are no complicated methods or ingredients needed.
And putting it together is a cinch. I often prep the strawberries ahead on Sunday then bake the shortcakes later for a dessert that feels special without much fuss. With just a few basic ingredients probably already in the fridge and pantry you can whip up warm shortcakes and pile them high with syrupy berries and cream or even serve the parts family style for a casual little dessert spread.
Ingredients
Here’s what I use for this recipe and you can always make substitutions if you prefer.
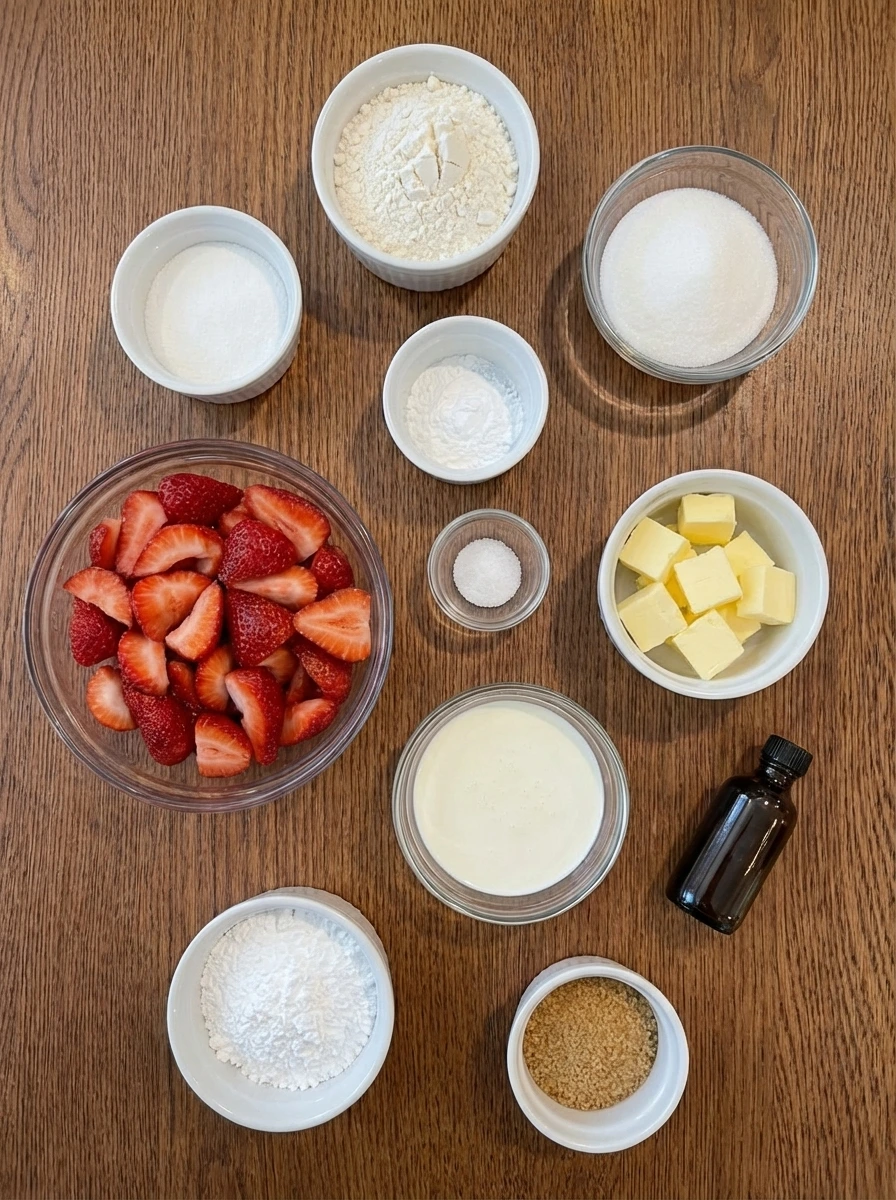
- Strawberries: the juicy fruit base that softens and turns syrupy
- Granulated sugar: sweetens the berries and helps draw out their juices
- All purpose flour: forms the tender shortcake structure
- Baking powder: lifts the dough for light biscuits
- Fine sea salt: balances sweetness and sharpens flavor
- Unsalted butter: creates flaky rich layers in the shortcakes
- Heavy cream: moistens the dough and whips into the topping
- Vanilla extract: adds warm sweet aroma to berries and cream
- Powdered sugar: sweetens the whipped cream gently
- Turbinado sugar: scattered on top for a lightly crisp golden finish
Tools You’ll Need
- Mixing bowl: for berries dough and whipped cream
- Measuring cups and spoons: for accurate ingredient portions
- Knife: for slicing berries and splitting shortcakes
- Baking dish: for baking the shortcakes
- Whisk or mixer: for whipping the cream
Instructions
Step 1: Slice and sweeten the strawberries
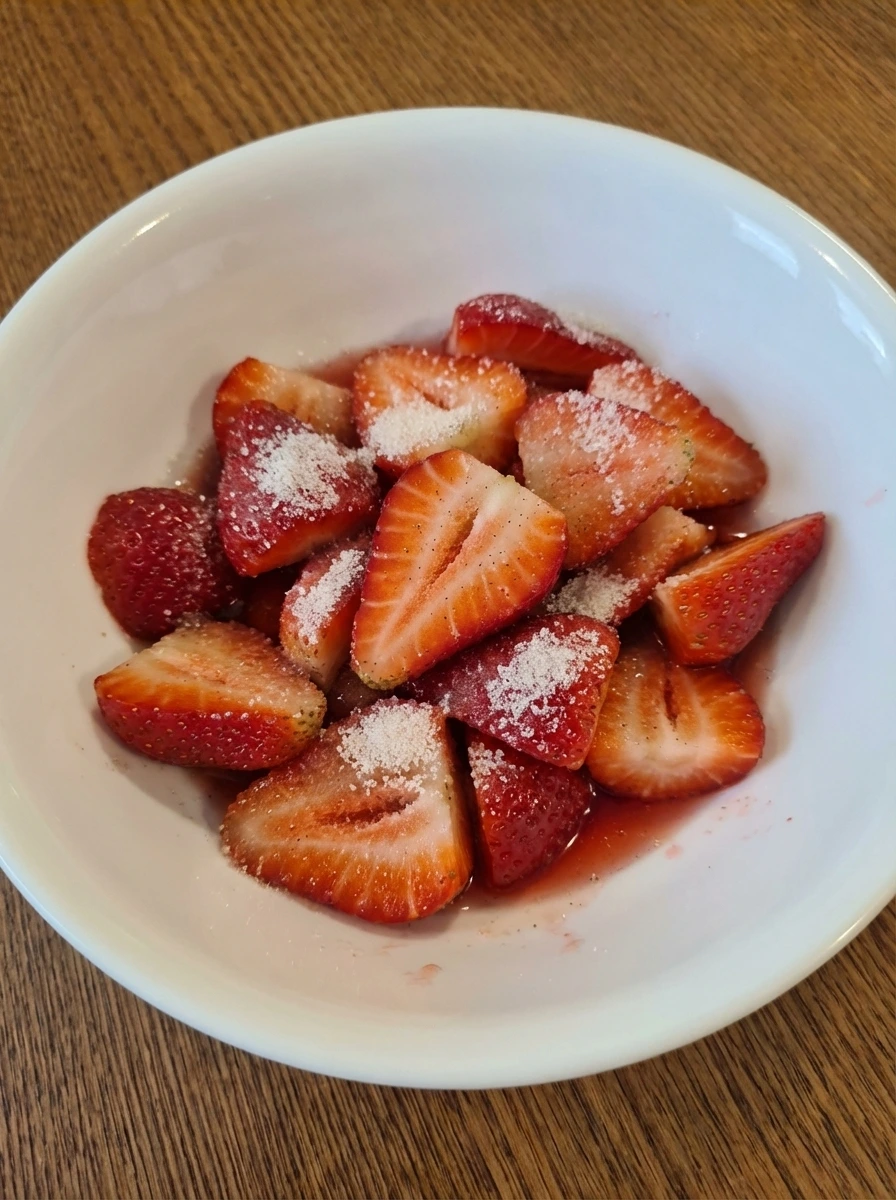
Hull the strawberries and slice them into uneven pieces so some stay chunky while others are thinner and softer looking. Scatter them into a bowl and pour over the granulated sugar with 1 teaspoon of vanilla. Stir until the fruit looks glossy and lightly coated. As the sugar settles against the berries the surfaces begin to look wetter and a little syrup starts gathering at the bottom while the slices relax and lose their dry cut edges.
Tip: Leave a few pieces slightly larger so the finished filling has natural texture.
Step 2: Let the berries soften and turn syrupy
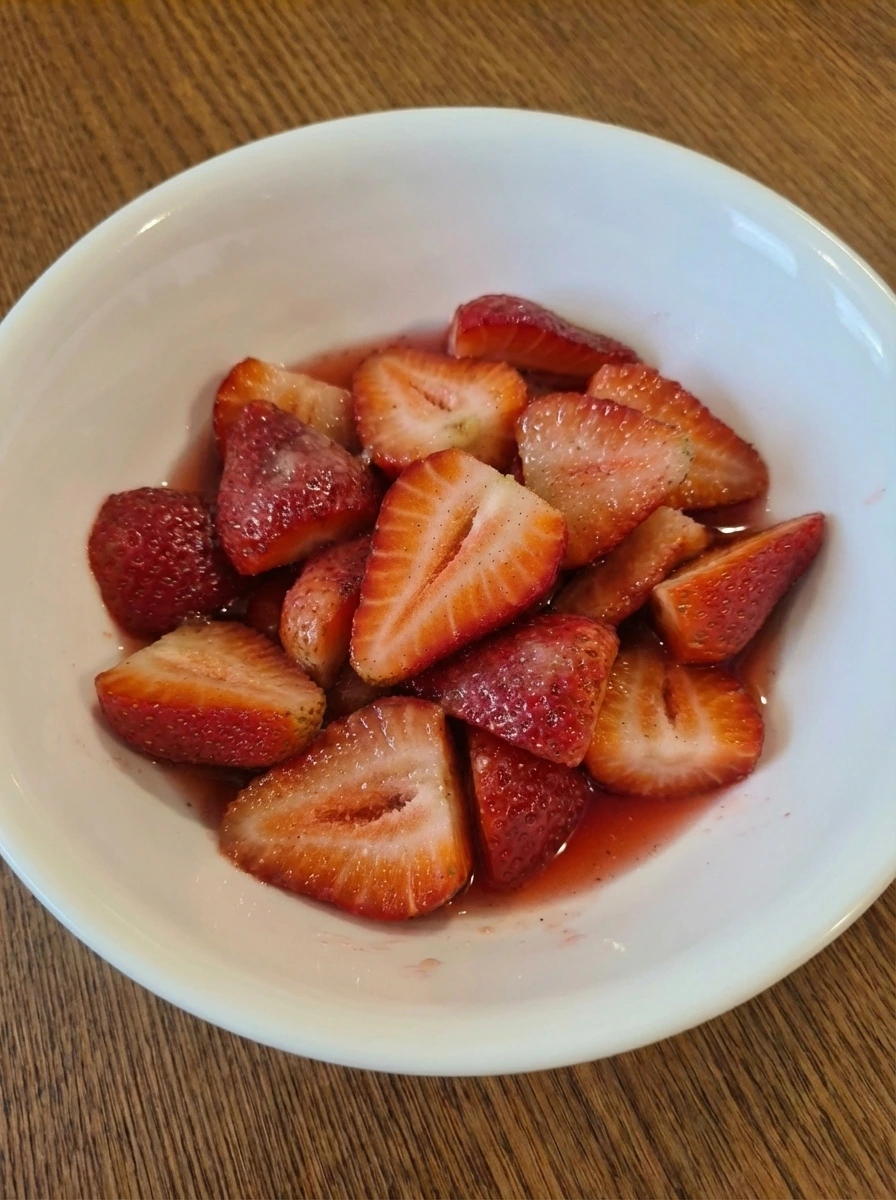
Set the strawberries aside and give them another gentle stir after a few minutes. The sugar draws out more juice and the fruit shifts from firm and matte to soft and glossy. By the end of this stage the bowl should hold bright berries in a loose rosy syrup that clings unevenly around the slices. This is the marinating step that gives the filling its juicy spoonable texture.
Tip: A little resting time makes the berries more flavorful and helps create natural syrup without cooking.
Step 3: Measure and combine the dry ingredients
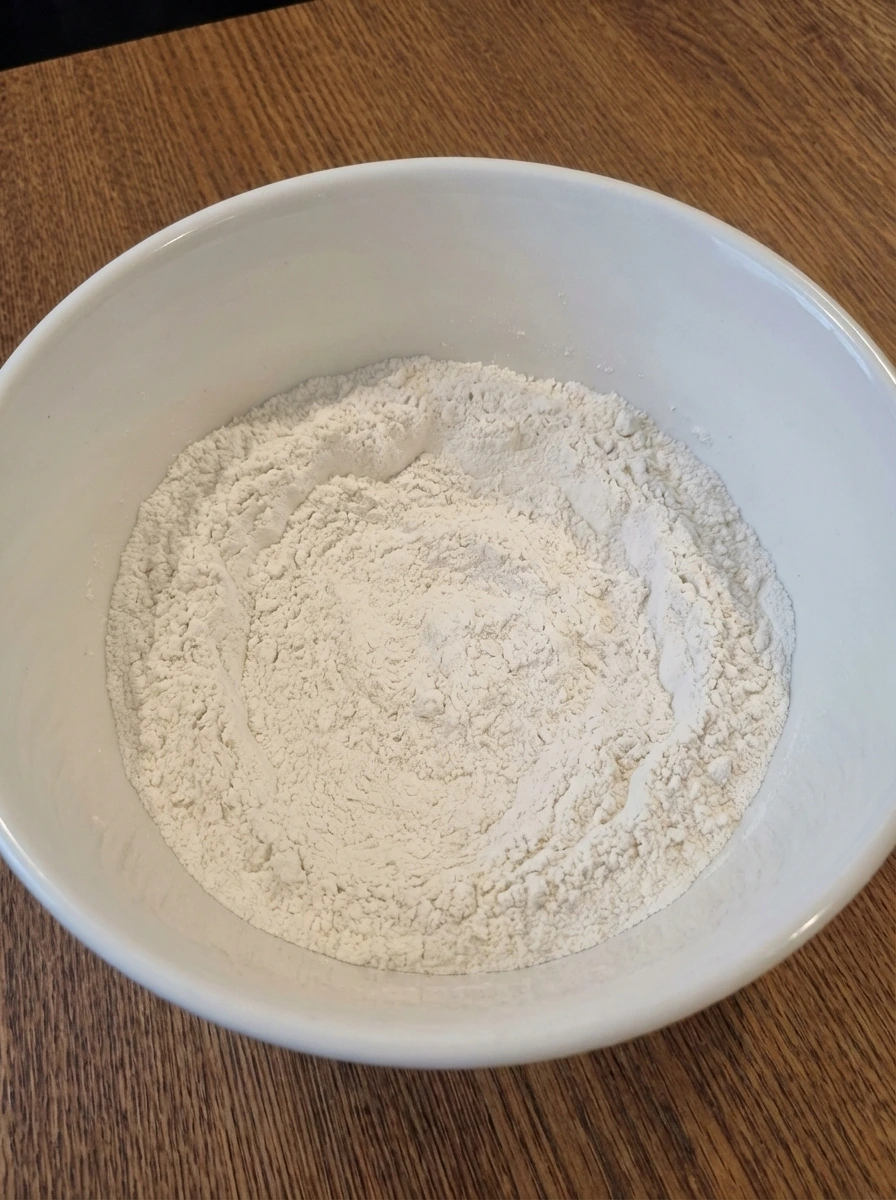
Add the flour baking powder and salt to a bowl and mix until the powdery streaks disappear. The mixture should look light and evenly blended with no dense pockets. This stage keeps the shortcakes uniform before the butter goes in. Visually it stays soft and pale though the surface becomes more even and airy as the ingredients are fully mixed together.
Tip: Break up any small lumps with your fingers so the dry mix looks loose and even.
Step 4: Coat the butter into the flour
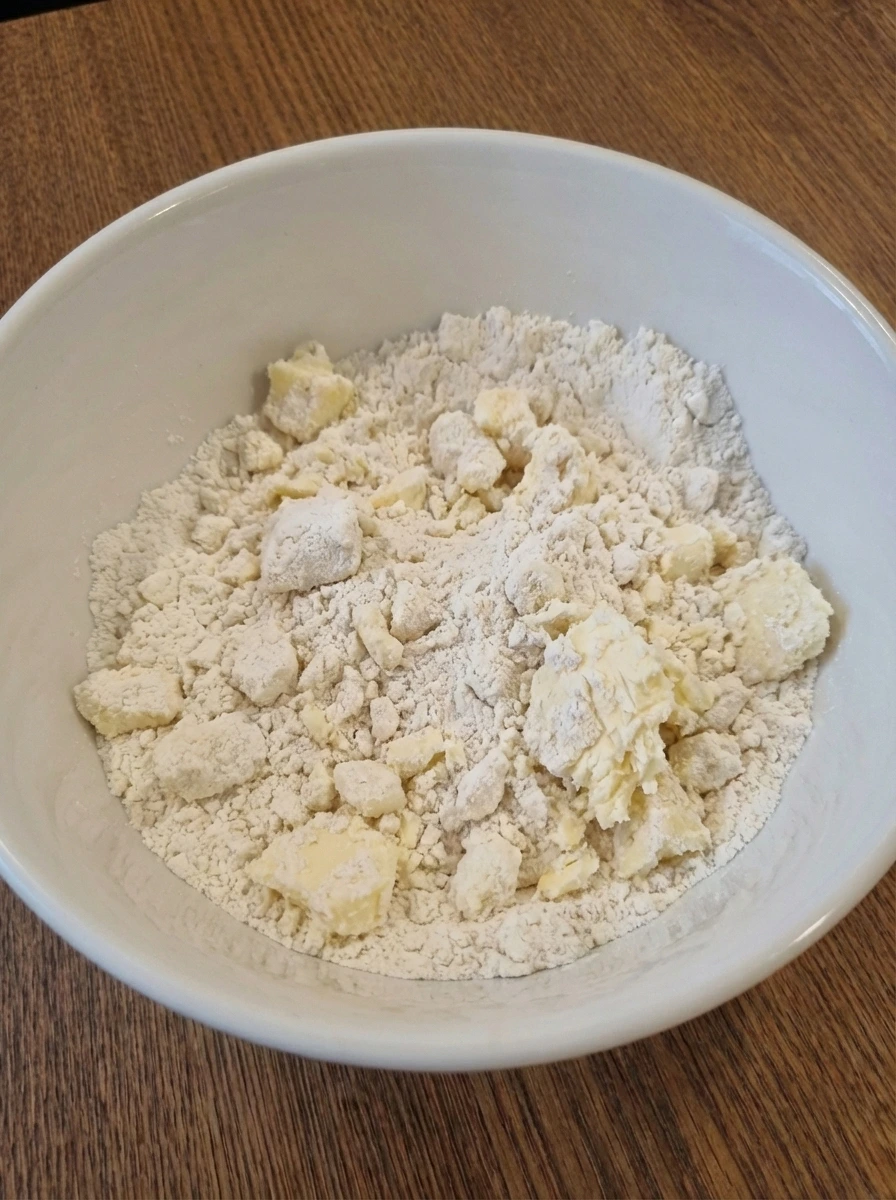
Add the cold butter pieces to the dry mixture and toss them through so each piece gets dusted all over. Then press and rub the butter into the flour until the bowl holds a mix of fine crumbs and a few larger flat bits. The look changes from loose flour to a textured crumb with buttery pieces scattered throughout. This coating stage matters because those uneven bits melt later and leave the shortcakes flaky instead of dense.
Tip: Stop while some butter pieces are still visible because they help create layered texture.
Step 5: Pour in the cream and mix a shaggy dough
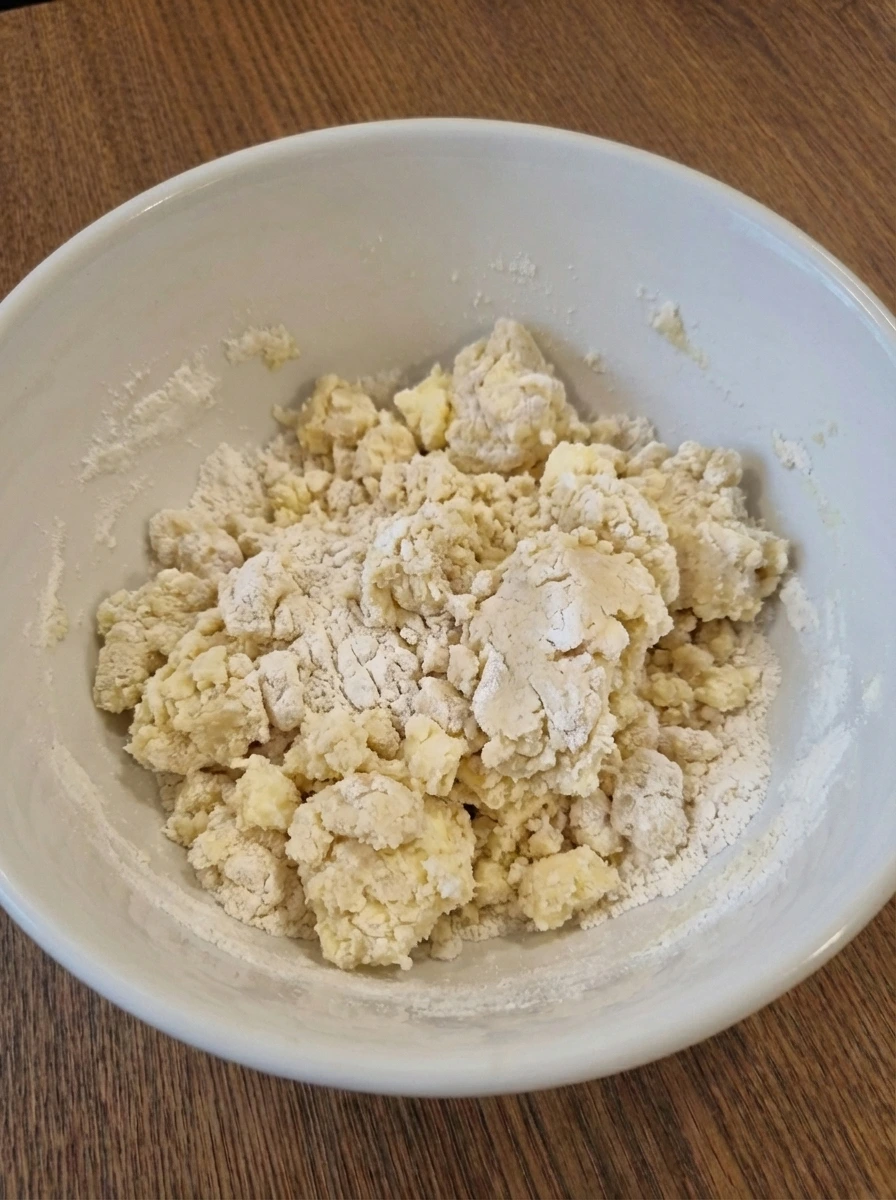
Pour in 3/4 cup heavy cream and the remaining 1 teaspoon vanilla then fold just until the crumbs start clinging together. Dry patches disappear in most places while the dough becomes shaggy moist and softly lumpy. Do not force it smooth. The best texture here looks partly mixed with rough edges and a few floury seams because that loose uneven structure bakes into tender shortcakes.
Tip: If a few dry spots remain press them in gently rather than overmixing the whole bowl.
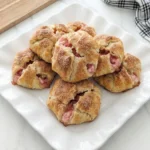
Step 6: Shape and cut the shortcakes
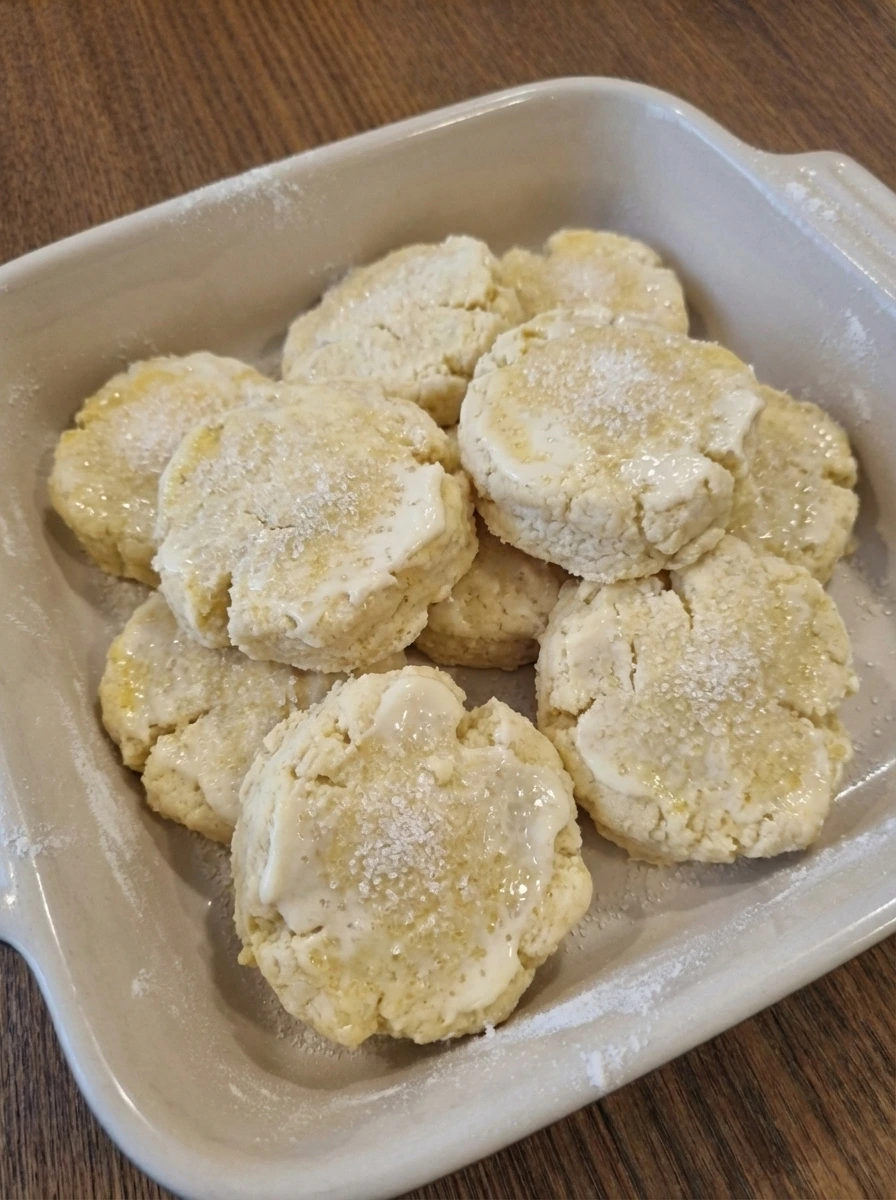
Gather the dough and press it into a thick round then pat it down until the top looks rough and the edges stay a little cracked. Cut out the shortcakes so each piece has its own irregular rim and soft layered sides. Arrange them with a little space between each one and brush the tops with the remaining 1/4 cup heavy cream. Scatter turbinado sugar loosely over the tops so some spots are more covered than others.
Tip: Press straight down when cutting so the layers stay taller as they bake.
Step 7: Bake until puffed and lightly browned
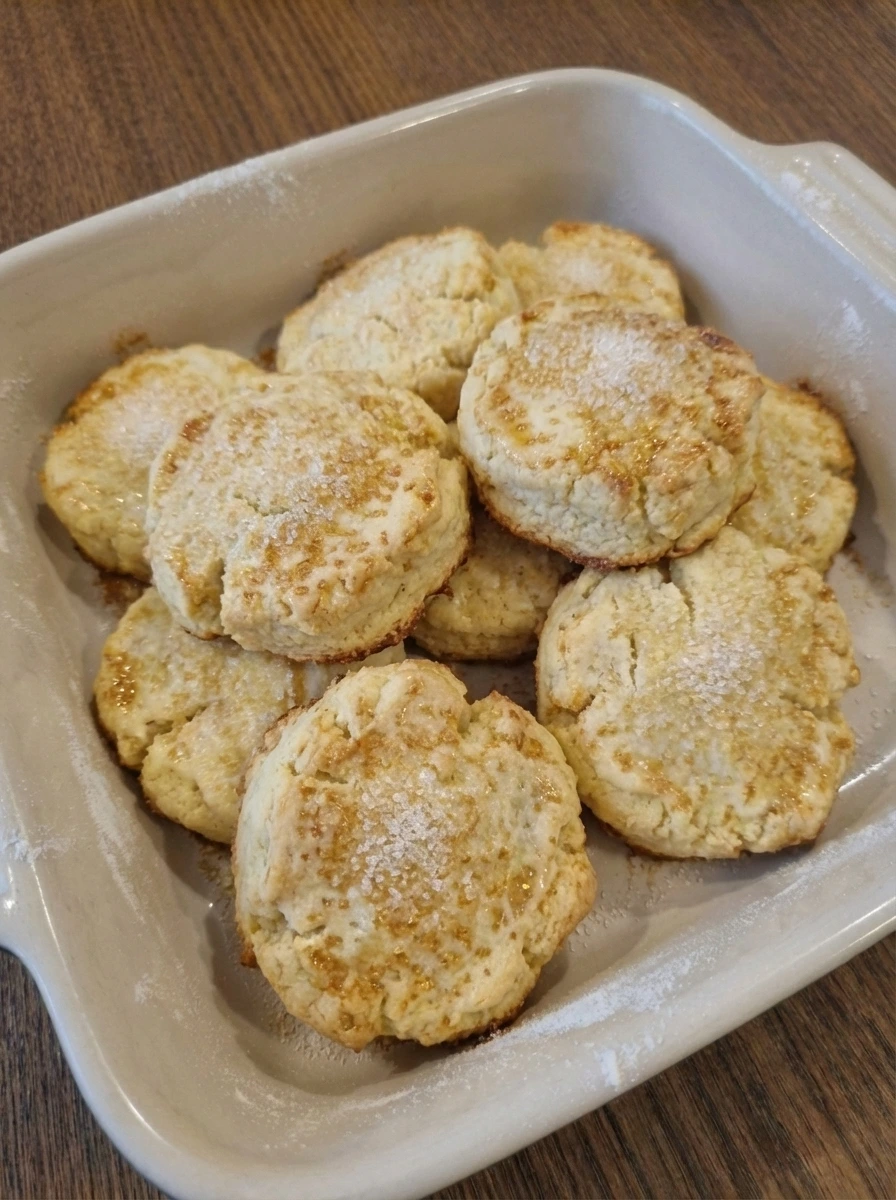
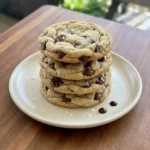
As the shortcakes bake the dough rises and the pale tops shift to warm golden brown. The sugar on top turns slightly crisp and patchy while the sides split in places to show tender layered seams. This is the big visual transformation from raw dough to baked shortcake. The centers look set and the tops carry uneven browning that makes them feel homemade and ready for filling.
Tip: Look for golden tops and dry set sides rather than deep dark color.
Step 8: Whip the cream into soft billowy peaks
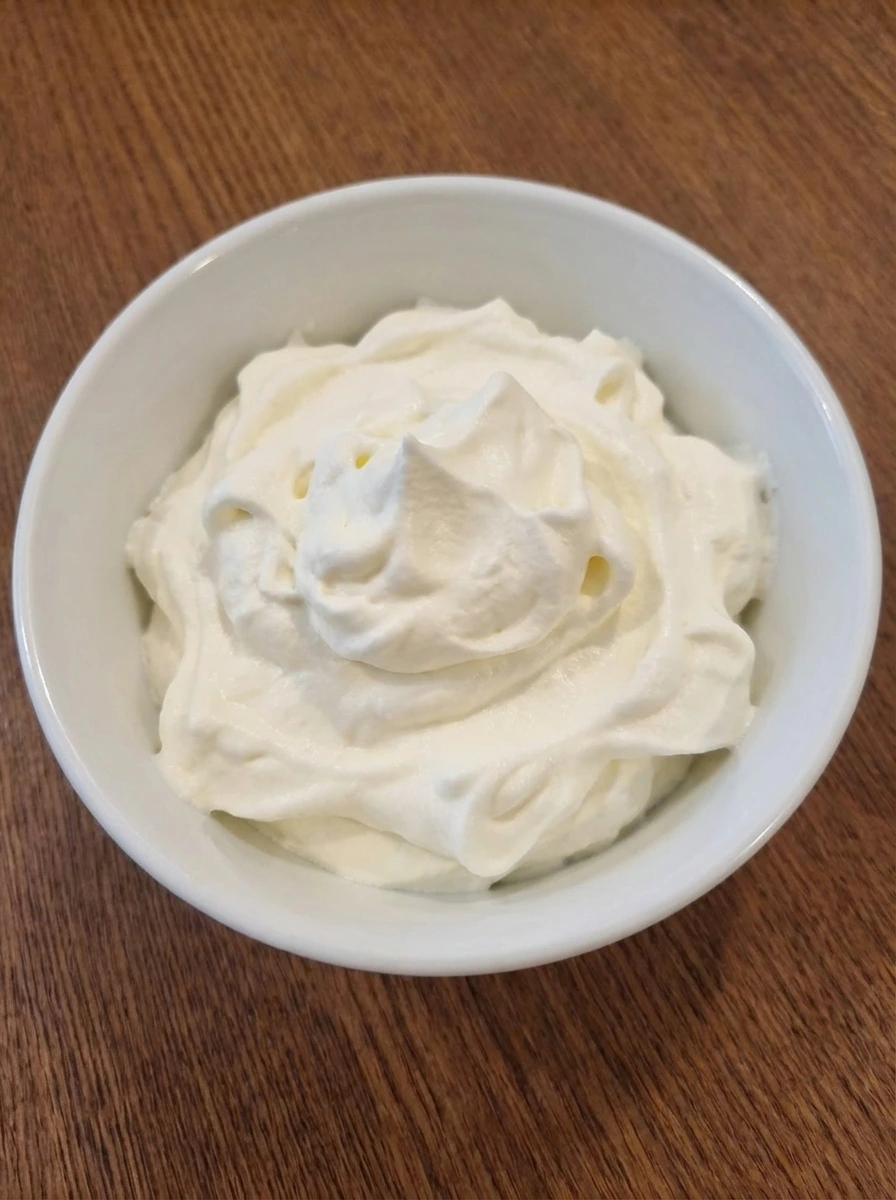
Pour the remaining 1/2 cup heavy cream into a bowl with the powdered sugar and whip until the mixture thickens from liquid to soft mounded cream. The surface changes from glossy and loose to airy and softly rippled. Stop when the cream holds relaxed peaks that curl over instead of standing stiff. That loose texture makes the finished shortcake look generous and natural rather than overly styled.
Tip: Soft peaks spoon more beautifully into the layers than very stiff whipped cream.
Step 9: Split the warm shortcakes
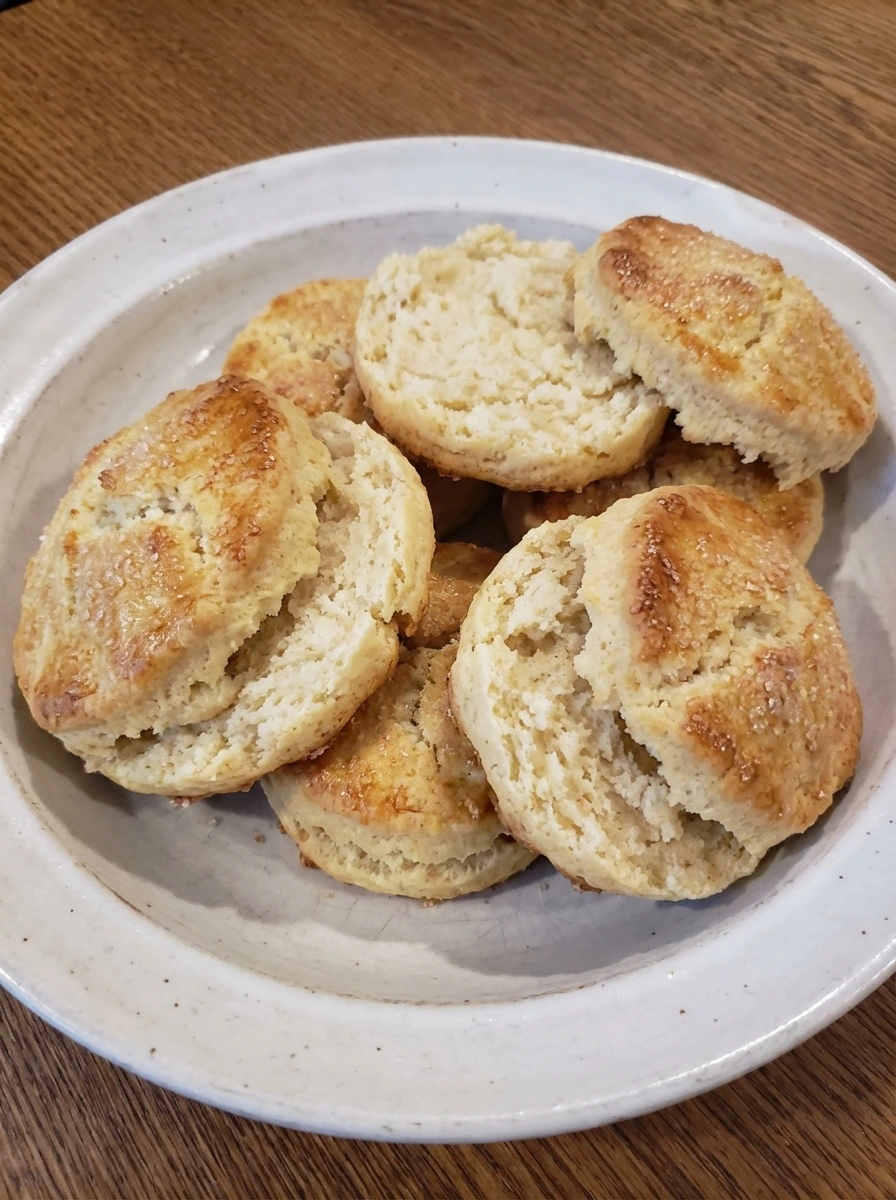
When the shortcakes are cool enough to handle split them open with your hands or a knife. The inside should look tender and slightly steamy with a pale soft crumb that contrasts with the lightly browned top. Leave the bottoms and tops a little uneven because those rough edges catch the berry syrup and cream better. This stage sets up the layers without making the dessert look too perfect.
Tip: Split while still faintly warm so the crumb stays tender and easy to open.
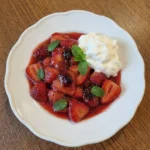
Step 10: Layer the berries and cream

Place the shortcake bottoms on plates then spoon over the strawberries with some of their syrup so it runs into the crumb in irregular streaks. Add whipped cream in loose dollops so some berry pieces stay visible and some syrup peeks through. Set the tops on at a slight angle instead of pressing them flat. The dessert now looks layered and full with casual height and a mix of soft cream glossy fruit and tender cake.
Tip: Use enough berry syrup to moisten the shortcake but not so much that the layers collapse.
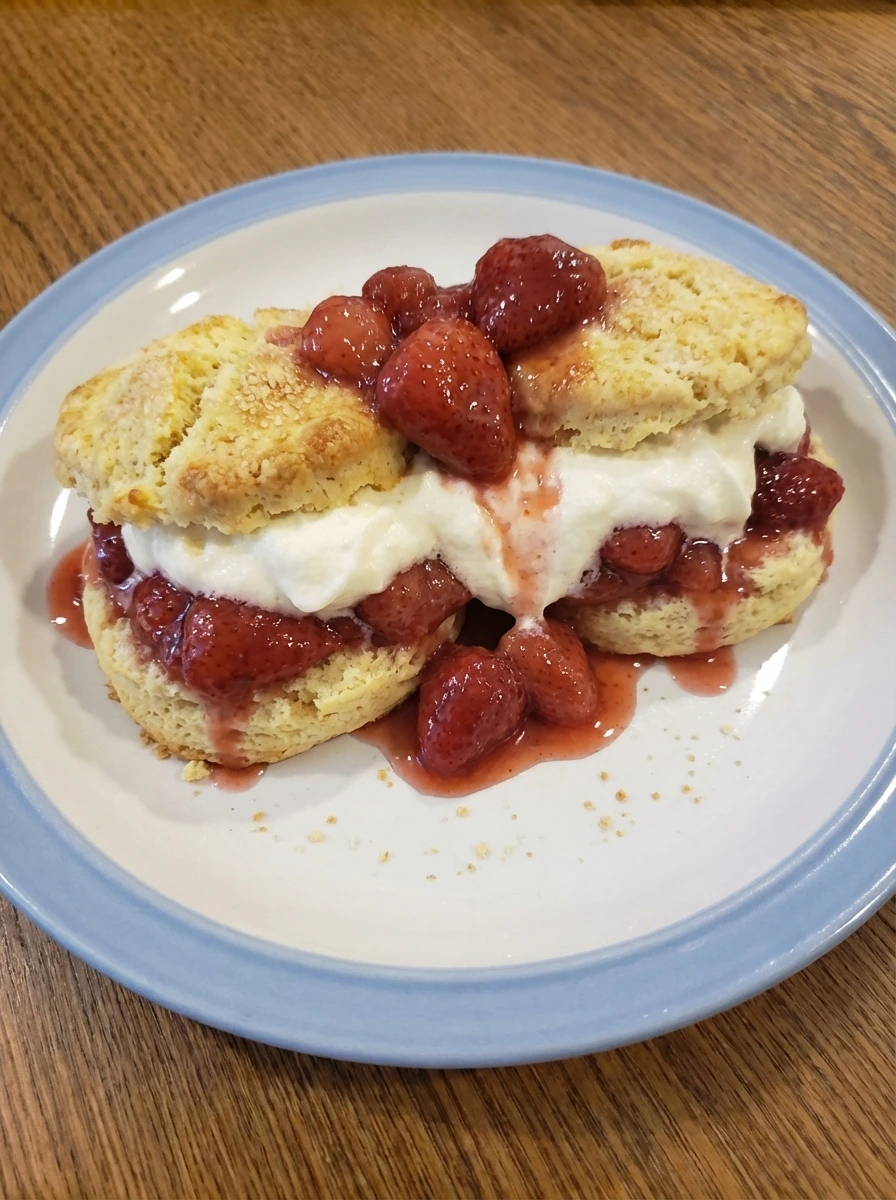
Step 11: Finish and plate the shortcakes
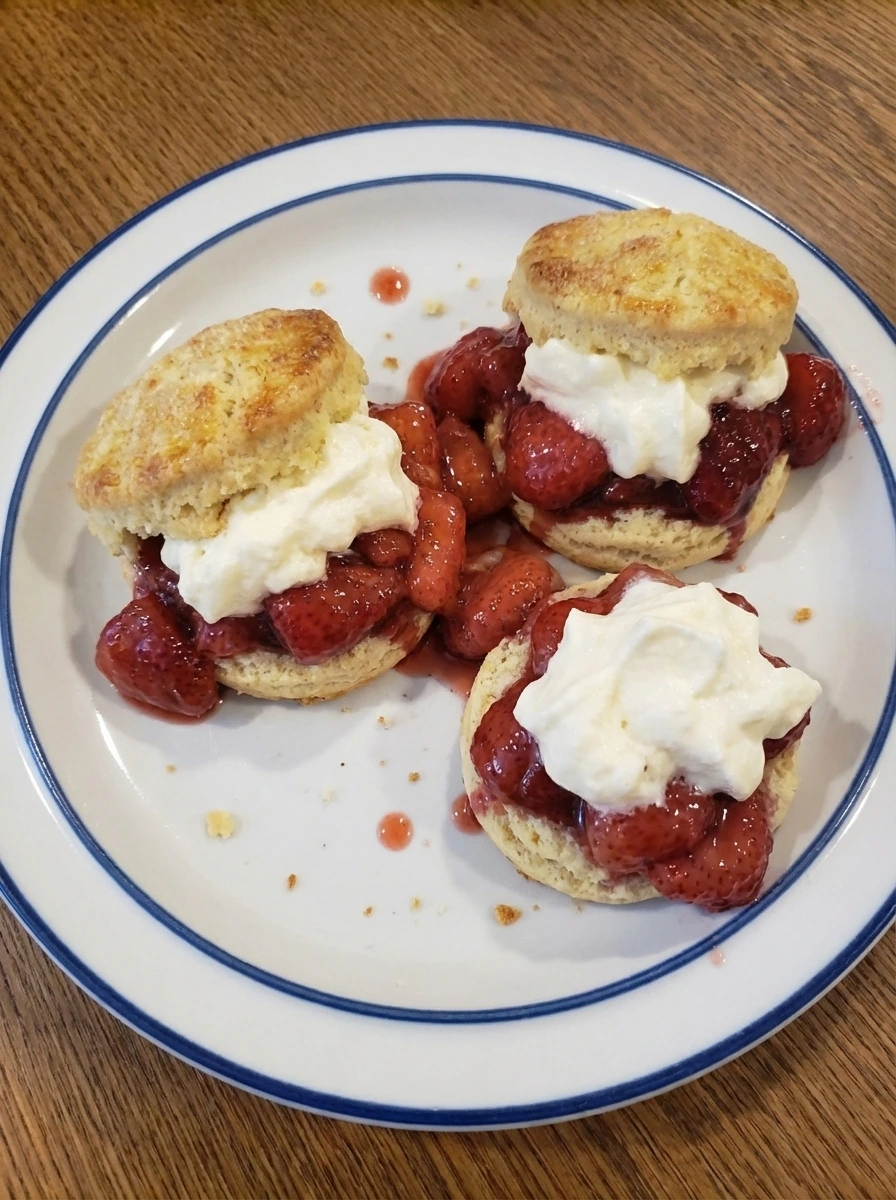
Spoon a few extra berries over the tops and let a little syrup fall down the sides. Add one more soft swipe of whipped cream where it feels natural and finish with a light scatter of crumbs from the shortcake edges. The final plated dish looks fully baked and ready to serve with golden brown biscuit tops glossy red fruit and soft cream tucked into uneven layers. Nothing is perfectly centered and that slight randomness makes the dessert look fresh homemade and especially inviting.
Tip: Serve right away so the biscuits stay tender while still holding their shape.
Pro Tips
- Use cold butter so the shortcakes bake up flaky and tender.
- Let the strawberries sit long enough to make a glossy syrup for the best flavor.
- Keep the dough rough and lightly mixed so the biscuits stay soft instead of tough.
- Assemble just before serving so the shortcakes hold their texture while still soaking in some berry juice.
Storage Instructions
Store the baked shortcakes covered at room temperature for 1 day or in the fridge for up to 3 days. Keep the strawberries and whipped cream chilled in separate containers and assemble just before serving for the best texture.
Frequently Asked Questions
Can I make the strawberries ahead of time?
Yes and the flavor gets even better after a short rest. Just keep them chilled and give them a stir before serving.
Can I use frozen strawberries?
You can though the texture will be softer and the syrup will be looser. Fresh strawberries give the most classic look and bite.
How do I keep the shortcakes tender?
Do not overmix the dough and keep the butter cold. A rough shaggy dough bakes into softer more delicate shortcakes.
Can I assemble these in advance?
It is best to bake and prep the components ahead then assemble right before serving so the biscuits do not get too soft.
Final Thoughts
This is the kind of recipe I wish I had found years ago. It would have saved me so many last minute dessert scrambles.
But now that I have it I make it all the time and I think you will too. If you enjoyed this check out some of my other popular recipes on the blog.
And leave a comment because I read every single one and it really makes my day.
Print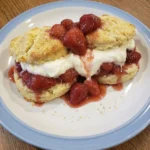
Classic Strawberry Shortcake
- Total Time: 45 minutes
- Yield: 4 servings 1x
Description
This easy Classic Strawberry Shortcake brings together juicy berries tender biscuits and soft whipped cream for one of the best dessert ideas to share. It feels quick and simple enough for brunch and meal prep while still special for a holiday potluck party or even a cozy weeknight dinner. Fresh fruit gives it a healthy feel and every layer tastes homemade and comforting without being fussy.
Ingredients
- 1 1/2 pounds Strawberries
- 1/3 cup Granulated sugar
- 2 cups All purpose flour
- 1 tablespoon Baking powder
- 1/2 teaspoon Fine sea salt
- 1/2 cup cold and cut into small pieces Unsalted butter
- 1 1/4 cups divided Heavy cream
- 2 teaspoons divided Vanilla extract
- 2 tablespoons Powdered sugar
- 1 tablespoon Turbinado sugar
Instructions
- Hull the strawberries and slice them into uneven pieces so some stay chunky while others are thinner and softer looking. Scatter them into a bowl and pour over the granulated sugar with 1 teaspoon of vanilla. Stir until the fruit looks glossy and lightly coated. As the sugar settles against the berries the surfaces begin to look wetter and a little syrup starts gathering at the bottom while the slices relax and lose their dry cut edges.
- Set the strawberries aside and give them another gentle stir after a few minutes. The sugar draws out more juice and the fruit shifts from firm and matte to soft and glossy. By the end of this stage the bowl should hold bright berries in a loose rosy syrup that clings unevenly around the slices. This is the marinating step that gives the filling its juicy spoonable texture.
- Add the flour baking powder and salt to a bowl and mix until the powdery streaks disappear. The mixture should look light and evenly blended with no dense pockets. This stage keeps the shortcakes uniform before the butter goes in. Visually it stays soft and pale though the surface becomes more even and airy as the ingredients are fully mixed together.
- Add the cold butter pieces to the dry mixture and toss them through so each piece gets dusted all over. Then press and rub the butter into the flour until the bowl holds a mix of fine crumbs and a few larger flat bits. The look changes from loose flour to a textured crumb with buttery pieces scattered throughout. This coating stage matters because those uneven bits melt later and leave the shortcakes flaky instead of dense.
- Pour in 3/4 cup heavy cream and the remaining 1 teaspoon vanilla then fold just until the crumbs start clinging together. Dry patches disappear in most places while the dough becomes shaggy moist and softly lumpy. Do not force it smooth. The best texture here looks partly mixed with rough edges and a few floury seams because that loose uneven structure bakes into tender shortcakes.
- Gather the dough and press it into a thick round then pat it down until the top looks rough and the edges stay a little cracked. Cut out the shortcakes so each piece has its own irregular rim and soft layered sides. Arrange them with a little space between each one and brush the tops with the remaining 1/4 cup heavy cream. Scatter turbinado sugar loosely over the tops so some spots are more covered than others.
- As the shortcakes bake the dough rises and the pale tops shift to warm golden brown. The sugar on top turns slightly crisp and patchy while the sides split in places to show tender layered seams. This is the big visual transformation from raw dough to baked shortcake. The centers look set and the tops carry uneven browning that makes them feel homemade and ready for filling.
- Pour the remaining 1/2 cup heavy cream into a bowl with the powdered sugar and whip until the mixture thickens from liquid to soft mounded cream. The surface changes from glossy and loose to airy and softly rippled. Stop when the cream holds relaxed peaks that curl over instead of standing stiff. That loose texture makes the finished shortcake look generous and natural rather than overly styled.
- When the shortcakes are cool enough to handle split them open with your hands or a knife. The inside should look tender and slightly steamy with a pale soft crumb that contrasts with the lightly browned top. Leave the bottoms and tops a little uneven because those rough edges catch the berry syrup and cream better. This stage sets up the layers without making the dessert look too perfect.
- Place the shortcake bottoms on plates then spoon over the strawberries with some of their syrup so it runs into the crumb in irregular streaks. Add whipped cream in loose dollops so some berry pieces stay visible and some syrup peeks through. Set the tops on at a slight angle instead of pressing them flat. The dessert now looks layered and full with casual height and a mix of soft cream glossy fruit and tender cake.
- Spoon a few extra berries over the tops and let a little syrup fall down the sides. Add one more soft swipe of whipped cream where it feels natural and finish with a light scatter of crumbs from the shortcake edges. The final plated dish looks fully baked and ready to serve with golden brown biscuit tops glossy red fruit and soft cream tucked into uneven layers. Nothing is perfectly centered and that slight randomness makes the dessert look fresh homemade and especially inviting.
Notes
Pro Tips:
- Use cold butter so the shortcakes bake up flaky and tender.
- Let the strawberries sit long enough to make a glossy syrup for the best flavor.
- Keep the dough rough and lightly mixed so the biscuits stay soft instead of tough.
- Assemble just before serving so the shortcakes hold their texture while still soaking in some berry juice.
Storage: Store the baked shortcakes covered at room temperature for 1 day or in the fridge for up to 3 days. Keep the strawberries and whipped cream chilled in separate containers and assemble just before serving for the best texture.
- Prep Time: 15 minutes
- Cook Time: 30 minutes
- Category: Dessert
- Cuisine: American
Nutrition
- Serving Size: 1 serving