Classic French Toast is one of the best breakfasts I have ever tasted and it has a soft custardy center and such a delicious golden outside with warm vanilla and cinnamon. Today I will show how I make my Classic French Toast at home easily with some easy to find ingredients. Just to know that my Classic French Toast turned out so delicious and so soft almost like the one from a favorite brunch spot and I really love this dish.
Also I tried the same mixing method with thicker bread slices and the result was even better and so I will leave some tasty other variations below you can try using the same ingredients and same cooking process. Usually Classic French Toast is served at brunch and it is so incredible. I recommend anyone to enjoy it and if you cannot go out you can try out my recipe.
Also for my recipe I use a warm buttery cooking surface for browning and I recommend letting the bread soak just enough so the center stays tender. Simply season the custard and coat your bread and cook it until it is golden through.
Ingredients
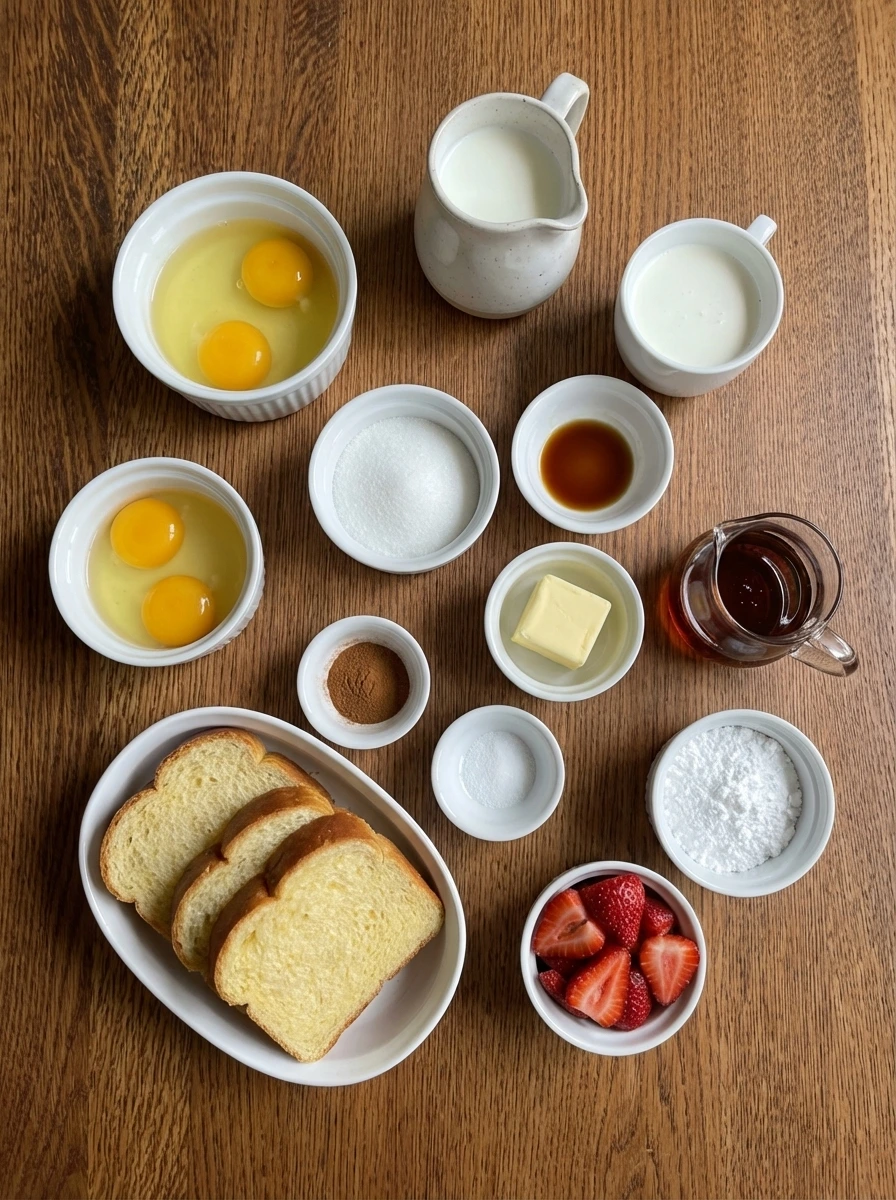
Here’s what I use for this recipe and you can always make substitutions if you prefer.
- brioche bread: soft rich bread that soaks up the custard
- large eggs: gives the custard structure and richness
- whole milk: loosens the custard and keeps it creamy
- heavy cream: adds extra richness and a softer texture
- granulated sugar: light sweetness for the custard
- vanilla extract: adds warm sweet flavor
- ground cinnamon: adds cozy spice
- fine salt: balances the sweetness
- unsalted butter: helps the toast brown and adds flavor
- maple syrup: finishing sweetness for the plated dish
- fresh strawberries: bright fresh garnish
- powdered sugar: light finishing garnish
Tools You’ll Need
- shallow dish: for soaking the bread evenly
- wide bowl: for mixing the custard
- whisk: for blending the eggs and dairy
- flat cooking surface: for even browning of the slices
- spatula: for turning the bread gently
Instructions
Step 1: Slice the bread
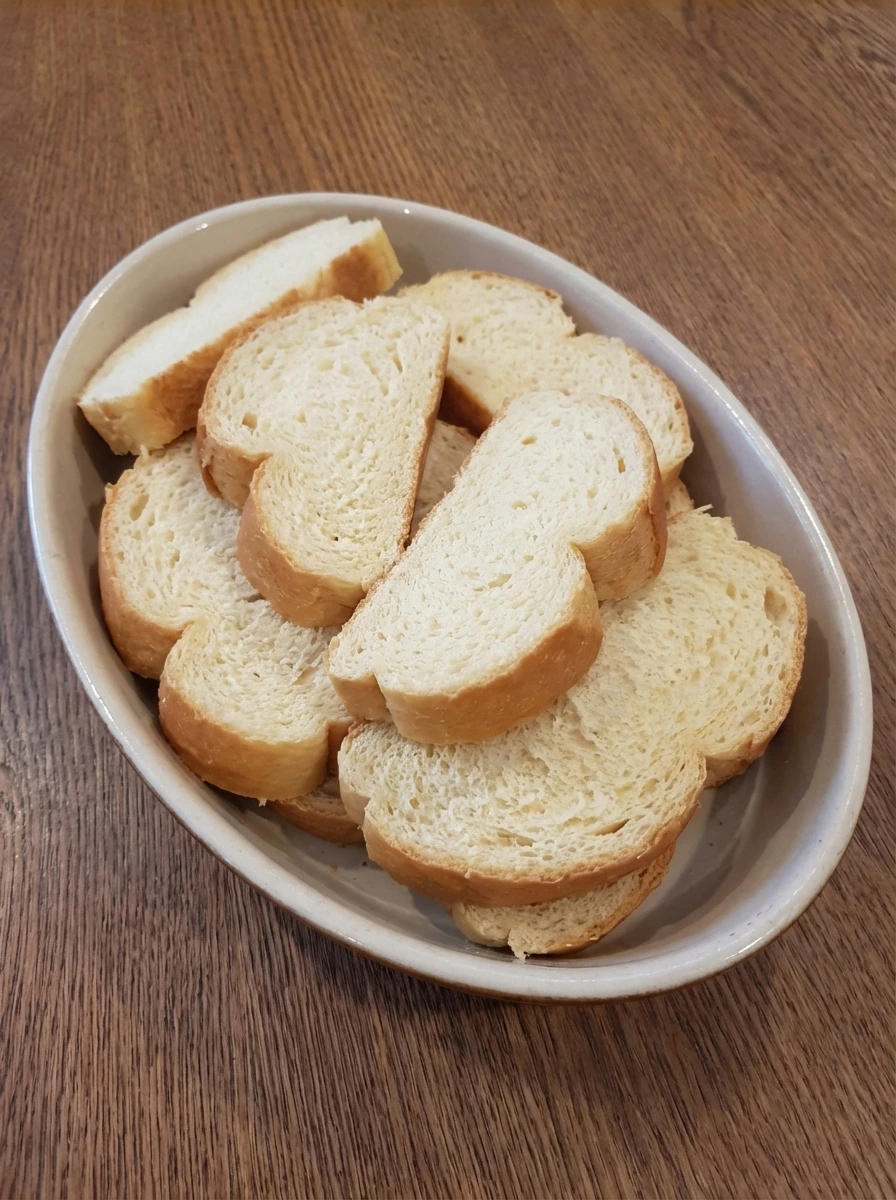
Cut the brioche into thick slices if it is not already sliced and place the pieces in a shallow dish. The bread should look soft and pillowy with uneven edges and a few slightly different slice sizes for a natural homemade feel. This first stage keeps everything raw and simple while setting up the right texture for soaking later. Thicker slices help the center stay tender while the outside turns golden in later steps.
Tip: Slightly stale bread holds the custard better and keeps the center from turning mushy.
Step 2: Measure and season the custard base
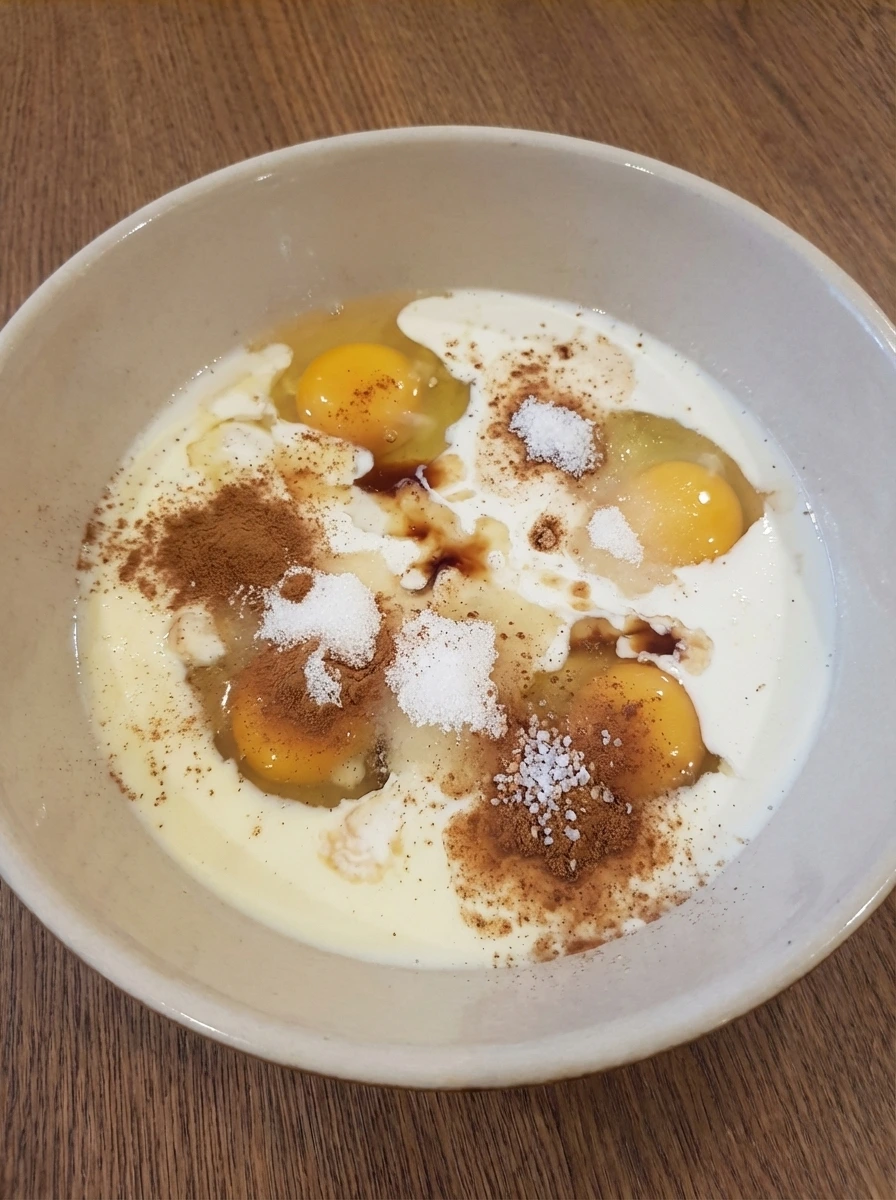
Add the eggs and milk and heavy cream and sugar and vanilla and cinnamon and salt to a wide bowl. The ingredients should still look separate at first with cinnamon floating over the pale liquids and egg yolks sitting in rich yellow patches. This stage shows the seasoning clearly before mixing so the visual progression feels natural. You can see the contrast between the white dairy and the golden eggs and the darker spice scattered across the surface.
Tip: Measure everything before mixing so the custard stays balanced and smooth.
Step 3: Mix until smooth
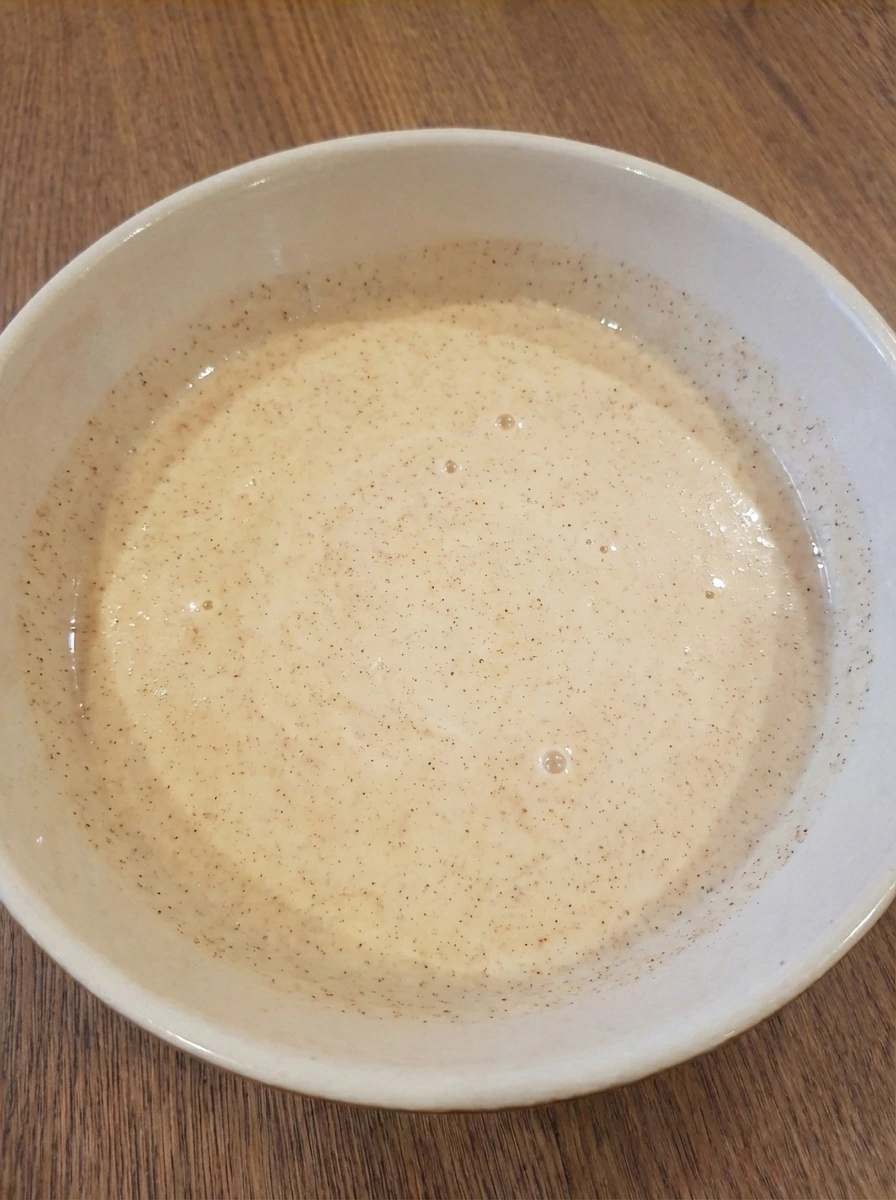
Whisk the custard until the eggs break down and the cinnamon spreads through the mixture. The liquid changes from streaky and separated to creamy and lightly speckled with a warm tan color. A few tiny bubbles on top and a little spice variation keep it looking real and homemade. This is the stage where the mixture becomes ready to coat the bread evenly without looking perfectly uniform.
Tip: Mix until no heavy egg streaks remain although a few spice flecks should still be visible.
Step 4: Soak the first side
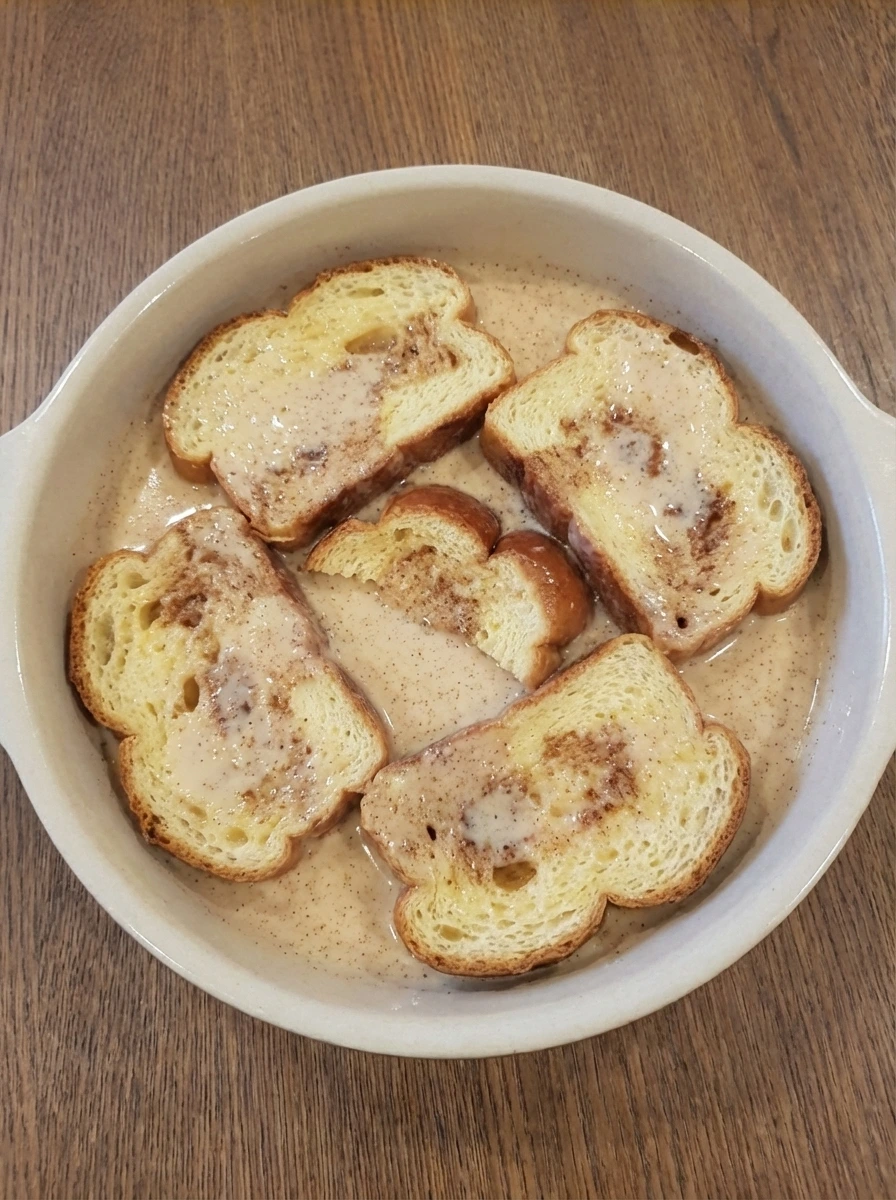
Lay the brioche slices into the custard in a loose layer and let the first side absorb the mixture. The bread starts to darken slightly as it drinks in the custard and the surface looks glossy and softened instead of dry. The custard should not cover every corner in a perfect way. Some edges stay a little lighter while the centers look more saturated and tender which gives the slices a natural uneven soak.
Tip: Let the slices rest just long enough to absorb the custard without falling apart.
Step 5: Turn and fully coat the slices
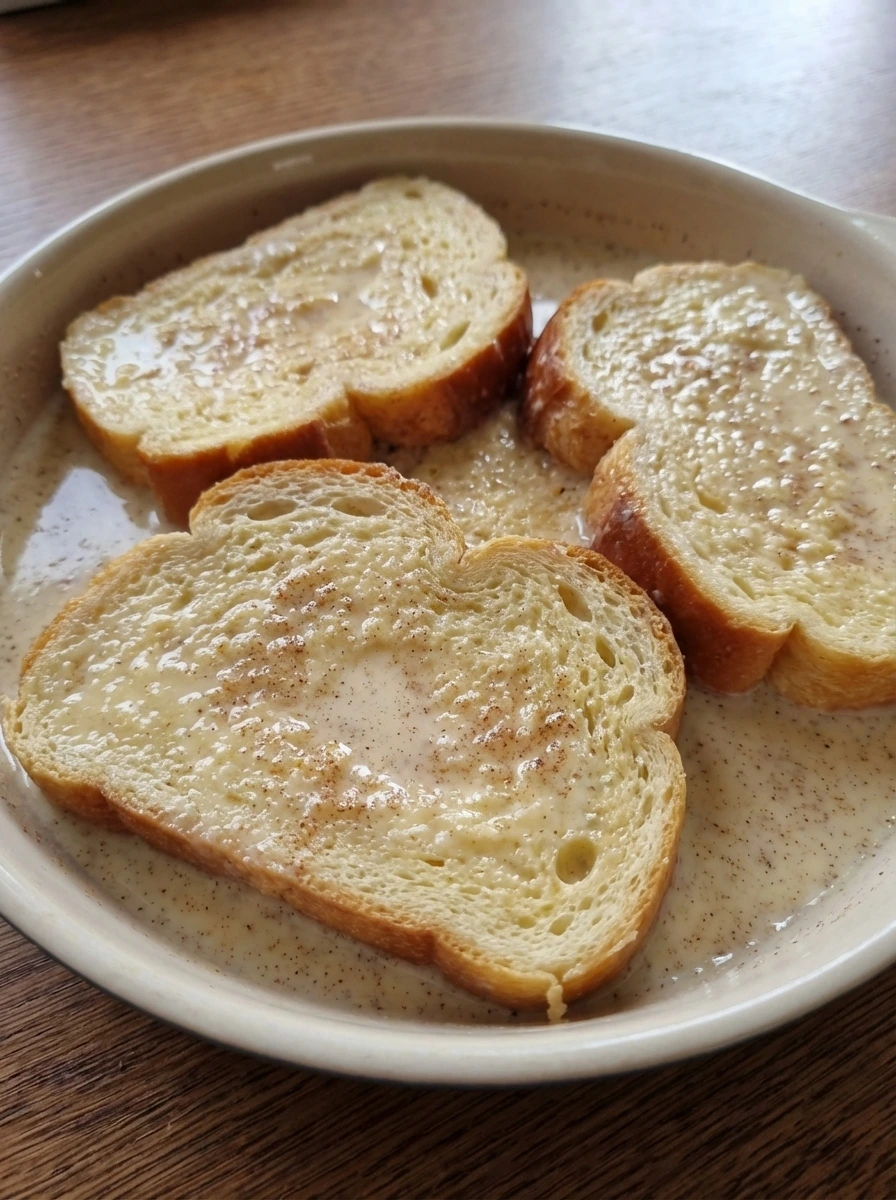
Turn each slice so the second side gets coated and let the bread finish soaking until the centers feel plush and the outsides look fully moistened. The slices now look heavier and more custardy with cinnamon speckles clinging to the surface. This is the coating stage where raw bread becomes fully prepared for browning. The bread should look soft and flexible with slight irregular edges and no dry white patches left behind.
Tip: Handle the soaked bread gently so it stays intact.
Step 6: Add butter and begin browning
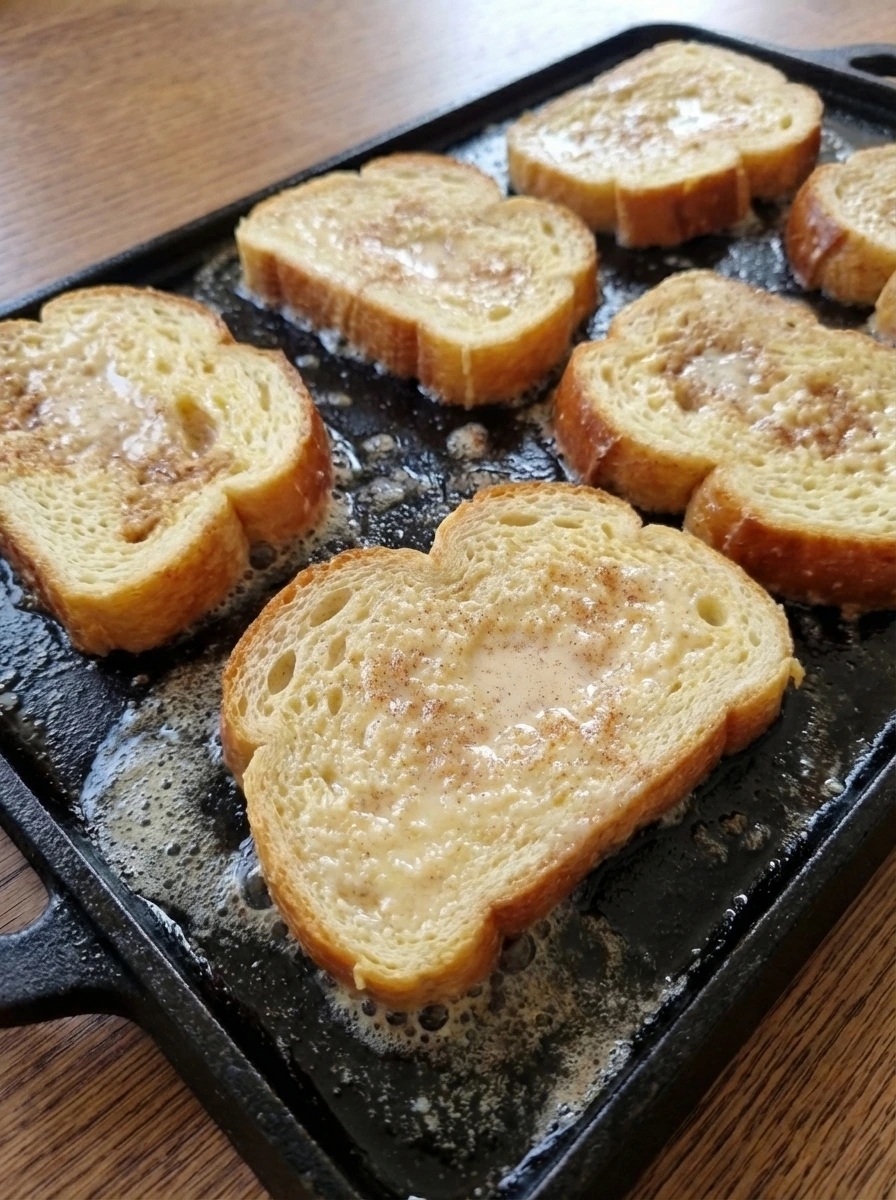
Melt the butter over the hot cooking surface and place the soaked slices down in a loose arrangement. The butter turns glossy and coats the bottoms while the bread starts to set and the surfaces look less wet. As the first side cooks the edges begin to deepen in color and a few spots turn lightly golden. The slices should still look soft in the middle although the outer layer begins its move from custardy to gently browned.
Tip: Do not crowd the slices so each one can brown instead of steam.
Step 7: Flip and cook until golden brown

Turn the slices and cook the second side until both surfaces show a warm golden brown color with a few darker toasted patches. The centers stay thick and tender while the outside looks lightly crisp and evenly set. This step completes the main cooking transformation from coated and softened bread into fully cooked French toast. The slices should not look pale or wet anymore and the browning should be slightly uneven for a true homemade finish.
Tip: Cook until the toast feels set through the center and shows rich color on both sides.
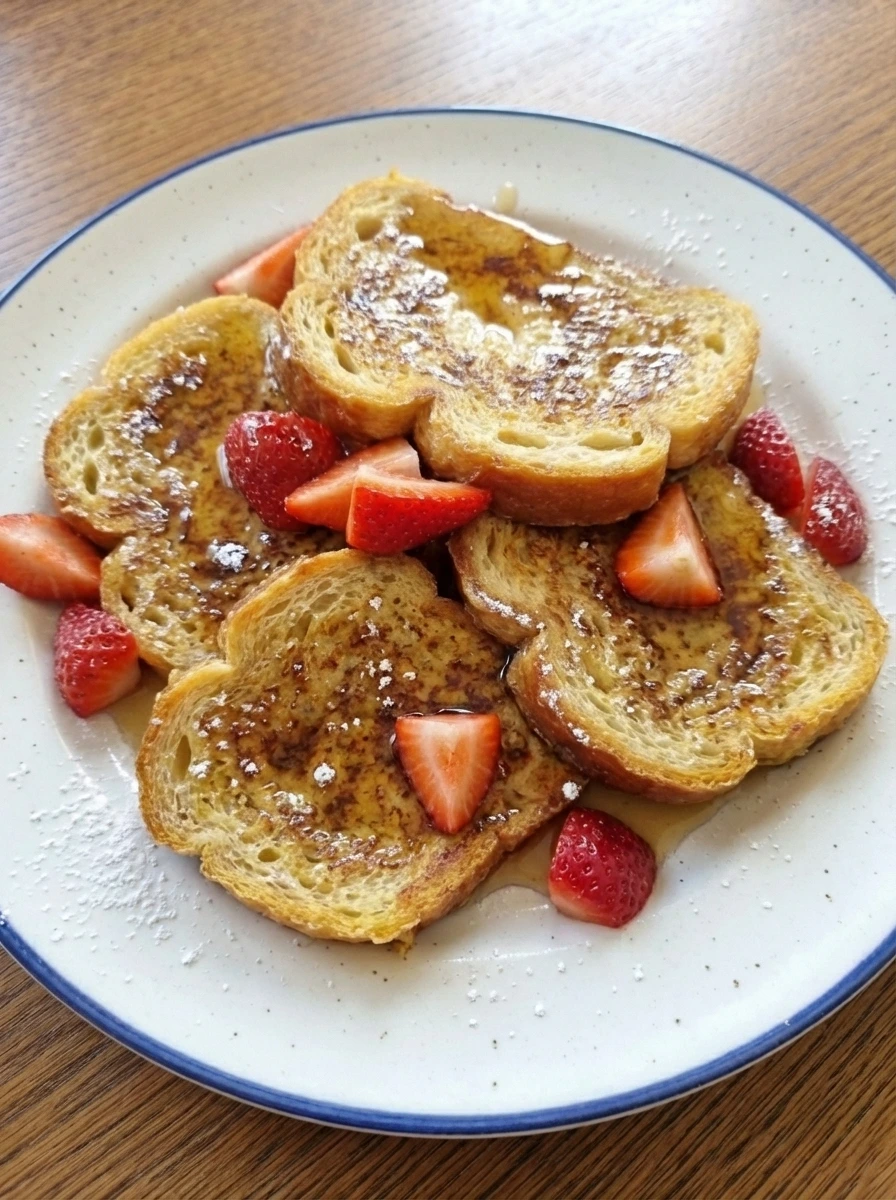
Step 8: Plate and garnish

Arrange the cooked slices on a plate with a casual overlap then drizzle maple syrup over the top so it runs unevenly into the ridges and around the edges. Scatter sliced strawberries over and around the toast and finish with a light dusting of powdered sugar. The final dish should look fully cooked and inviting with rich golden brown color and glossy syrup in some areas more than others. The toast is plated and ready to serve with visible texture variation and natural homemade imperfections.
Tip: Serve right away while the edges stay lightly crisp and the center stays warm and soft.
Pro Tips
- Use slightly stale brioche so the slices soak up the custard without collapsing.
- Let the bread rest in the custard long enough to soften although not so long that it tears.
- Cook in batches for better color and a more even golden finish.
- Finish with syrup just before serving so the toast keeps its light edge texture.
Storage Instructions
Store leftover Classic French Toast in a covered container in the fridge for up to 3 days. Reheat until warmed through and lightly crisp on the outside before serving again.
Frequently Asked Questions
What bread is best for Classic French Toast?
Brioche works especially well because it is rich and soft and it absorbs the custard beautifully while still holding its shape.
Can I make Classic French Toast ahead of time?
Yes and you can mix the custard ahead and slice the bread early then cook the toast fresh for the best texture.
Why is my French toast soggy?
It usually happens when the bread is too thin or too fresh or soaked too long. Thicker slightly stale slices give a better result.
Can I use only milk instead of cream?
Yes and the toast will still be delicious though the center will be a little lighter and less rich.
Final Thoughts
So there you go. A recipe that is simple enough for a Tuesday morning but good enough to serve at a gathering.
I have made this more times than I can count and it never disappoints. Save this one and share it with a friend and let me know in the comments if you made any fun changes.
I am always curious to see how people put their own spin on things.
Print
Classic French Toast
- Total Time: 45 minutes
- Yield: 4 servings 1x
Description
This easy Classic French Toast is one of the best breakfast ideas for a quick and simple morning meal that still feels special and healthy enough for a cozy brunch. It works for holiday breakfast and meal prep and potluck mornings and even a relaxed party spread. The slices turn soft in the center and golden outside while simple pantry ingredients make this recipe easy to make again and again.
Ingredients
- 8 thick slices brioche bread
- 4 large eggs
- 1 cup whole milk
- 1/4 cup heavy cream
- 2 tablespoons granulated sugar
- 2 teaspoons vanilla extract
- 1 teaspoon ground cinnamon
- 1/8 teaspoon fine salt
- 2 tablespoons unsalted butter
- 1/2 cup for serving maple syrup
- 1/2 cup sliced fresh strawberries
- 1 tablespoon for dusting powdered sugar
Instructions
- Cut the brioche into thick slices if it is not already sliced and place the pieces in a shallow dish. The bread should look soft and pillowy with uneven edges and a few slightly different slice sizes for a natural homemade feel. This first stage keeps everything raw and simple while setting up the right texture for soaking later. Thicker slices help the center stay tender while the outside turns golden in later steps.
- Add the eggs and milk and heavy cream and sugar and vanilla and cinnamon and salt to a wide bowl. The ingredients should still look separate at first with cinnamon floating over the pale liquids and egg yolks sitting in rich yellow patches. This stage shows the seasoning clearly before mixing so the visual progression feels natural. You can see the contrast between the white dairy and the golden eggs and the darker spice scattered across the surface.
- Whisk the custard until the eggs break down and the cinnamon spreads through the mixture. The liquid changes from streaky and separated to creamy and lightly speckled with a warm tan color. A few tiny bubbles on top and a little spice variation keep it looking real and homemade. This is the stage where the mixture becomes ready to coat the bread evenly without looking perfectly uniform.
- Lay the brioche slices into the custard in a loose layer and let the first side absorb the mixture. The bread starts to darken slightly as it drinks in the custard and the surface looks glossy and softened instead of dry. The custard should not cover every corner in a perfect way. Some edges stay a little lighter while the centers look more saturated and tender which gives the slices a natural uneven soak.
- Turn each slice so the second side gets coated and let the bread finish soaking until the centers feel plush and the outsides look fully moistened. The slices now look heavier and more custardy with cinnamon speckles clinging to the surface. This is the coating stage where raw bread becomes fully prepared for browning. The bread should look soft and flexible with slight irregular edges and no dry white patches left behind.
- Melt the butter over the hot cooking surface and place the soaked slices down in a loose arrangement. The butter turns glossy and coats the bottoms while the bread starts to set and the surfaces look less wet. As the first side cooks the edges begin to deepen in color and a few spots turn lightly golden. The slices should still look soft in the middle although the outer layer begins its move from custardy to gently browned.
- Turn the slices and cook the second side until both surfaces show a warm golden brown color with a few darker toasted patches. The centers stay thick and tender while the outside looks lightly crisp and evenly set. This step completes the main cooking transformation from coated and softened bread into fully cooked French toast. The slices should not look pale or wet anymore and the browning should be slightly uneven for a true homemade finish.
- Arrange the cooked slices on a plate with a casual overlap then drizzle maple syrup over the top so it runs unevenly into the ridges and around the edges. Scatter sliced strawberries over and around the toast and finish with a light dusting of powdered sugar. The final dish should look fully cooked and inviting with rich golden brown color and glossy syrup in some areas more than others. The toast is plated and ready to serve with visible texture variation and natural homemade imperfections.
Notes
Pro Tips:
- Use slightly stale brioche so the slices soak up the custard without collapsing.
- Let the bread rest in the custard long enough to soften although not so long that it tears.
- Cook in batches for better color and a more even golden finish.
- Finish with syrup just before serving so the toast keeps its light edge texture.
Storage: Store leftover Classic French Toast in a covered container in the fridge for up to 3 days. Reheat until warmed through and lightly crisp on the outside before serving again.
- Prep Time: 15 minutes
- Cook Time: 30 minutes
- Category: Breakfast
- Cuisine: French
Nutrition
- Serving Size: 1 serving