You guys! When my mom tasted this recipe she said and I think that is one of the best things you have ever done! I have to say it is one of my top five favorites! A Saturday morning experiment turned into the best Raspberry Colada ever!
It has the same creamy tropical feel as a beachy dessert and yet it is made with real fruit and coconut and a simple homemade topping. This bake is sweetened with maple syrup and coconut sugar and its base is juicy raspberries and pineapple.
I think you all know I am usually the person who reaches for chocolate first and I have already tasted so many rich bakes before and I rarely fall this hard for a recipe that does not have chocolate in the name and yet this one is just so good! The recipe makes 4 servings and I typically like to make things in smaller batches since I test so many sweets and yet if you have a bigger group or want more you can double the batch and bake it in a larger dish.
This Raspberry Colada can be dessert and you can also serve it with coffee for a cozy brunch. It is also great for meal prep and if you want to make a larger batch and store portions in the fridge and warm them up through the week for an easy sweet treat.
Ingredients
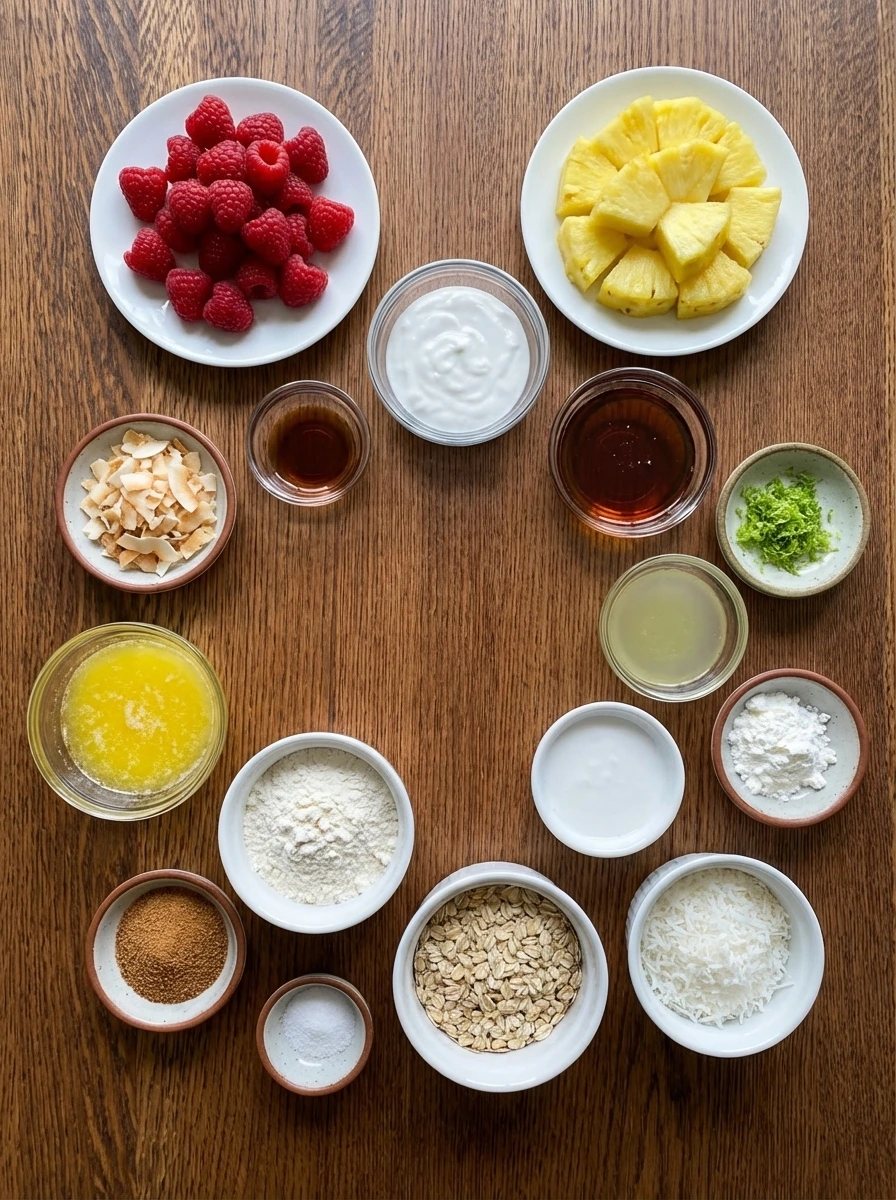
Here’s what I use for this recipe and you can always make substitutions if you prefer.
- Raspberries: Fresh berries that break down into a bright tangy filling.
- Pineapple chunks: Juicy tropical fruit that adds sweetness and texture.
- Maple syrup: Natural sweetness that blends into the fruit.
- Lime zest: Fresh citrus aroma that sharpens the tropical flavor.
- Lime juice: Acid that balances the sweet fruit.
- Cornstarch: Thickener that turns the juices glossy as the fruit bakes.
- Unsweetened shredded coconut: Toasty topping that adds texture and coconut flavor.
- Old fashioned oats: Body for the crumb topping with a rustic finish.
- All purpose flour: Helps the topping clump into uneven golden bits.
- Coconut sugar: Warm sweetness for the topping and fruit.
- Salt: Balances the sweet notes and makes the fruit pop.
- Melted butter: Brings the topping together and helps it brown.
- Thick coconut cream: Creamy finish that gives the dessert its colada feel.
- Vanilla extract: Rounds out the coconut cream with a soft sweet note.
- Toasted coconut flakes: Final garnish that adds color and crunch.
Tools You’ll Need
- Mixing bowl: Holds the fruit filling and crumble mixtures.
- Glass or ceramic baking dish: Bakes the layered dessert evenly and shows the bubbling fruit.
- White plate: Serves the final portion with a clean contrast for the colors.
Instructions
Step 1: Fold the fruit filling
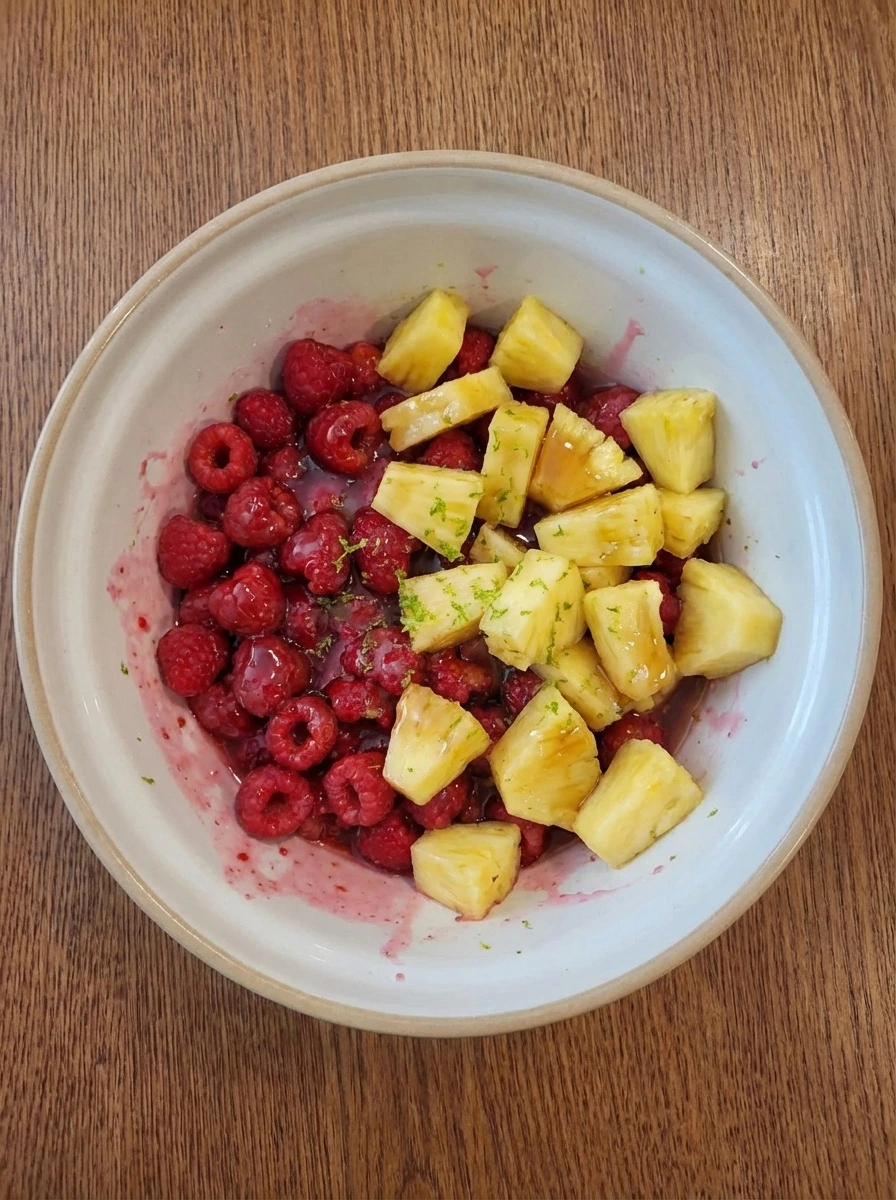
Scatter the raspberries and pineapple together and then pour over the maple syrup and lime juice and sprinkle in the zest and cornstarch. As everything is folded together the berries begin to streak the juices pink and the pineapple stays chunky so the mixture looks glossy and lightly coated rather than fully broken down. Keep the fruit unevenly distributed so some raspberries stay whole while others crush slightly into the syrupy coating. The color shifts from separate red and yellow pieces into a marbled rosy mixture with natural gaps and casual overlap.
Tip: Do not overmix or the raspberries will disappear too quickly.
Step 2: Press together the coconut crumble
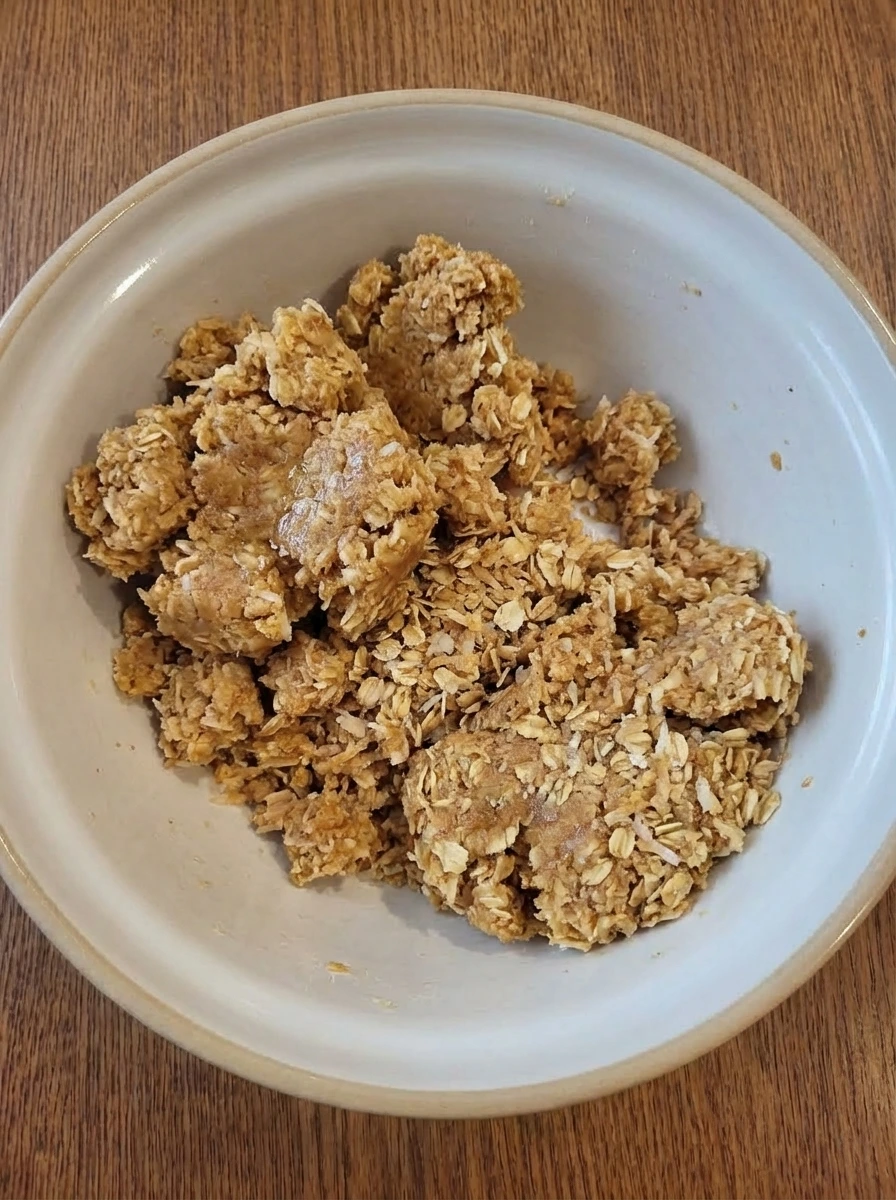
Add the shredded coconut and oats and flour and coconut sugar and salt and melted butter until dry patches turn into damp clumps. The topping should look shaggy and uneven with some loose bits and some larger clusters so it feels rustic rather than tidy. This is the moment the texture changes most clearly because the dry mixture becomes crumbly and structured. You want irregular pieces that will toast at different speeds and give the baked dessert a homemade finish.
Tip: Pinch a few larger clumps together so the top bakes with mixed texture.
Step 3: Layer the filling and crumble
Spread the rosy fruit filling into the baking dish and then scatter the crumble over the top so some bright fruit still peeks through. The structure changes here from loose mixtures into a clear two layer dessert with jammy fruit below and pale crumb clusters above. Leave the topping casually uneven with a few thicker patches and a few thinner spots so the fruit can bubble through later. The contrast between the vivid filling and the dry pale topping sets up the next transformation.
Tip: Do not pack the topping down or it will bake up heavy instead of crisp.
Step 4: Bake until bubbling and golden
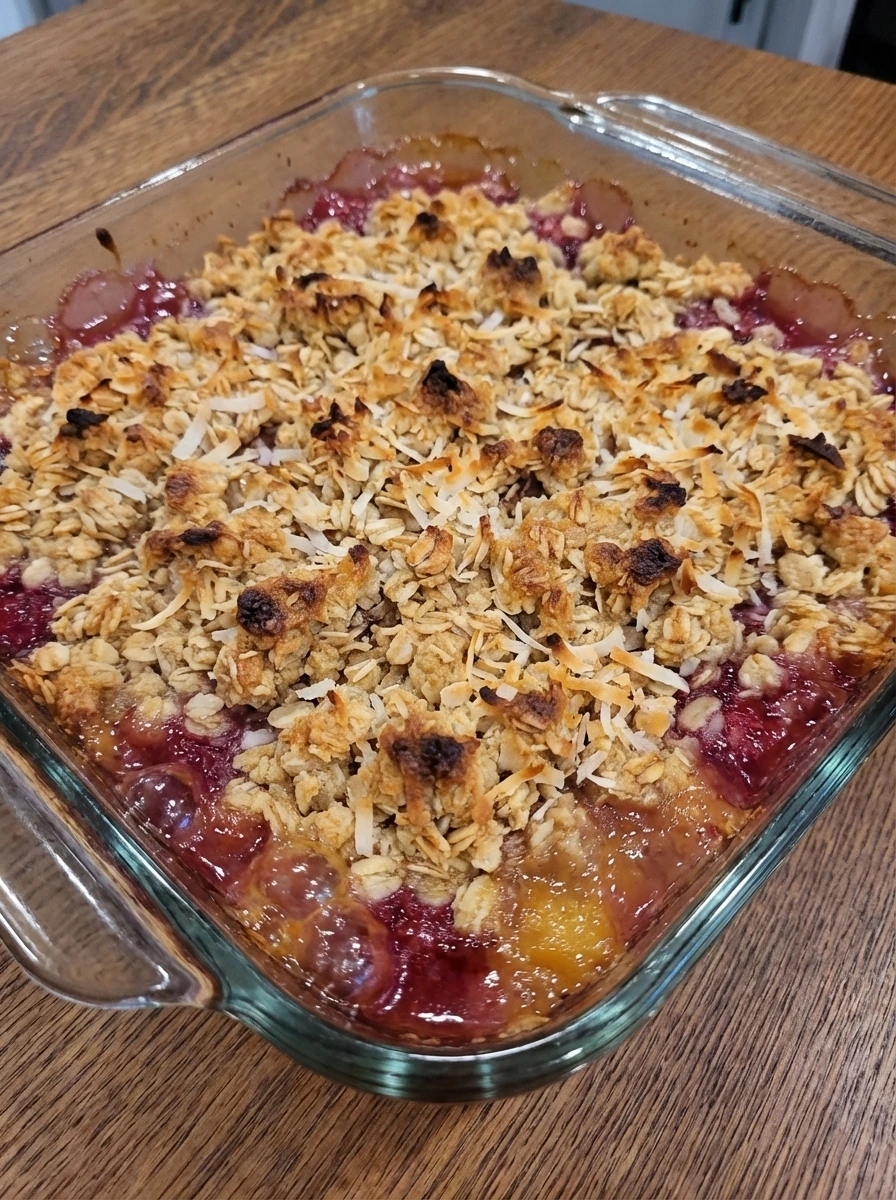
As the dessert bakes the fruit underneath loosens into thick bubbling pockets and the topping turns from pale beige to golden brown in scattered spots. Some raspberries collapse fully and stain the edges a deeper pink while the coconut on top toasts unevenly for a more natural look. This is the biggest visual shift because the layers start interacting with each other. Juices push up through thinner areas and the crumble looks crisper and more defined with jagged browned edges.
Tip: Pull it once the top is toasted and the fruit bubbles around the edges.
Step 5: Drizzle the coconut cream finish
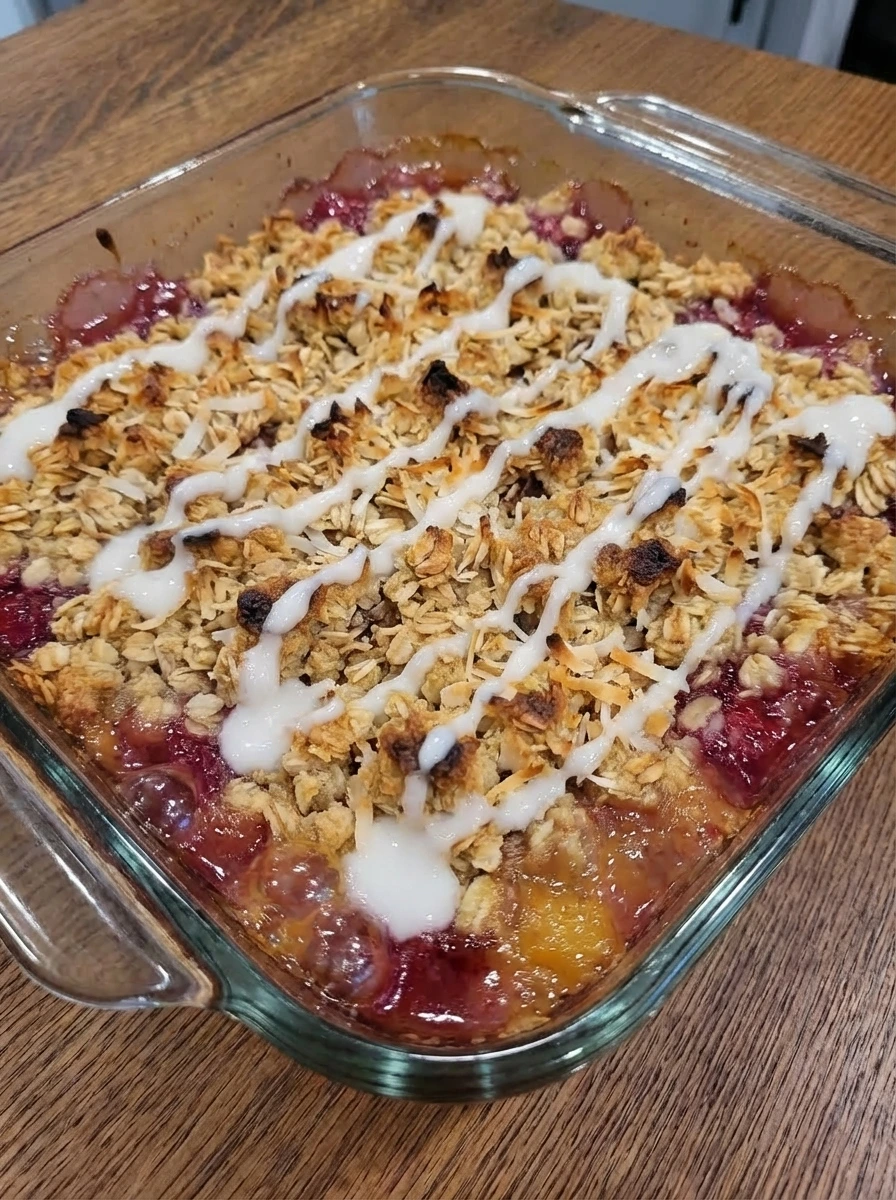
Whisk the coconut cream with vanilla and then drizzle it over the hot baked dessert so thin white ribbons melt slightly into the warm topping. The surface changes again as the crisp browned areas pick up a soft creamy sheen while still keeping plenty of rough texture. Do not flood the whole top because the contrast matters here. Let the cream land in loose streaks and small pooled spots so the toasted coconut and bubbling fruit stay visible.
Tip: Use thick coconut cream so the drizzle sits on top instead of disappearing.
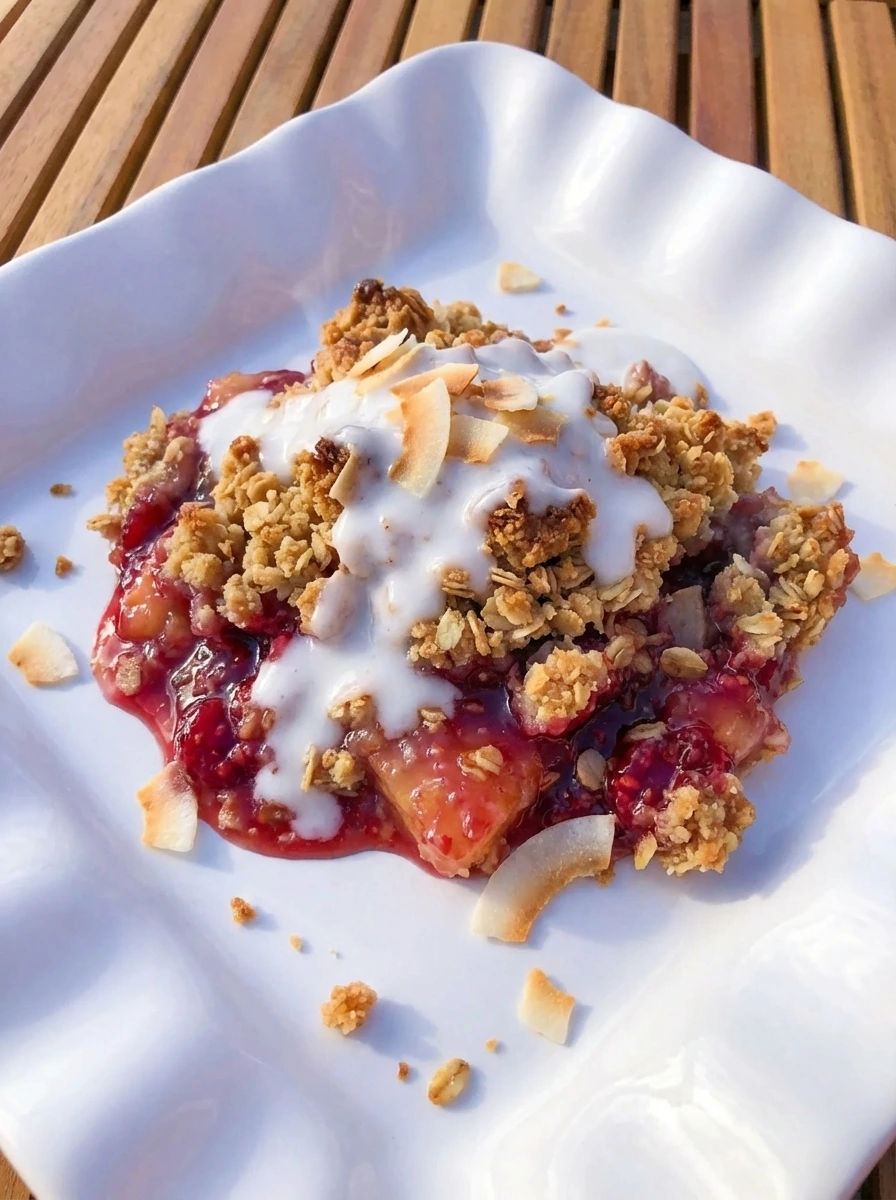
Step 6: Serve a warm portion with toasted coconut
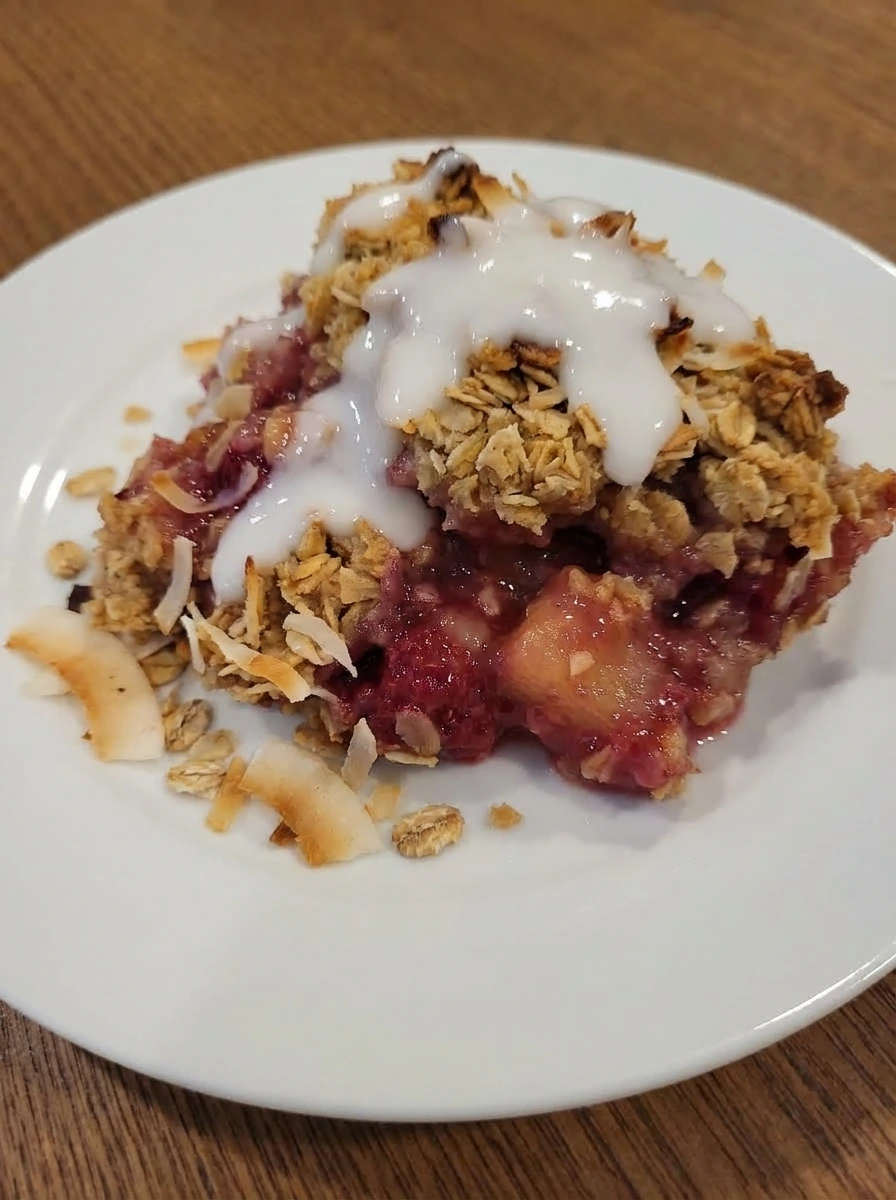
Spoon one generous portion onto a white plate so the inside shows jammy raspberry pineapple filling under the browned topping. Finish with toasted coconut flakes scattered off center so the final dish looks relaxed and homemade with uneven edges and a few crumbs falling away from the scoop. The final plate should show every texture at once with glossy fruit and crisp topping and creamy drizzle. Nothing should look perfectly shaped because that slightly messy finish is exactly what makes it inviting.
Tip: Serve warm so the fruit stays glossy and the coconut cream softens into the crumble.
Pro Tips
- Use ripe pineapple for the sweetest tropical flavor.
- Leave some raspberries whole so the filling keeps texture.
- Scatter the topping unevenly for better browning and a homemade finish.
- Let the dessert rest briefly so the filling thickens before serving.
Storage Instructions
Store cooled Raspberry Colada in a covered container in the fridge for up to 4 days. The topping will soften a little and yet the flavor stays bright and the fruit filling stays rich. For the best texture warm individual portions before serving and add a fresh spoon of coconut cream if you like. You can also freeze portions and thaw them overnight in the fridge before reheating.
Frequently Asked Questions
Can I use frozen raspberries?
Yes and they work well here and you can add them straight from frozen. The filling may need a few extra minutes so the juices can thicken properly.
Can I make Raspberry Colada ahead of time?
Yes and you can bake it earlier in the day and warm portions before serving. Add the coconut cream drizzle just before eating for the best texture.
What can I use instead of pineapple?
Mango works nicely and keeps the tropical feel. The flavor will be softer and sweeter and the filling may look a little less juicy.
How do I keep the topping crisp?
Bake until the coconut is deeply golden in spots and avoid covering the hot dessert too soon. Reheat uncovered so the top can dry out and crisp again.
Final Thoughts
If you try this recipe I really hope you love it as much as my family does. It has become one of those desserts we just keep coming back to and it somehow fits every season.
Drop a comment below and let me know how yours turned out. And if you are looking for more easy dessert ideas make sure to bookmark this page.
I am always adding new recipes that are simple and satisfying and perfect for busy weeknights.
Print
Raspberry Colada
- Total Time: 45 minutes
- Yield: 4 servings 1x
Description
This easy Raspberry Colada is packed with bright berries and juicy pineapple and a creamy coconut finish for one of the best tropical dessert ideas to keep on repeat. It is quick enough for a weeknight dinner treat and simple enough for brunch or party prep and it feels healthy thanks to fruit forward flavor and a homemade filling. Serve it warm for a crowd or stash portions for meal prep when you want a fun sweet bite.
Ingredients
- 3 cups Raspberries
- 2 cups Pineapple chunks
- 3 tablespoons Maple syrup
- 1 teaspoon Lime zest
- 1 tablespoon Lime juice
- 2 tablespoons Cornstarch
- 1 cup Unsweetened shredded coconut
- 3/4 cup Old fashioned oats
- 1/2 cup All purpose flour
- 1/3 cup Coconut sugar
- 1/4 teaspoon Salt
- 6 tablespoons Melted butter
- 1/2 cup Thick coconut cream
- 1 teaspoon Vanilla extract
- 2 tablespoons Toasted coconut flakes
Instructions
- Scatter the raspberries and pineapple together and then pour over the maple syrup and lime juice and sprinkle in the zest and cornstarch. As everything is folded together the berries begin to streak the juices pink and the pineapple stays chunky so the mixture looks glossy and lightly coated rather than fully broken down. Keep the fruit unevenly distributed so some raspberries stay whole while others crush slightly into the syrupy coating. The color shifts from separate red and yellow pieces into a marbled rosy mixture with natural gaps and casual overlap.
- Add the shredded coconut and oats and flour and coconut sugar and salt and melted butter until dry patches turn into damp clumps. The topping should look shaggy and uneven with some loose bits and some larger clusters so it feels rustic rather than tidy. This is the moment the texture changes most clearly because the dry mixture becomes crumbly and structured. You want irregular pieces that will toast at different speeds and give the baked dessert a homemade finish.
- Spread the rosy fruit filling into the baking dish and then scatter the crumble over the top so some bright fruit still peeks through. The structure changes here from loose mixtures into a clear two layer dessert with jammy fruit below and pale crumb clusters above. Leave the topping casually uneven with a few thicker patches and a few thinner spots so the fruit can bubble through later. The contrast between the vivid filling and the dry pale topping sets up the next transformation.
- As the dessert bakes the fruit underneath loosens into thick bubbling pockets and the topping turns from pale beige to golden brown in scattered spots. Some raspberries collapse fully and stain the edges a deeper pink while the coconut on top toasts unevenly for a more natural look. This is the biggest visual shift because the layers start interacting with each other. Juices push up through thinner areas and the crumble looks crisper and more defined with jagged browned edges.
- Whisk the coconut cream with vanilla and then drizzle it over the hot baked dessert so thin white ribbons melt slightly into the warm topping. The surface changes again as the crisp browned areas pick up a soft creamy sheen while still keeping plenty of rough texture. Do not flood the whole top because the contrast matters here. Let the cream land in loose streaks and small pooled spots so the toasted coconut and bubbling fruit stay visible.
- Spoon one generous portion onto a white plate so the inside shows jammy raspberry pineapple filling under the browned topping. Finish with toasted coconut flakes scattered off center so the final dish looks relaxed and homemade with uneven edges and a few crumbs falling away from the scoop. The final plate should show every texture at once with glossy fruit and crisp topping and creamy drizzle. Nothing should look perfectly shaped because that slightly messy finish is exactly what makes it inviting.
Notes
Pro Tips:
- Use ripe pineapple for the sweetest tropical flavor.
- Leave some raspberries whole so the filling keeps texture.
- Scatter the topping unevenly for better browning and a homemade finish.
- Let the dessert rest briefly so the filling thickens before serving.
Storage: Store cooled Raspberry Colada in a covered container in the fridge for up to 4 days. The topping will soften a little and yet the flavor stays bright and the fruit filling stays rich. For the best texture warm individual portions before serving and add a fresh spoon of coconut cream if you like. You can also freeze portions and thaw them overnight in the fridge before reheating.
- Prep Time: 15 minutes
- Cook Time: 30 minutes
- Category: Dessert
- Cuisine: Tropical inspired