

Seriously, no joke, these are the best Banana Cheesecake Bars. They’re the ones I make when ripe bananas start piling up. It’s a classic dessert with simple, delicious ingredients. A buttery vanilla wafer crust holds creamy banana cheesecake and soft banana slices. Then a cloud of whipped cream and crushed wafers goes on top. Perfect for potlucks or brunch with cold coffee on the side.

A pan of Banana Cheesecake Bars is one of my go-to make-ahead desserts. Not only does it make a rich little treat, but it slices neatly and feeds a crowd without fuss. Also, there aren’t any complicated methods or hard-to-find ingredients. And prep’s a cinch. When I want an even softer banana dessert, I make Classic Banana Pudding instead. Both disappear fast at family gatherings.
With a few basics probably already in the fridge and pantry, you can bake these bars for a party or holiday tray. You can also cut smaller squares for a sweet snack. I usually chill the pan overnight because the texture turns much cleaner. And that whipped topping makes every slice look special without feeling fussy. A few wafer crumbs on top add just enough crunch.
Ingredients
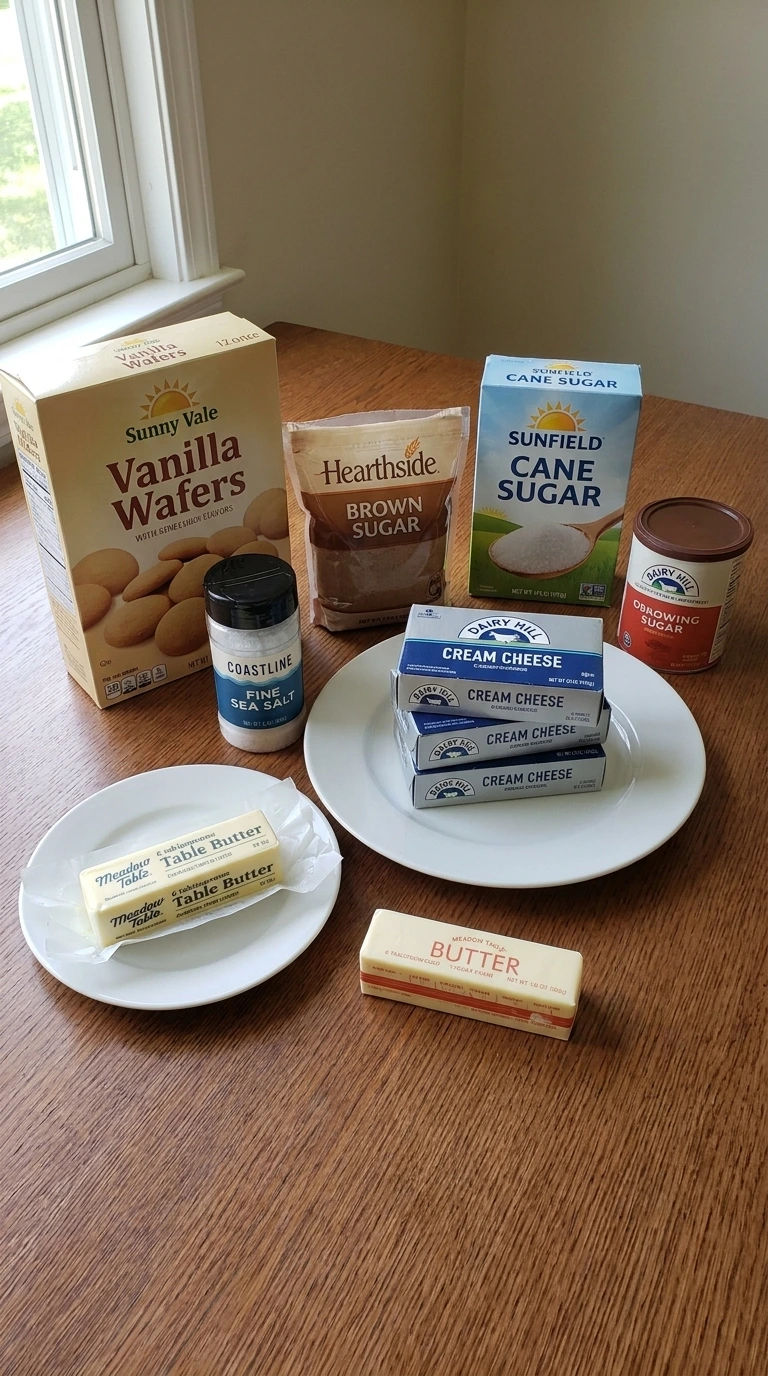
Here’s what I use for this recipe and you can always make substitutions if you prefer.
- Vanilla wafer cookies: Crush enough for 2.5 cups of crumbs and reserve 8 cookies for the topping.
- Unsalted butter: Melted and cooled for 5 minutes so it coats the crumbs without making them greasy.
- Light brown sugar: Packed into the spoon to sweeten and lightly caramelize the crumb base.
- Fine sea salt: Disperses evenly through the crust and balances the sweet banana filling.
- Full-fat block cream cheese: Softened to about 70°F so the filling blends smoothly without lumps.
- Granulated cane sugar: Sweetens the filling and dissolves fully during low-speed mixing.
- Cornstarch: Binds excess banana moisture and helps the chilled bars hold clean edges.
- Full-fat sour cream: Brought to room temperature to add tang and soften the dense cream cheese texture.
- Cavendish banana: Mash 1 very ripe banana for the filling and keep 3 firm yellow bananas for layering and garnish.
- Pure vanilla extract: Use 2 teaspoons in the filling and 1 teaspoon in the whipped topping.
- Large egg: Bring to about 70°F and add one at a time to limit trapped air.
- Heavy whipping cream: Keep below 40°F before whipping so it forms stable medium peaks.
- Powdered cane sugar: Sift before whipping to sweeten the topping without gritty lumps.
Tools You’ll Need
- 9×13-inch light aluminum baking pan: A straight-sided light aluminum pan bakes the slab evenly and gives clean bars. Dark nonstick metal can overbrown the vanilla wafer crust.
- Parchment paper: A 15-inch parchment sheet creates a lifting sling for the chilled slab. Wax paper can melt and stick during baking.
- Large clear glass mixing bowl: A 4-quart bowl leaves room to blend the filling without splashing. A smaller bowl traps unmixed cream cheese along the rim.
- Electric hand mixer: A mixer with low-speed control smooths 24 ounces of cream cheese without whipping in excess air. A fixed high-speed model can cause cracks.
- Flat-bottomed measuring cup: A sturdy 1-cup measure compacts the crumb crust into an even layer. A rounded cup leaves thin spots that crumble after slicing.
- Instant-read thermometer: A thin probe confirms the center reaches 150°F without overbaking. A thick roasting probe leaves a large hole in the soft filling.
- Sharp chef’s knife: An 8-inch sharp blade cuts the chilled slab in long clean strokes. A serrated knife drags whipped topping through the layers.
Instructions
Step 1: Press and prebake the vanilla wafer crust

Heat the oven to 350°F. Stir the vanilla wafer crumbs with melted butter, light brown sugar and fine sea salt for 60 seconds. Press the mixture into a parchment-lined 9×13-inch metal pan. Use the flat bottom of a measuring cup and work from the center outward.
Bake for 9 to 11 minutes and rotate the pan at minute 6. The crust should look one shade darker and smell like toasted vanilla. Its center will feel dry while the edges show a few loose crumbs. Let it cool for 15 minutes before layering.
Bake past 11 minutes and the sugar can turn bitter. Brief heat sets the butter and keeps the crumb base crisp.
Tip: Line the pan with a parchment sling that extends 2 inches above both long sides so the chilled slab lifts cleanly.
Step 2: Blend the banana cheesecake filling
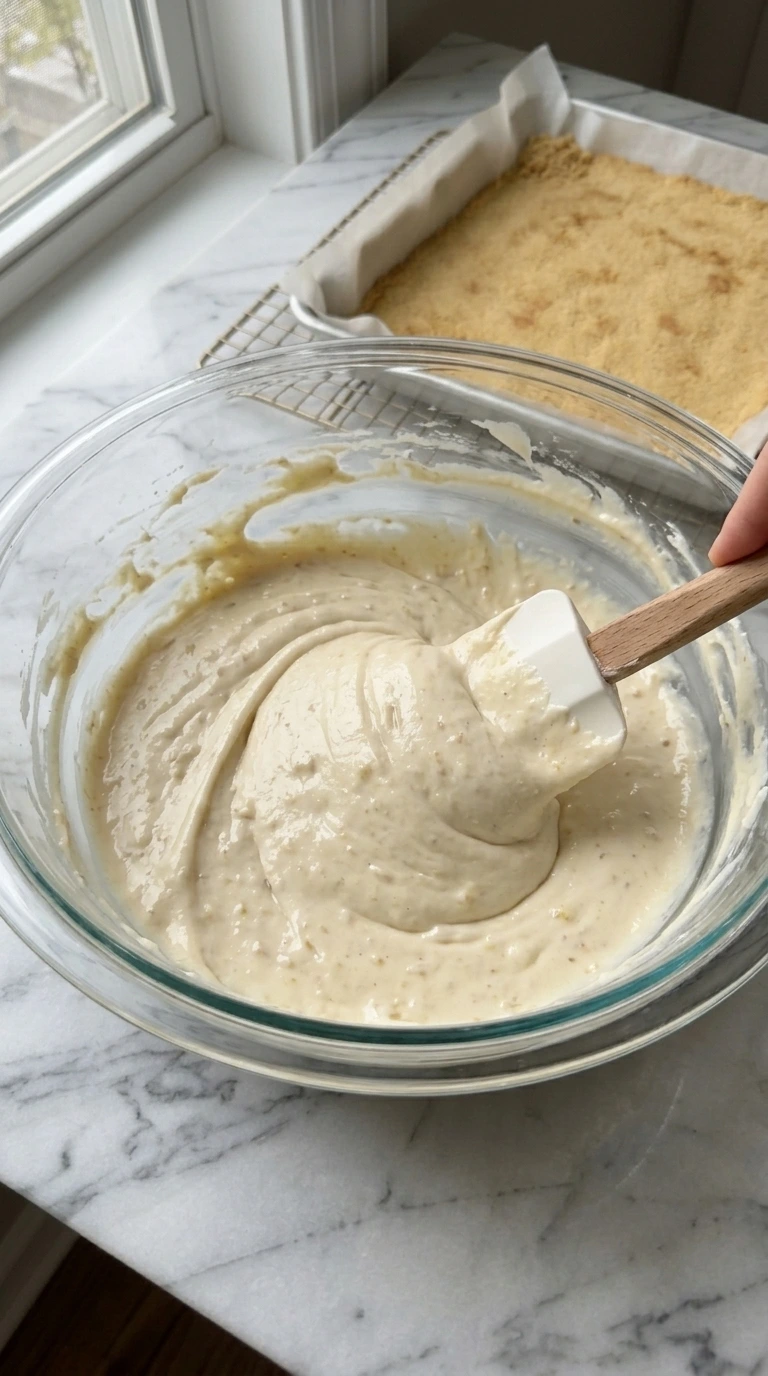
Set the full-fat cream cheese, sour cream and eggs out until they reach about 70°F. Beat the cream cheese with granulated sugar and cornstarch on low speed for 2 minutes. Scrape the bowl halfway through. Add mashed ripe banana, sour cream and vanilla extract.
Mix for 60 seconds until the filling looks smooth and pale. Add the eggs one at a time and mix 20 seconds after each addition. The batter should fall in a thick ribbon with only tiny banana flecks visible. (I once whipped it on high, the baked top puffed and cracked badly.
) Mix longer than 4 minutes and excess air gets trapped. Low-speed mixing keeps the cheesecake dense and even.
Tip: Choose block-style full-fat cream cheese with about 33 percent fat because whipped tubs contain extra water and set more softly.
Step 3: Layer the banana coins and filling
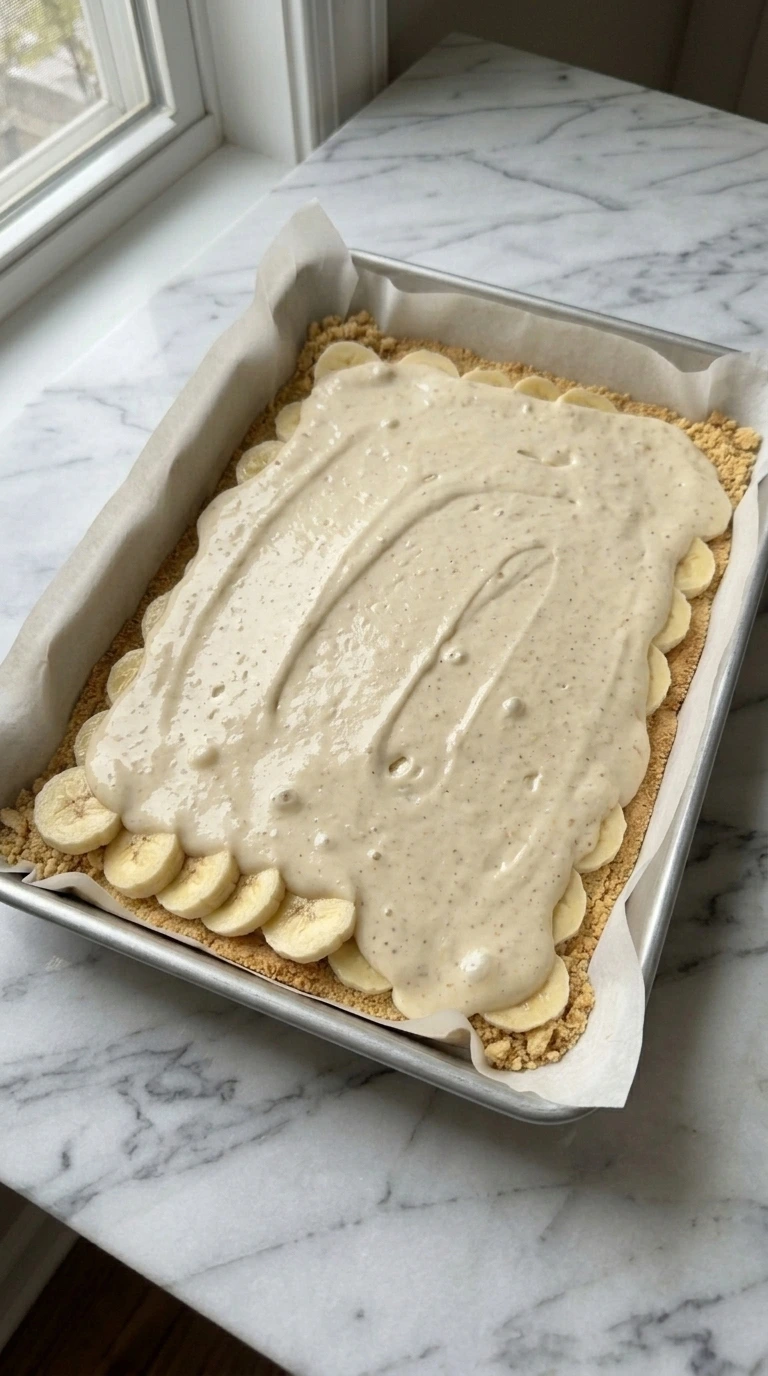
Lower the oven to 325°F. Slice 2 medium firm bananas into 1/4-inch coins within 5 minutes of assembly. Arrange them in one loose layer over the cooled crust with slight overlap.
Pour the banana cheesecake filling over the slices. Tilt the pan slowly toward each corner and smooth the top with three broad strokes. The filling should settle into an even pale layer while a few banana curves remain faintly visible underneath.
Tap the pan against the counter exactly three times to release large bubbles. Wait longer than 10 minutes before baking and the banana layer can weep. Quick layering limits moisture between the crust and filling.
Tip: Use firm yellow bananas with barely any brown spotting because very ripe slices release more liquid during the 40-minute bake.
Step 4: Bake until the center softly wobbles

Bake the layered pan at 325°F for 38 to 44 minutes. Rotate it once at minute 25 and keep the oven door closed otherwise. The outer 2 inches should set while the center still moves as one soft piece. Check for 150°F in the middle.
Cool the pan at room temperature for exactly 1 hour. The surface should stay pale ivory with faint golden edges and no wet shine. A few tiny bubbles are normal and the middle will firm as it cools. (My first batch reached 165°F, the filling turned grainy.
) Go past 155°F and the proteins tighten too far. Gentle heat preserves the creamy custard structure.
Tip: Check the center through the oven window after minute 35 because opening the door early can drop the temperature by 25°F.
Step 5: Chill and spread the whipped topping
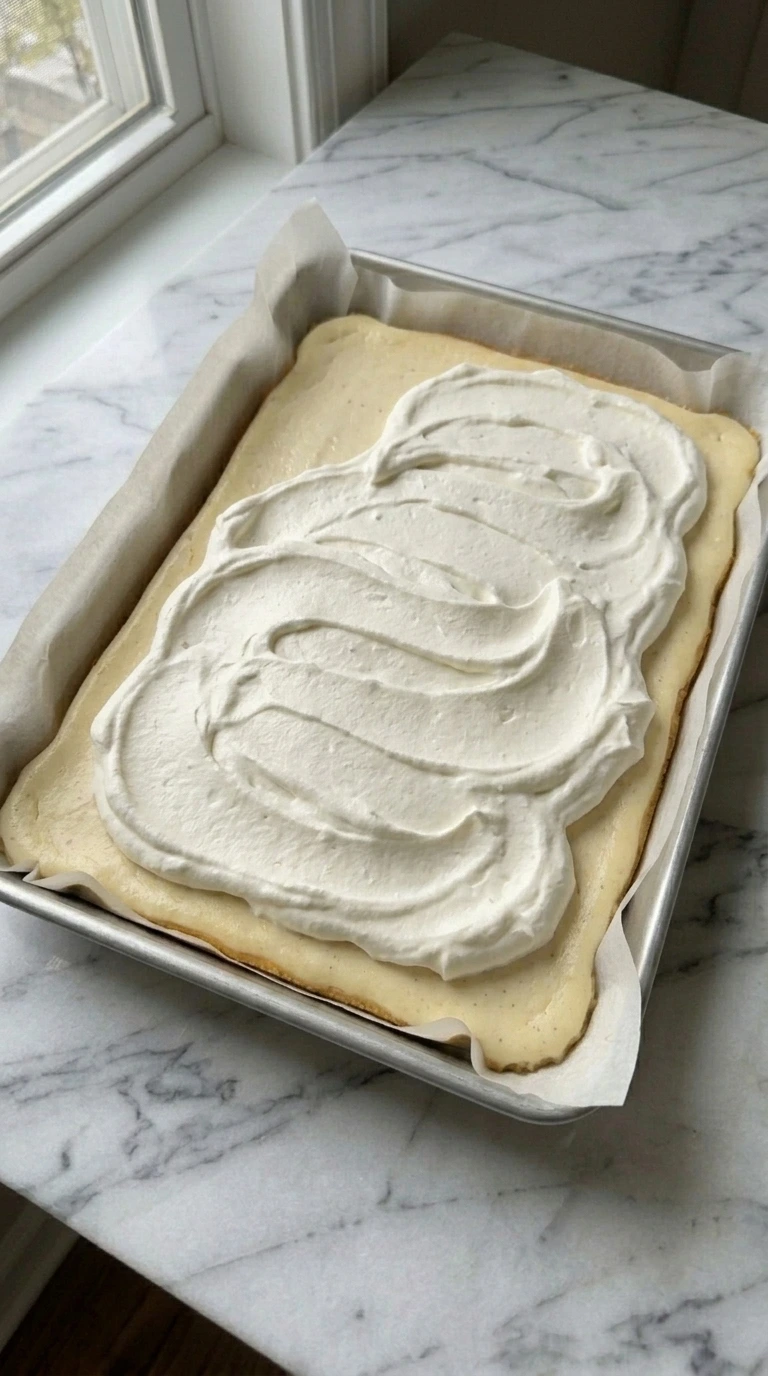
Cover the cooled pan and refrigerate it at 40°F or colder for 6 to 12 hours. Then whip the cold heavy cream, powdered sugar and vanilla extract for 2 to 3 minutes. Stop at medium peaks.
Spread the cream over the chilled cheesecake with loose swirls and leave a narrow uneven border visible. The topping should hold soft ridges without looking stiff or grainy. Meanwhile, the cheesecake underneath should feel firm when the pan moves.
Whip past 4 minutes and the cream starts turning buttery. Chill less than 6 hours and the layers smear during cutting. Cold fat traps air and supports clean slices.
Tip: Chill the cream bowl for 15 minutes before whipping so 1 cup of cream reaches medium peaks faster and stays smoother.
Step 6: Cut and finish the chilled bars

Rest the chilled pan at 40°F for 10 minutes before cutting. Lift out the slab and divide it into 16 squares with a knife blade warmed to 120°F. Wipe and rewarm the blade after every cut.
Top each square with 1 fresh banana coin, crushed vanilla wafers and one small whipped cream mound. The cut sides should reveal a golden crumb base and pale cheesecake with soft banana coins near the bottom. The topping can sit unevenly and a few crumbs should cling to the edges.
Leave the bars warm for 30 minutes and the filling slumps. A warm clean blade separates the chilled layers without dragging.
Tip: Warm the blade to about 120°F and wipe it after each slice so the white topping stays out of the crust.
Pro Tips
- Use cream cheese blocks that list about 33 percent fat because spreadable tubs contain extra water and can leave the center loose.
- Measure the mashed banana at 1/2 cup. More than 2/3 cup adds enough moisture to make the bars difficult to slice.
- Pack the crumb base to about 1/4 inch thick with a flat cup because thin corners break when the slab lifts.
- Schedule the 6-hour chilling window before guests arrive. Overnight chilling gives the cleanest 16 squares and the firmest lower crust.
- Stop baking when the center reaches 150°F and moves as one soft section. A fully rigid middle usually means dry cheesecake.
- Warm the blade to about 120°F and wipe it after each slice so the white topping stays out of the crust.
- Add the fresh banana garnish within 20 minutes of serving. Earlier slices brown and release moisture onto the whipped cream.
- Swirl 1/3 cup warmed dulce de leche through the filling before baking for a caramel banana version with amber ribbons.
- Fold 1/2 cup miniature dark chocolate chips into the filling for a banana chocolate variation with small bittersweet pockets.
- Replace 1 firm banana in the layer with 1 cup thinly sliced strawberries for a brighter spring version that needs 5 extra baking minutes.
- Add 1/2 teaspoon ground cinnamon to the crust and scatter 1/3 cup toasted pecans over the topping for a warm holiday variation.
Storage Instructions
Store the finished bars in a shallow airtight container at 40°F or colder for up to 4 days. Keep parchment between stacked layers so the whipped topping doesn’t smear. For freezing, leave off fresh banana garnish and wafer crumbs.
Freeze individual squares for 2 hours, then wrap them tightly in plastic and foil. They keep their best texture for 2 months. These bars shouldn’t be reheated because warmth loosens the cream cheese structure.
Instead, thaw frozen squares in the refrigerator for 8 to 12 hours and rest them at room temperature for 15 minutes. Add fresh whipped cream or wafer crumbs after thawing. Discard bars with a sour odor, watery separation, gray banana patches or topping that feels unusually slick or slimy.
Print
Banana Cheesecake Bars
- Total Time: 8 hours 22 minutes
- Yield: 16 servings 1x
Description
These easy Banana Cheesecake Bars bring creamy banana filling and a buttery vanilla wafer crust to brunch, a holiday, potluck or party. The texture is smooth with soft banana slices and a light whipped topping. The trick is baking at 325°F and chilling for 6 hours so every square cuts cleanly. They’re quick to mix and simple to serve, with make-ahead ideas for busy days. It’s one of the best desserts when you want something sweet and nostalgic with a healthy little twist.
Ingredients
- 12 ounces Vanilla wafer cookies
- 6 tablespoons Unsalted butter
- 2 tablespoons Light brown sugar
- 1/4 teaspoon Fine sea salt
- 24 ounces Full-fat block cream cheese
- 3/4 cup Granulated cane sugar
- 1 tablespoon Cornstarch
- 1/2 cup Full-fat sour cream
- 4 medium Cavendish banana
- 1 tablespoon Pure vanilla extract
- 3 large Large egg
- 1 cup Heavy whipping cream
- 2 tablespoons Powdered cane sugar
Instructions
- Heat the oven to 350°F. Stir the vanilla wafer crumbs with melted butter, light brown sugar and fine sea salt for 60 seconds. Press the mixture into a parchment-lined 9×13-inch metal pan. Use the flat bottom of a measuring cup and work from the center outward. Bake for 9 to 11 minutes and rotate the pan at minute 6. The crust should look one shade darker and smell like toasted vanilla. Its center will feel dry while the edges show a few loose crumbs. Let it cool for 15 minutes before layering. Bake past 11 minutes and the sugar can turn bitter. Brief heat sets the butter and keeps the crumb base crisp.
- Set the full-fat cream cheese, sour cream and eggs out until they reach about 70°F. Beat the cream cheese with granulated sugar and cornstarch on low speed for 2 minutes. Scrape the bowl halfway through. Add mashed ripe banana, sour cream and vanilla extract. Mix for 60 seconds until the filling looks smooth and pale. Add the eggs one at a time and mix 20 seconds after each addition. The batter should fall in a thick ribbon with only tiny banana flecks visible. (I once whipped it on high, the baked top puffed and cracked badly.) Mix longer than 4 minutes and excess air gets trapped. Low-speed mixing keeps the cheesecake dense and even.
- Lower the oven to 325°F. Slice 2 medium firm bananas into 1/4-inch coins within 5 minutes of assembly. Arrange them in one loose layer over the cooled crust with slight overlap. Pour the banana cheesecake filling over the slices. Tilt the pan slowly toward each corner and smooth the top with three broad strokes. The filling should settle into an even pale layer while a few banana curves remain faintly visible underneath. Tap the pan against the counter exactly three times to release large bubbles. Wait longer than 10 minutes before baking and the banana layer can weep. Quick layering limits moisture between the crust and filling.
- Bake the layered pan at 325°F for 38 to 44 minutes. Rotate it once at minute 25 and keep the oven door closed otherwise. The outer 2 inches should set while the center still moves as one soft piece. Check for 150°F in the middle. Cool the pan at room temperature for exactly 1 hour. The surface should stay pale ivory with faint golden edges and no wet shine. A few tiny bubbles are normal and the middle will firm as it cools. (My first batch reached 165°F, the filling turned grainy.) Go past 155°F and the proteins tighten too far. Gentle heat preserves the creamy custard structure.
- Cover the cooled pan and refrigerate it at 40°F or colder for 6 to 12 hours. Then whip the cold heavy cream, powdered sugar and vanilla extract for 2 to 3 minutes. Stop at medium peaks. Spread the cream over the chilled cheesecake with loose swirls and leave a narrow uneven border visible. The topping should hold soft ridges without looking stiff or grainy. Meanwhile, the cheesecake underneath should feel firm when the pan moves. Whip past 4 minutes and the cream starts turning buttery. Chill less than 6 hours and the layers smear during cutting. Cold fat traps air and supports clean slices.
- Rest the chilled pan at 40°F for 10 minutes before cutting. Lift out the slab and divide it into 16 squares with a knife blade warmed to 120°F. Wipe and rewarm the blade after every cut. Top each square with 1 fresh banana coin, crushed vanilla wafers and one small whipped cream mound. The cut sides should reveal a golden crumb base and pale cheesecake with soft banana coins near the bottom. The topping can sit unevenly and a few crumbs should cling to the edges. Leave the bars warm for 30 minutes and the filling slumps. A warm clean blade separates the chilled layers without dragging.
Notes
Pro Tips:
- Use cream cheese blocks that list about 33 percent fat because spreadable tubs contain extra water and can leave the center loose.
- Measure the mashed banana at 1/2 cup. More than 2/3 cup adds enough moisture to make the bars difficult to slice.
- Pack the crumb base to about 1/4 inch thick with a flat cup because thin corners break when the slab lifts.
- Schedule the 6-hour chilling window before guests arrive. Overnight chilling gives the cleanest 16 squares and the firmest lower crust.
- Stop baking when the center reaches 150°F and moves as one soft section. A fully rigid middle usually means dry cheesecake.
- Warm the blade to about 120°F and wipe it after each slice so the white topping stays out of the crust.
- Add the fresh banana garnish within 20 minutes of serving. Earlier slices brown and release moisture onto the whipped cream.
Storage: Store the finished bars in a shallow airtight container at 40°F or colder for up to 4 days. Keep parchment between stacked layers so the whipped topping doesn’t smear. For freezing, leave off fresh banana garnish and wafer crumbs. Freeze individual squares for 2 hours, then wrap them tightly in plastic and foil. They keep their best texture for 2 months. These bars shouldn’t be reheated because warmth loosens the cream cheese structure. Instead, thaw frozen squares in the refrigerator for 8 to 12 hours and rest them at room temperature for 15 minutes. Add fresh whipped cream or wafer crumbs after thawing. Discard bars with a sour odor, watery separation, gray banana patches or topping that feels unusually slick or slimy.
- Prep Time: 30 minutes
- Cook Time: 52 minutes
- Category: Dessert
- Cuisine: American
Nutrition
- Serving Size: 1 serving (of 16)
- Calories: 443
- Sugar: 28g
- Sodium: 273mg
- Fat: 31g
- Carbohydrates: 42g
- Fiber: 1g
- Cholesterol: 111mg
Frequently Asked Questions
Yes. Bake the slab up to 2 days ahead and chill it covered at 40°F or colder. Add the whipped cream and wafer crumbs up to 6 hours before serving, but wait to add fresh banana slices until the final 20 minutes.
The usual cause is too much mashed banana or cream cheese from a tub. Keep the puree to 1/2 cup and use 24 ounces of block cream cheese. Also bake until the center reaches 150°F, then chill for at least 6 hours before cutting.
Use 2.5 cups of gluten-free vanilla cookie crumbs and keep the remaining filling unchanged. Add up to 1 extra tablespoon of melted butter if the crumbs won’t hold when squeezed. Check every package because some pudding-style cookies share equipment with wheat products.
Bake two separate 9×13-inch pans rather than one deeper pan. A doubled deep slab can stay loose in the center while the edges overcook. Rotate both pans at minute 25 and allow 42 to 48 minutes if they share one oven.
Freeze ungarnished squares on a tray for 2 hours, then wrap each one twice and store for up to 2 months. Thaw them overnight in the refrigerator. Add whipped cream, banana slices and wafer crumbs only after the centers feel fully thawed.
Serve one cold square with coffee or unsweetened iced tea so the rich filling stays balanced. For a brunch tray, cut 1.75-inch pieces and keep them below 40°F until 15 minutes before serving. Fresh strawberries also add a tart contrast.
Final Thoughts
This is the kind of dessert recipe I wish I had found years ago. It would have saved me so many last-minute party desserts.
But now that I have it, I make it all the time and I think you will too. If you enjoyed this, check out Homemade Cinnamon Rolls and Raspberry Colada on the blog.
And leave a comment, I read every single one and it really makes my day.