

This Banana Pudding Cookies recipe is full of flavor and easy enough for busy afternoons or last-minute dessert plans. It’s budget-friendly, takes about 55 minutes to make, and gives you soft centers with crisp, golden edges. Bake a batch for dessert tonight, then save the extras for tomorrow’s snack.
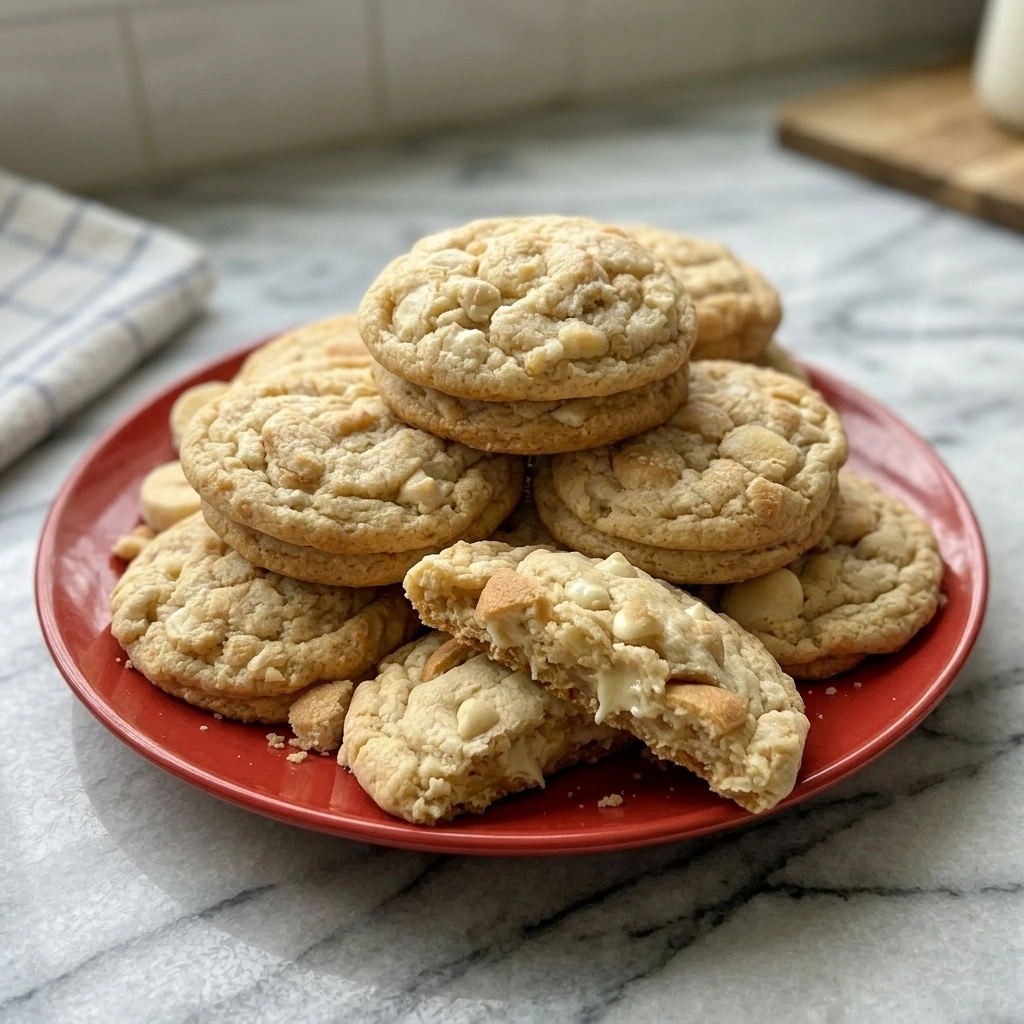
If you love banana desserts, you’re going to love these cookies. They’re thick, chewy, buttery, and hard to resist, while the pudding mix keeps the centers soft even after they cool. With crushed vanilla wafers and white chocolate chips in every bite, you’ll probably reach for another before the first one is gone.
Looking for more easy desserts? Try my Classic Banana Pudding or Classic Rice Krispie Treats. Both are simple to make and work well for family treats, holiday trays, or casual parties.
Ingredients
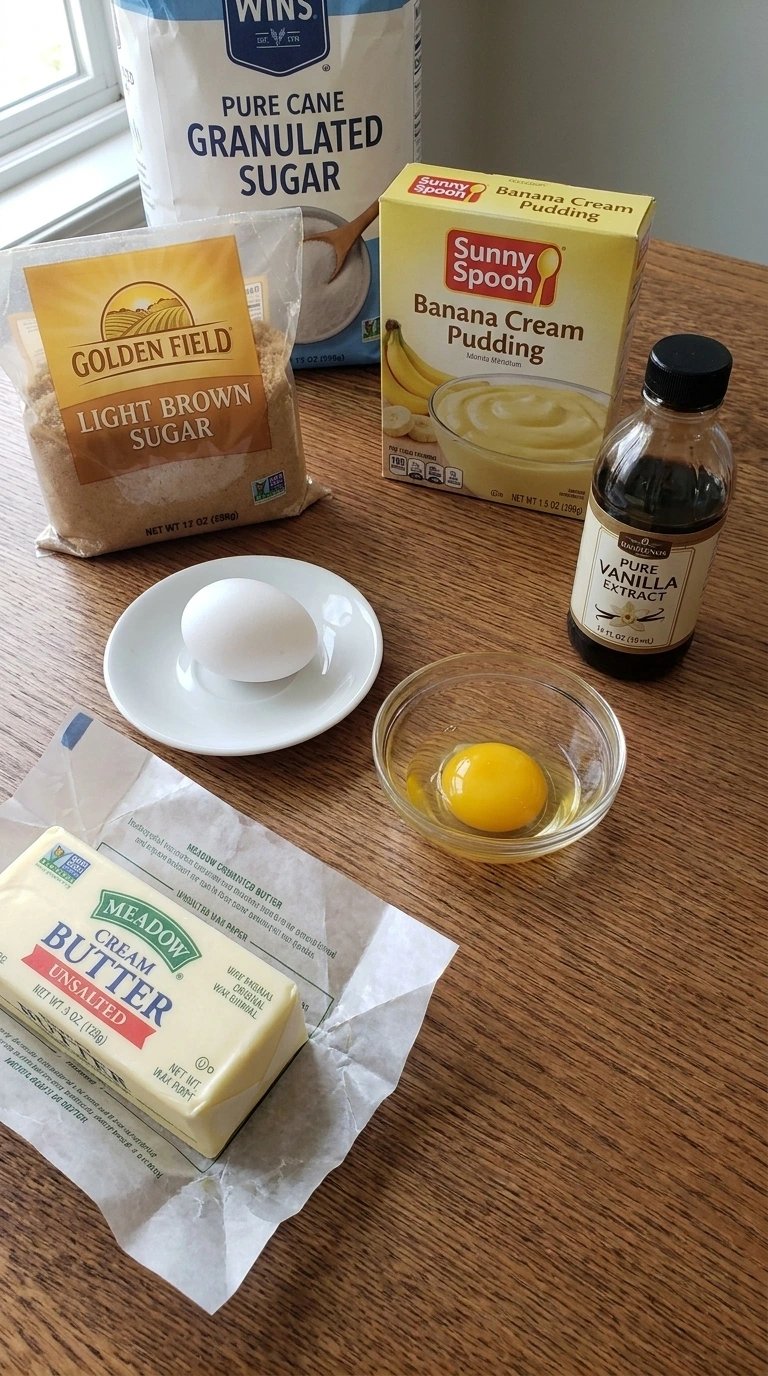
Here’s what I use for this recipe and you can always make substitutions if you prefer.
- unsalted butter: Softened to about 67°F so it creams smoothly while staying cool enough to control spread.
- light brown sugar: Packed lightly to add moisture and a gentle caramel flavor.
- granulated sugar: Adds crispness around the edges without making the centers dry.
- instant banana cream pudding mix: Use the dry instant mix to supply banana flavor and moisture-binding starch.
- large egg: Bring to room temperature so it blends into the creamed butter without curdling.
- large egg yolk: Adds richness and chew while limiting the extra water found in a second whole egg.
- pure vanilla extract: Rounds out the banana flavor and reinforces the vanilla wafer notes.
- all-purpose flour: Spoon it into the measuring cup and level it so the dough doesn’t become dry.
- baking soda: Provides controlled spread and helps the cookie edges turn golden.
- fine sea salt: Balances the sweet pudding mix and white chocolate.
- vanilla wafer cookies: Coarsely crushed into 1/4-inch pieces so distinct crunchy pockets remain after baking.
- white chocolate chips: Reserve 2 tablespoons for the tops and fold the rest through the dough.
Tools You’ll Need
- 5-quart stand mixer or electric hand mixer: It creams the butter and sugars evenly, and a 5-quart bowl gives the dough room to fold without flour spilling over the rim.
- 4-quart clear glass mixing bowl: It holds the full dough and shows hidden flour pockets, while a bowl smaller than 4 quarts makes even folding difficult.
- two light-colored 13×18-inch aluminum sheet pans: They give six large cookies enough space per pan, and dark nonstick metal can overbrown the bottoms before the centers set.
- 1/4-cup cookie scoop: It portions about 2 1/2 ounces of dough per cookie, while a smaller scoop changes the baking time and produces thinner cookies.
- flexible silicone spatula: It finishes the fold without overmixing, and a stiff spoon can leave dry flour at the base of the bowl.
- parchment paper: It prevents sticking without adding grease, and wax paper can’t replace it because the coating can melt at 350°F.
- wire cooling rack: It lets steam escape under the cookies, and a solid plate traps moisture that softens the crisp edges.
Instructions
Step 1: Cream the butter sugars and pudding mix

Set the unsalted butter out until it reaches about 67°F. Beat it with the light brown sugar, granulated sugar and instant banana cream pudding mix for 3 to 4 minutes. Use medium speed and scrape the bowl at minute 2. Then beat in the large egg and egg yolk for 45 seconds.
Add the pure vanilla extract and mix 15 seconds more. The mixture should look pale yellow and fluffy with faint sugar crystals still visible. You’ll smell banana and vanilla before the flour goes in. Stop once the ridges hold for two seconds.
Beat longer than 4 minutes and the butter warms too much, so the cookies spread. Cream at 67°F because cool butter holds the air that shapes thick centers.
Tip: Weigh the light brown sugar at 150 grams so excess packing doesn’t make the finished cookies greasy.
Step 2: Fold in the flour wafers and chips
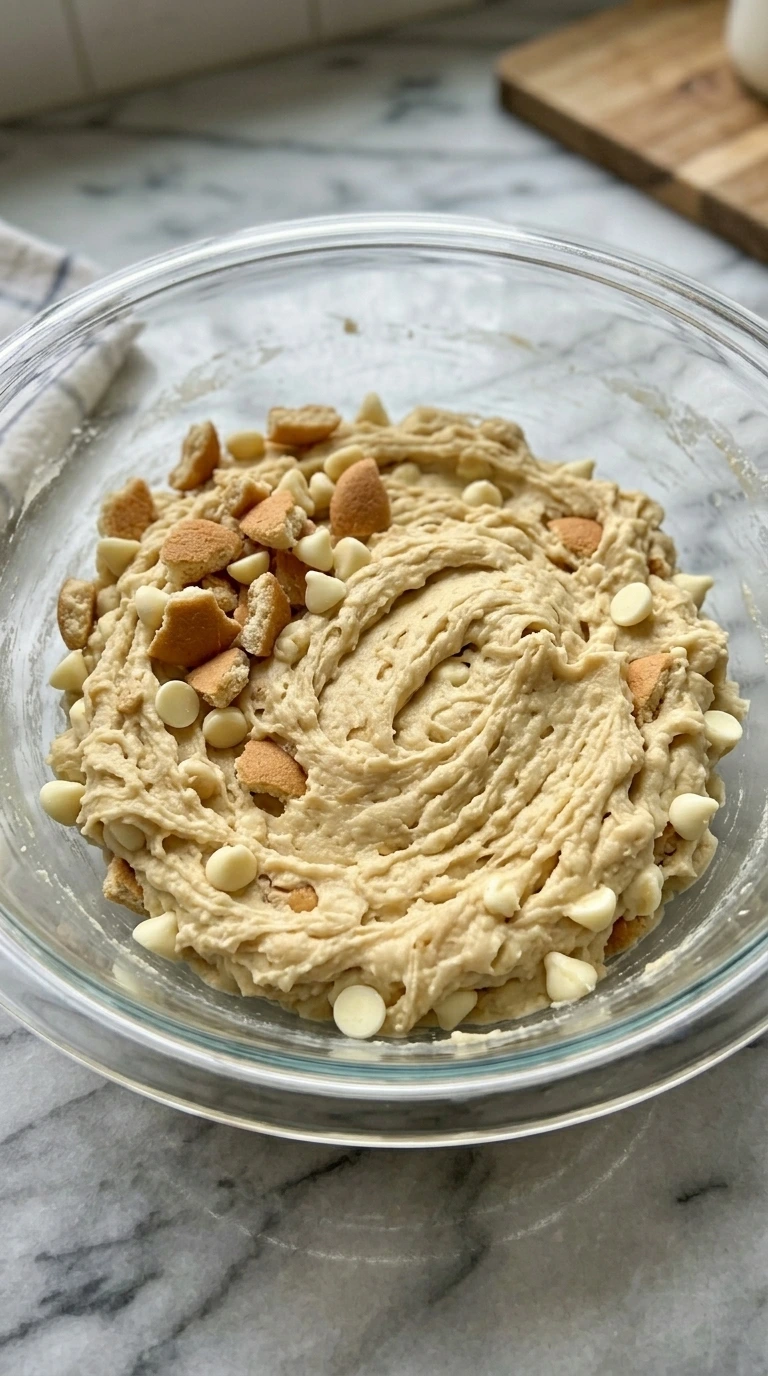
Whisk the all-purpose flour, baking soda and fine sea salt for 30 seconds. Add the dry mixture to the pale cream in three additions at low speed. Stop after 45 to 60 seconds and finish with a folding motion. Fold in the crushed vanilla wafer cookies and white chocolate chips until they sit unevenly through the dough.
Chill the bowl at 40°F for 20 minutes. The dough should turn thick and matte and it should hold a deep spatula track. Small wafer pieces will absorb a little moisture while the chips stay distinct. Mix past 60 seconds and the cookies get tough.
Skip the 20-minute chill and the edges spread before the centers set. Chill at 40°F because firm butter slows spreading while the flour finishes hydrating.
Tip: Reserve 2 tablespoons of white chocolate chips before folding so every portion can show two or three chips on top.
Step 3: Shape twelve rough cookie mounds
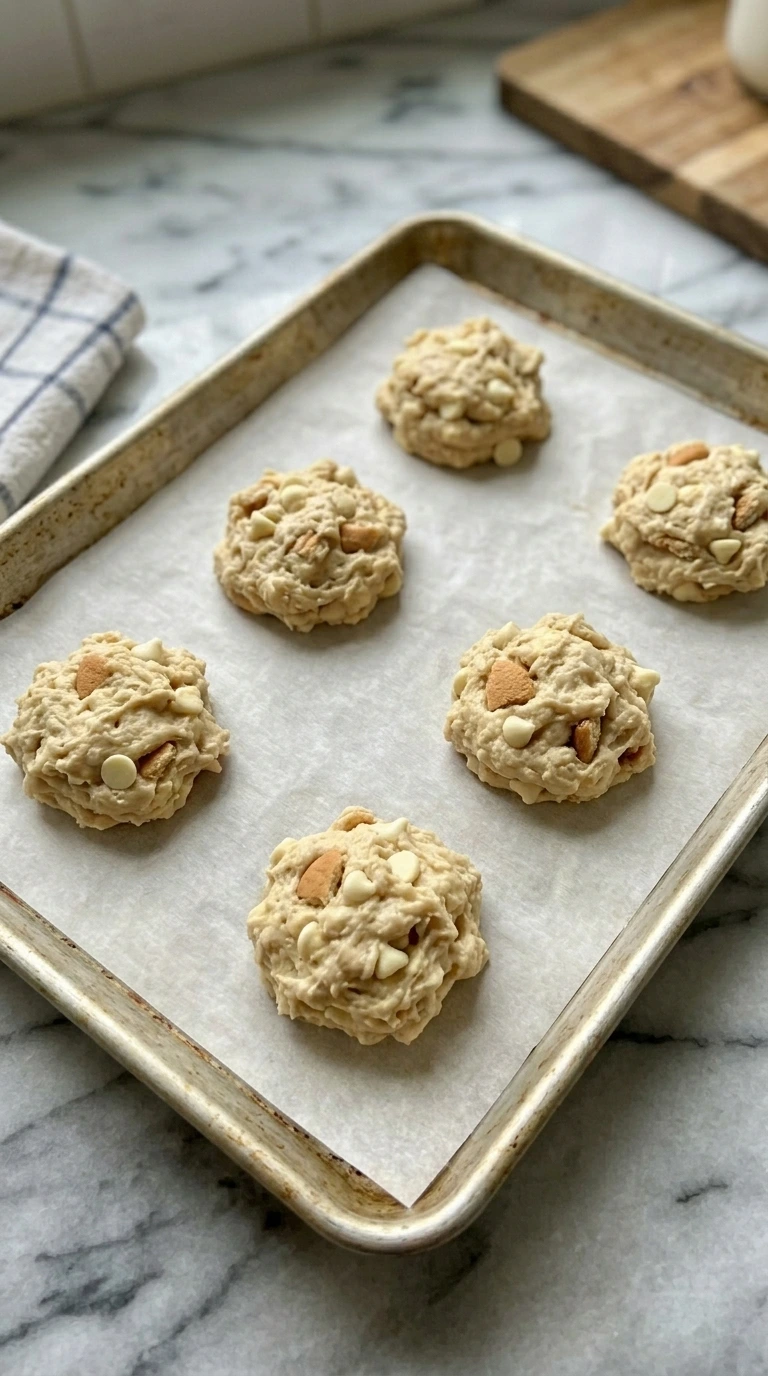
Divide the chilled dough into 12 portions that weigh about 2 1/2 ounces each. Roll each portion once between your palms and stop before the surface turns smooth. Place six mounds on each lined sheet pan with 3 inches between them. Press each mound to about 1 inch thick.
Keep the dough near 40°F and finish shaping within 7 minutes. The mounds should look rough and rounded with visible white chocolate chips and tan wafer chunks. Uneven cracks are good. If the dough becomes glossy or leaves butter on your hands, chill the pans for 8 minutes before baking.
Warm dough spreads into thin rings and loses its soft center. Shape quickly because cold fat keeps each cookie tall as the edges begin setting.
Tip: A 1/4-cup cookie scoop portions close to 2 1/2 ounces and keeps all 12 cookies within the same baking window.
Step 4: Bake until the edges turn golden
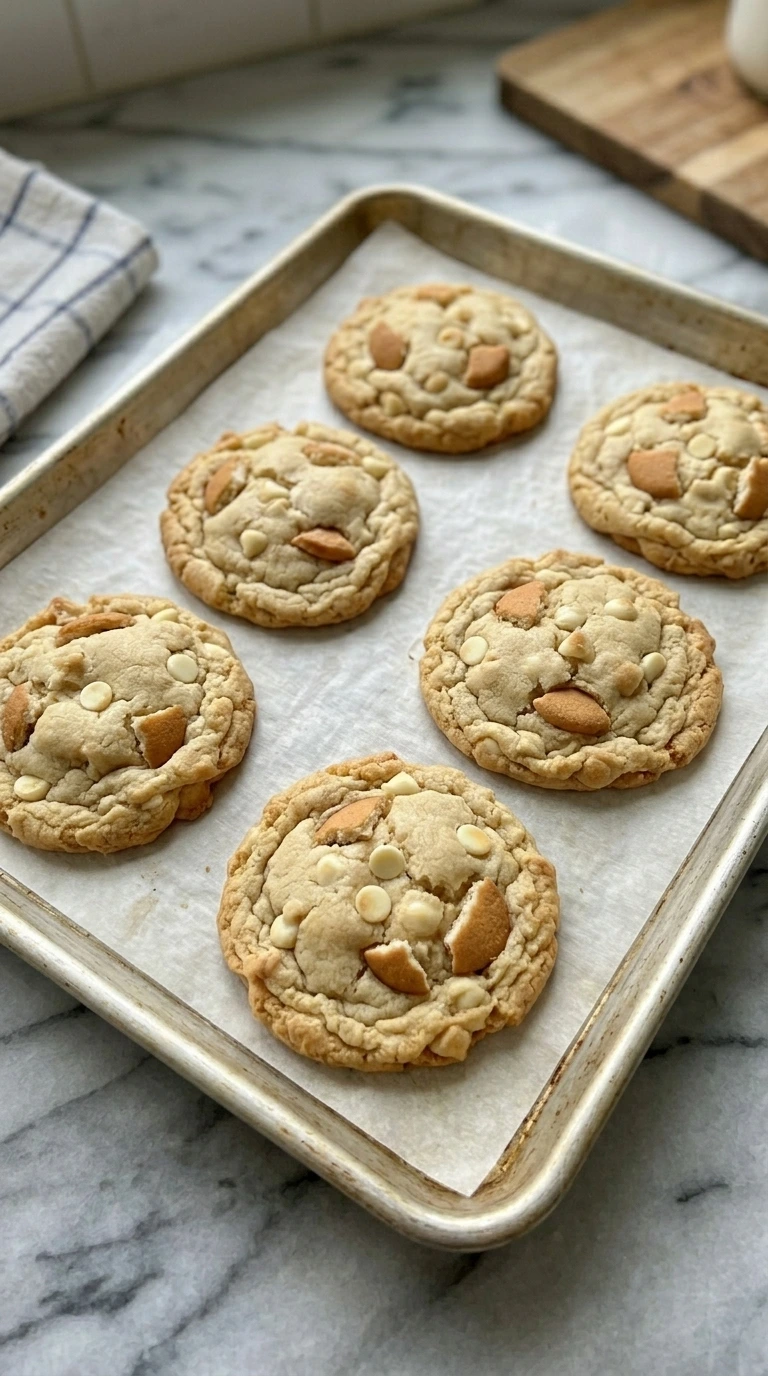
Bake both sheet pans in a 350°F preheated oven for 11 to 13 minutes. Set one pan in the upper third and one in the lower third. Swap their racks and rotate each pan 180 degrees at minute 6. Don’t flatten the cookies while they bake.
(My first batch stayed in for 15 minutes, the banana flavor faded and the centers turned dry. ) The cookies should puff into thick rounds with pale golden tops and deeper golden edges. The centers will look matte but slightly soft and you’ll smell toasted vanilla wafers. Remove them by minute 13.
Go longer and the sugars harden the edges before carryover heat sets the middle. Bake at 350°F because moderate heat browns the rims without drying the pudding-softened centers.
Tip: Reduce the oven to 340°F when using dark nonstick pans because their surface can overbrown the bottoms by minute 10.
Step 5: Cool and split one cookie for serving

Leave the 12 cookies on their sheet pans for 10 minutes after baking. Their centers should fall from about 190°F to near 125°F. Then move them to a cooling rack and wait another 20 minutes.
Break one cookie into two uneven halves and place both pieces on a small white plate with the soft center facing outward. The broken center should look dense and tender with melted ivory chips and small tan wafer pockets. The edges will feel crisp while the middle bends slightly.
Move the cookies before 10 minutes and they can split at the base. Stack them while warm and trapped steam softens every edge. Cool to 75°F because the starches need time to set without turning the center dry.
Tip: Let the cookies sit uncovered for 30 minutes before packing so condensation doesn’t soften the vanilla wafer pieces.
Pro Tips
- Keep the unsalted butter near 67°F. Butter above 72°F looks shiny and makes the 2 1/2-ounce portions spread too far.
- Crush the vanilla wafer cookies into 1/4-inch pieces. Fine crumbs disappear into the dough and won’t give the same gentle crunch.
- Use light-colored aluminum sheet pans. Dark pans can make the bottoms deep brown before the centers set at minute 10.
- Chill the mixed dough for exactly 20 minutes. A 60-minute chill makes the mounds harder to press and can reduce spreading too much.
- Swap the pans between oven racks and rotate them 180 degrees at minute 6 so both rows brown at the same rate.
- Press two reserved white chocolate chips into each mound before baking. They’ll stay visible and give the tops the bakery-style look.
- Cool the cookies for 10 minutes on the pan. Moving them sooner can tear the soft bases around the melted chips.
- Replace 1/4 cup of the white chocolate chips with butterscotch baking chips for a warmer caramel note that suits holiday cookie trays.
- Add 1/2 teaspoon ground cinnamon and 1/4 teaspoon ground nutmeg to the flour for a spiced banana bread flavor.
- Replace 1/4 cup of all-purpose flour with unsweetened cocoa powder and use dark chocolate chips for a chocolate banana version.
- Fold in 1/3 cup toasted sweetened coconut with the vanilla wafer pieces for a chewy tropical twist.
Storage Instructions
Keep fully cooled cookies in an airtight container at room temperature for 4 days or refrigerate them for 7 days. Separate layers with parchment and don’t add a bread slice because extra moisture softens the wafer pieces. Freeze each cookie in food wrap, then seal it in a freezer bag for 2 months.
You can also freeze unbaked 2 1/2-ounce dough mounds for 6 weeks. Warm one cookie in a 300°F oven for 4 to 5 minutes, or microwave it at 50 percent power for 10 to 12 seconds. Let it rest 2 minutes so the center evens out.
Discard cookies that smell sour, show gray or green spots, or feel damp and sticky after storage. Chalky white chips alone usually show harmless fat bloom rather than spoilage.
Print
Banana Pudding Cookies
- Total Time: 53 minutes
- Yield: 12 large cookies servings 1x
Description
These Banana Pudding Cookies turn a classic dessert into an easy bake with soft centers, crisp golden edges and the warm smell of banana and vanilla wafers. The trick is instant banana pudding mix, which keeps every cookie tender while crushed wafers add a gentle crunch. They’re quick, simple and one of the best ideas for a party, potluck, holiday tray or brunch. For a healthy balance, serve one with fruit and coffee. They’re sturdy enough for meal prep snack boxes too.
Ingredients
- 3/4 cup unsalted butter
- 3/4 cup light brown sugar
- 1/4 cup granulated sugar
- 1 box, 3.4 ounces instant banana cream pudding mix
- 1 large large egg
- 1 large large egg yolk
- 2 teaspoons pure vanilla extract
- 1 3/4 cups all-purpose flour
- 1 teaspoon baking soda
- 1/2 teaspoon fine sea salt
- 3/4 cup vanilla wafer cookies
- 1/2 cup white chocolate chips
Instructions
- Set the unsalted butter out until it reaches about 67°F. Beat it with the light brown sugar, granulated sugar and instant banana cream pudding mix for 3 to 4 minutes. Use medium speed and scrape the bowl at minute 2. Then beat in the large egg and egg yolk for 45 seconds. Add the pure vanilla extract and mix 15 seconds more. The mixture should look pale yellow and fluffy with faint sugar crystals still visible. You’ll smell banana and vanilla before the flour goes in. Stop once the ridges hold for two seconds. Beat longer than 4 minutes and the butter warms too much, so the cookies spread. Cream at 67°F because cool butter holds the air that shapes thick centers.
- Whisk the all-purpose flour, baking soda and fine sea salt for 30 seconds. Add the dry mixture to the pale cream in three additions at low speed. Stop after 45 to 60 seconds and finish with a folding motion. Fold in the crushed vanilla wafer cookies and white chocolate chips until they sit unevenly through the dough. Chill the bowl at 40°F for 20 minutes. The dough should turn thick and matte and it should hold a deep spatula track. Small wafer pieces will absorb a little moisture while the chips stay distinct. Mix past 60 seconds and the cookies get tough. Skip the 20-minute chill and the edges spread before the centers set. Chill at 40°F because firm butter slows spreading while the flour finishes hydrating.
- Divide the chilled dough into 12 portions that weigh about 2 1/2 ounces each. Roll each portion once between your palms and stop before the surface turns smooth. Place six mounds on each lined sheet pan with 3 inches between them. Press each mound to about 1 inch thick. Keep the dough near 40°F and finish shaping within 7 minutes. The mounds should look rough and rounded with visible white chocolate chips and tan wafer chunks. Uneven cracks are good. If the dough becomes glossy or leaves butter on your hands, chill the pans for 8 minutes before baking. Warm dough spreads into thin rings and loses its soft center. Shape quickly because cold fat keeps each cookie tall as the edges begin setting.
- Bake both sheet pans in a 350°F preheated oven for 11 to 13 minutes. Set one pan in the upper third and one in the lower third. Swap their racks and rotate each pan 180 degrees at minute 6. Don’t flatten the cookies while they bake. (My first batch stayed in for 15 minutes, the banana flavor faded and the centers turned dry.) The cookies should puff into thick rounds with pale golden tops and deeper golden edges. The centers will look matte but slightly soft and you’ll smell toasted vanilla wafers. Remove them by minute 13. Go longer and the sugars harden the edges before carryover heat sets the middle. Bake at 350°F because moderate heat browns the rims without drying the pudding-softened centers.
- Leave the 12 cookies on their sheet pans for 10 minutes after baking. Their centers should fall from about 190°F to near 125°F. Then move them to a cooling rack and wait another 20 minutes. Break one cookie into two uneven halves and place both pieces on a small white plate with the soft center facing outward. The broken center should look dense and tender with melted ivory chips and small tan wafer pockets. The edges will feel crisp while the middle bends slightly. Move the cookies before 10 minutes and they can split at the base. Stack them while warm and trapped steam softens every edge. Cool to 75°F because the starches need time to set without turning the center dry.
Notes
Pro Tips:
- Keep the unsalted butter near 67°F. Butter above 72°F looks shiny and makes the 2 1/2-ounce portions spread too far.
- Crush the vanilla wafer cookies into 1/4-inch pieces. Fine crumbs disappear into the dough and won’t give the same gentle crunch.
- Use light-colored aluminum sheet pans. Dark pans can make the bottoms deep brown before the centers set at minute 10.
- Chill the mixed dough for exactly 20 minutes. A 60-minute chill makes the mounds harder to press and can reduce spreading too much.
- Swap the pans between oven racks and rotate them 180 degrees at minute 6 so both rows brown at the same rate.
- Press two reserved white chocolate chips into each mound before baking. They’ll stay visible and give the tops the bakery-style look.
- Cool the cookies for 10 minutes on the pan. Moving them sooner can tear the soft bases around the melted chips.
Storage: Keep fully cooled cookies in an airtight container at room temperature for 4 days or refrigerate them for 7 days. Separate layers with parchment and don’t add a bread slice because extra moisture softens the wafer pieces. Freeze each cookie in food wrap, then seal it in a freezer bag for 2 months. You can also freeze unbaked 2 1/2-ounce dough mounds for 6 weeks. Warm one cookie in a 300°F oven for 4 to 5 minutes, or microwave it at 50 percent power for 10 to 12 seconds. Let it rest 2 minutes so the center evens out. Discard cookies that smell sour, show gray or green spots, or feel damp and sticky after storage. Chalky white chips alone usually show harmless fat bloom rather than spoilage.
- Prep Time: 40 minutes
- Cook Time: 13 minutes
- Category: Dessert
- Cuisine: American
Nutrition
- Serving Size: 1 serving (of 12)
- Calories: 533
- Sugar: 39g
- Sodium: 467mg
- Fat: 25g
- Carbohydrates: 76g
- Fiber: 2g
- Cholesterol: 166mg
Frequently Asked Questions
Yes. Cover the mixed dough tightly and refrigerate it at 40°F for up to 48 hours. Let it stand for 12 minutes before scooping, then bake the 2 1/2-ounce portions at 350°F for 12 to 14 minutes because colder dough needs slightly longer.
The butter was probably warmer than 72°F or the dough skipped its 20-minute chill. Cool the dough to 40°F and leave 3 inches between portions. Also check that the baking soda measures exactly 1 teaspoon because excess leavener weakens the cookie structure.
Freeze fully cooled cookies in a single layer for 1 hour, then seal them with parchment between layers for up to 2 months. Thaw at room temperature for 30 minutes. Warm one at 300°F for 4 minutes when you want the edges lightly crisp again.
Use 1 3/4 cups of a gluten-free 1-to-1 baking flour that already contains xanthan gum and choose certified gluten-free vanilla wafers. Rest the dough for 30 minutes instead of 20. Then start checking the cookies at minute 10 because gluten-free edges can color faster.
Yes, but mix two separate batches so the flour doesn’t get overworked in a crowded bowl. Portion 24 cookies and keep the waiting pans refrigerated at 40°F. Bake two pans at a time at 350°F and swap their racks at minute 6.
Serve them near 75°F when the centers feel soft but no longer warm. A cold glass of milk or unsweetened coffee balances the white chocolate. For a dessert table, pair each cookie with a small spoonful of banana pudding rather than stacking wet pudding on top.
Final Thoughts
If you try this recipe, I really hope you love it as much as my family does. It has become one of those cookies we just keep coming back to because the centers stay soft and buttery.
Drop a comment below and let me know how yours turned out. And if you’re looking for more easy dessert ideas, make sure to bookmark this page.
I’m always adding new recipes that are simple, satisfying and perfect for busy weeks, including Homemade Cinnamon Rolls and Classic Rice Krispie Treats.