If you’ve ever had breakfast at a cozy diner you know that Fluffy Buttermilk Pancakes are the kind of stack that stands out with their warm buttery flavor. In this article we have the Fluffy Buttermilk Pancakes recipe for you to try in the comfort of your own home with this easy step by step guide.
This classic breakfast favorite has tender pancakes with a soft airy center and lightly golden edges that are both rich and delicate. This recipe is great for weekend brunch or a simple morning meal and this recipe is sure to impress your family and friends.
Ingredients
Here’s what I use for this recipe and you can always make substitutions if you prefer.
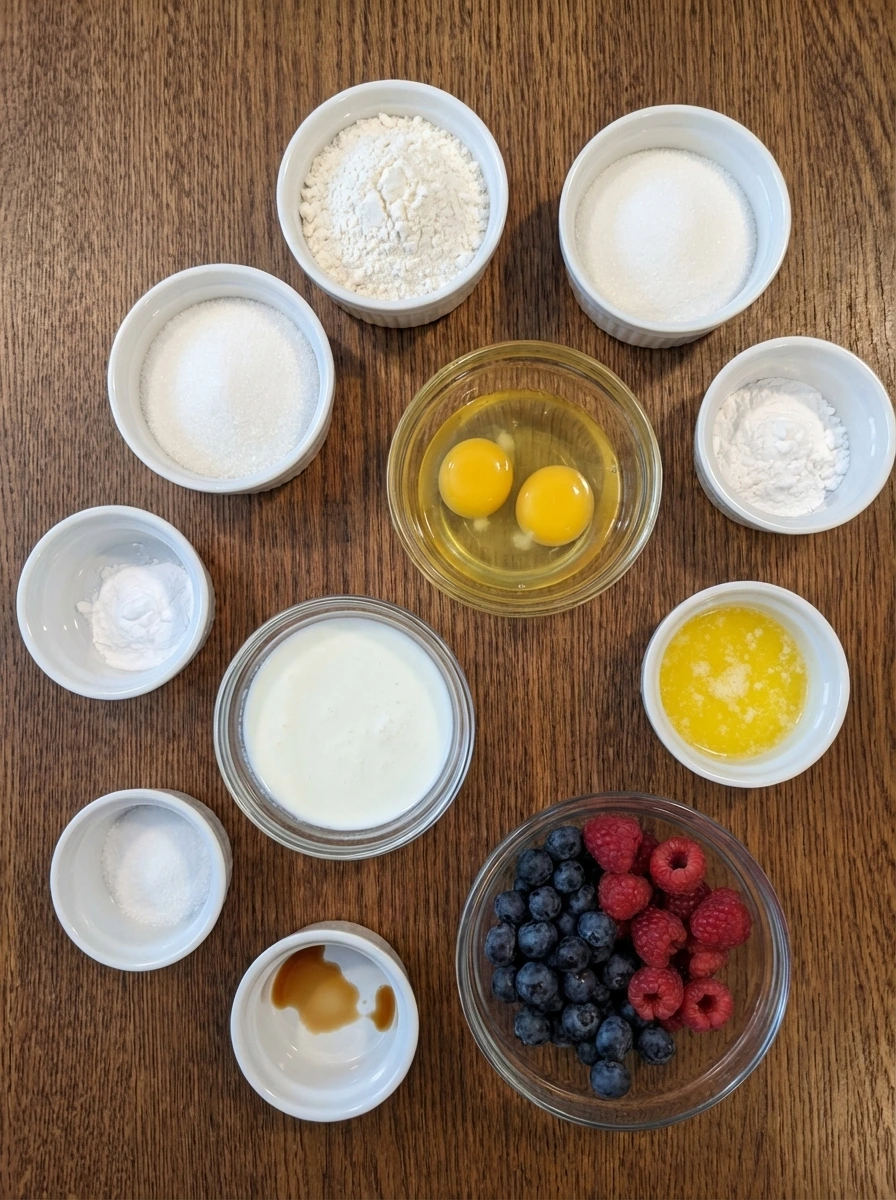
- all purpose flour: builds the soft structure of the pancakes
- granulated sugar: adds light sweetness and helps browning
- baking powder: lifts the batter for a fluffy rise
- baking soda: reacts with buttermilk for extra tenderness
- fine sea salt: balances the sweetness and sharpens flavor
- large eggs: bind the batter and add richness
- buttermilk: adds tang and keeps the crumb tender
- unsalted butter melted: adds buttery flavor and soft texture
- vanilla extract: rounds out the sweet breakfast flavor
- neutral oil or melted butter for the batter bowl: helps release any thick batter from the bowl sides
- butter for finishing: melts over the warm stack for serving
- maple syrup: adds glossy sweetness over the plated pancakes
- fresh berries: adds color and a bright juicy garnish
Tools You’ll Need
- mixing bowls: Use one for the dry ingredients and one for the wet ingredients.
- whisk: Helps blend the wet mixture smoothly and stir the dry base evenly.
- measuring cups and spoons: Keeps the batter balanced for soft fluffy pancakes.
- flat cooking surface: Cook the pancakes in batches so they brown gently and evenly.
- spatula: Flip once when the bubbles appear and the edges are set.
Instructions
Step 1: Measure and season the dry base
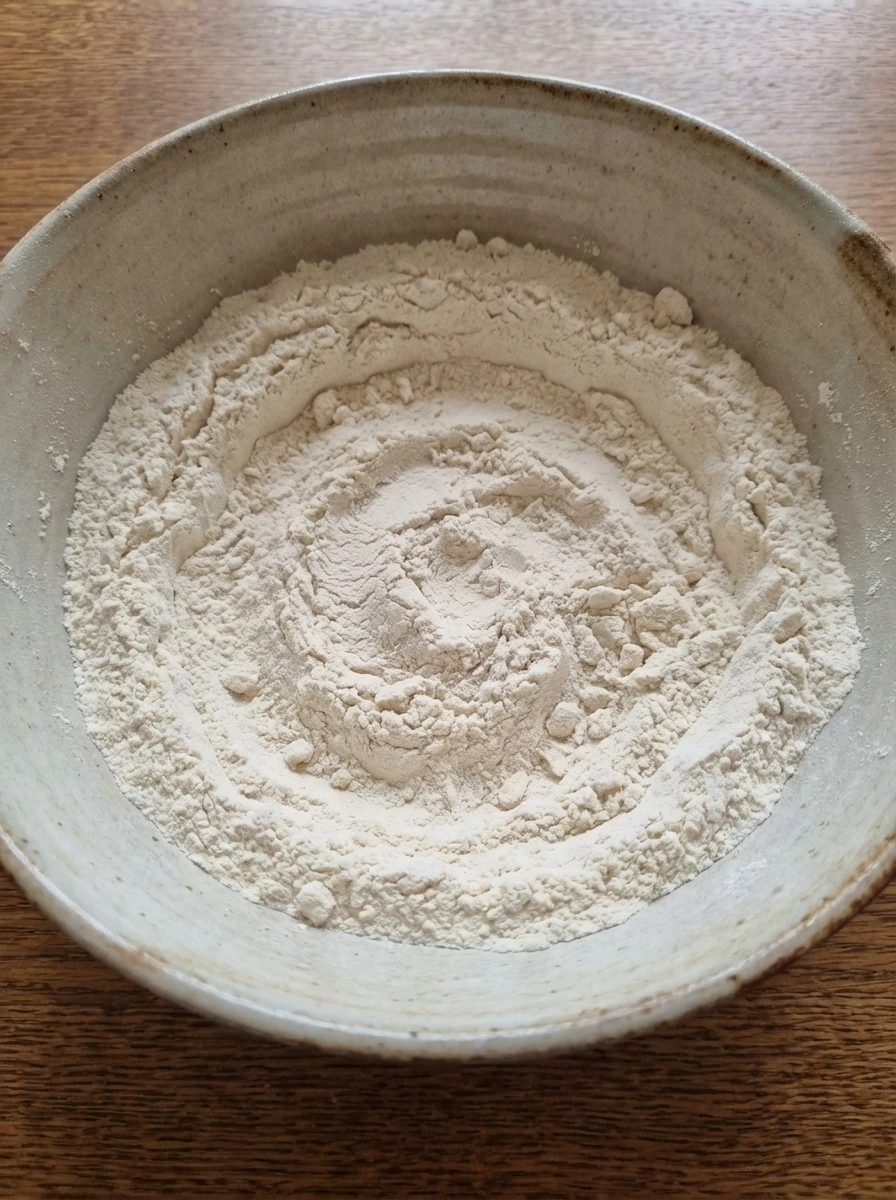
Add the flour sugar baking powder baking soda and salt into a wide bowl. The pale ingredients sit in loose uneven mounds at first and then become one soft powder as they are lightly stirred together. As the dry mixture blends the color stays creamy white yet the texture looks more even and airy with no large pockets of baking powder or soda left behind.
Tip: Stir gently until the dry mixture looks uniform so the pancakes rise evenly without dense spots.
Step 2: Combine the wet ingredients
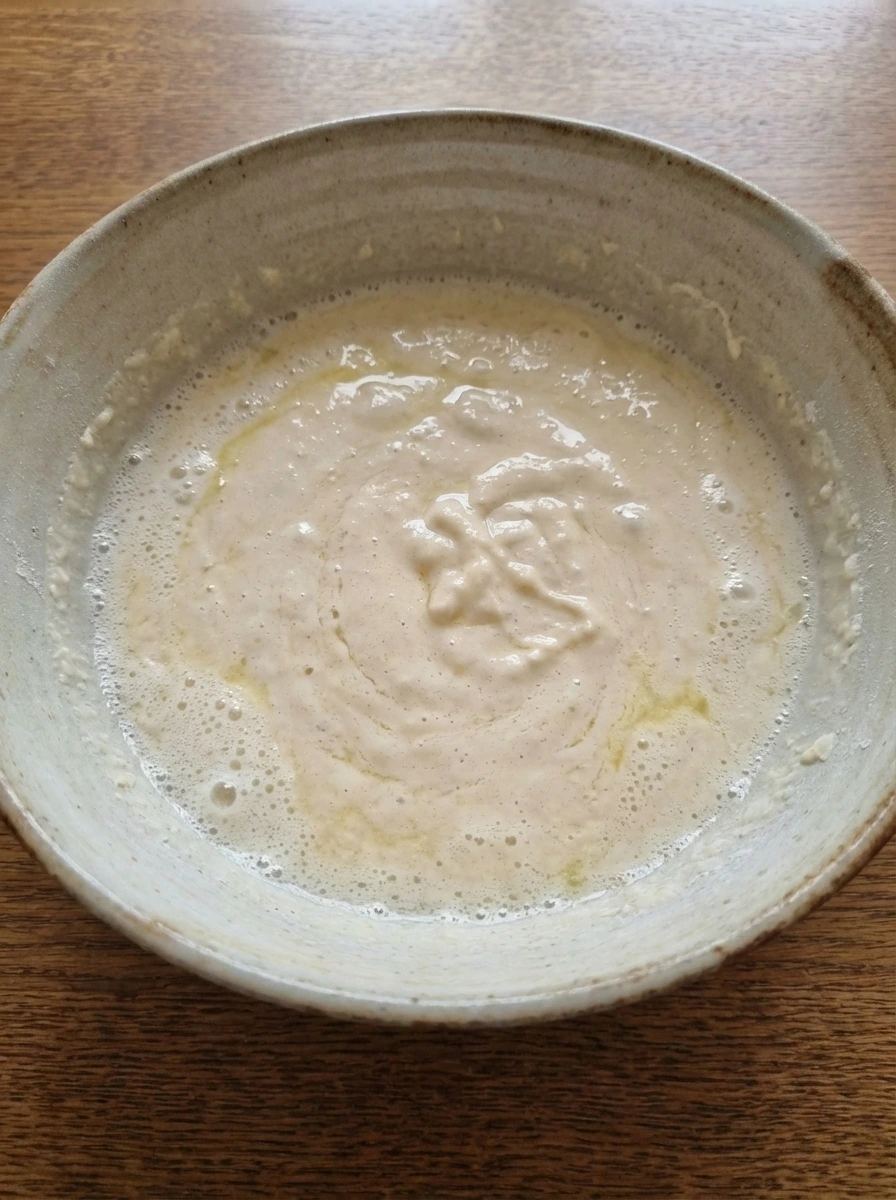
In a second bowl whisk the eggs with the buttermilk melted butter and vanilla. At first the yolks streak through the liquid and the butter floats in thin golden ribbons and then the mixture turns smooth and creamy with a pale buttery color. The surface looks lightly glossy and slightly frothy around the edges which shows the wet ingredients are fully combined.
Tip: Let the melted butter cool slightly before adding so it blends in smoothly instead of forming firm bits.
Step 3: Pour and partially mix the batter
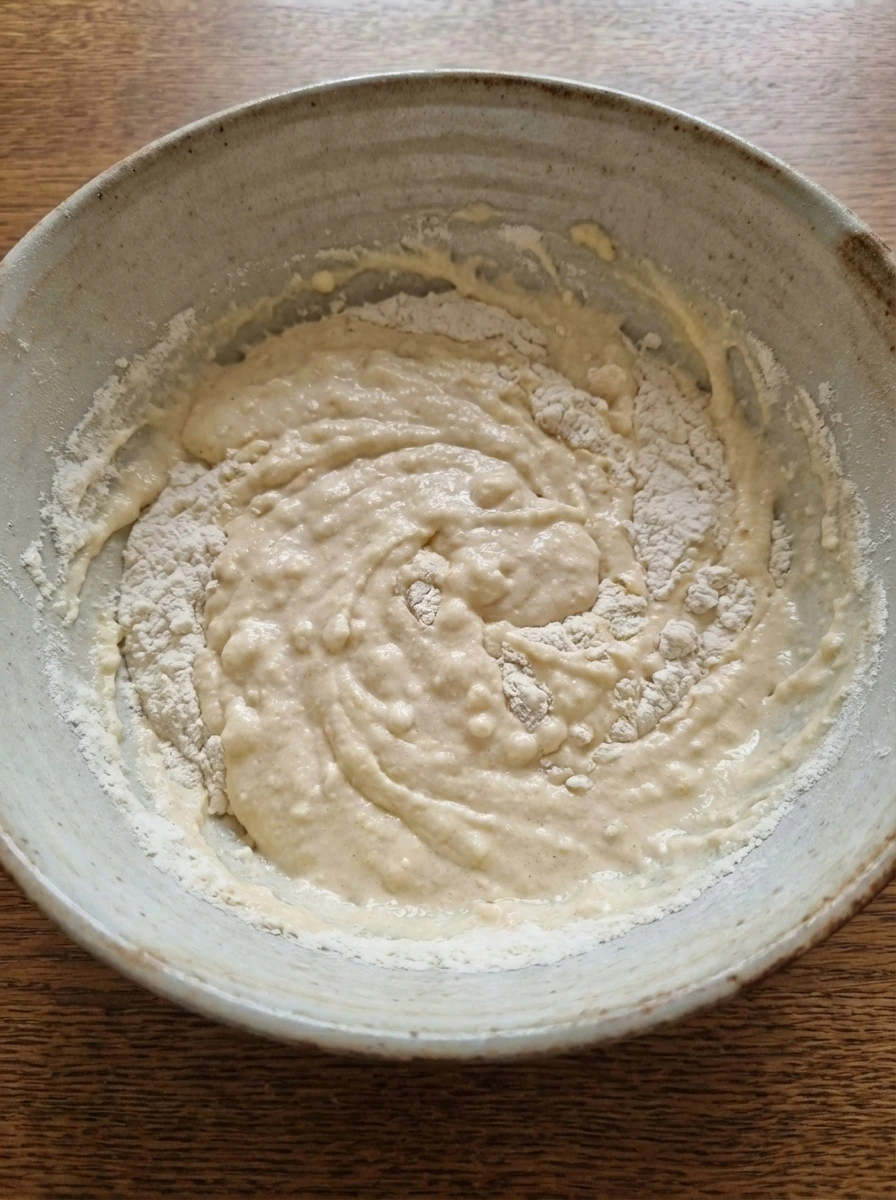
Pour the creamy wet mixture over the seasoned dry base. The liquid spreads unevenly across the flour and small islands of dry mix remain visible as the batter is folded together. After a few turns the batter looks thick and shaggy with streaks of flour still fading into the mixture. This partial mixing stage keeps the batter from turning heavy and it begins the raw to combined transformation.
Tip: Stop folding as soon as most of the flour disappears because a few small lumps help keep the pancakes tender.
Step 4: Rest until the batter softens
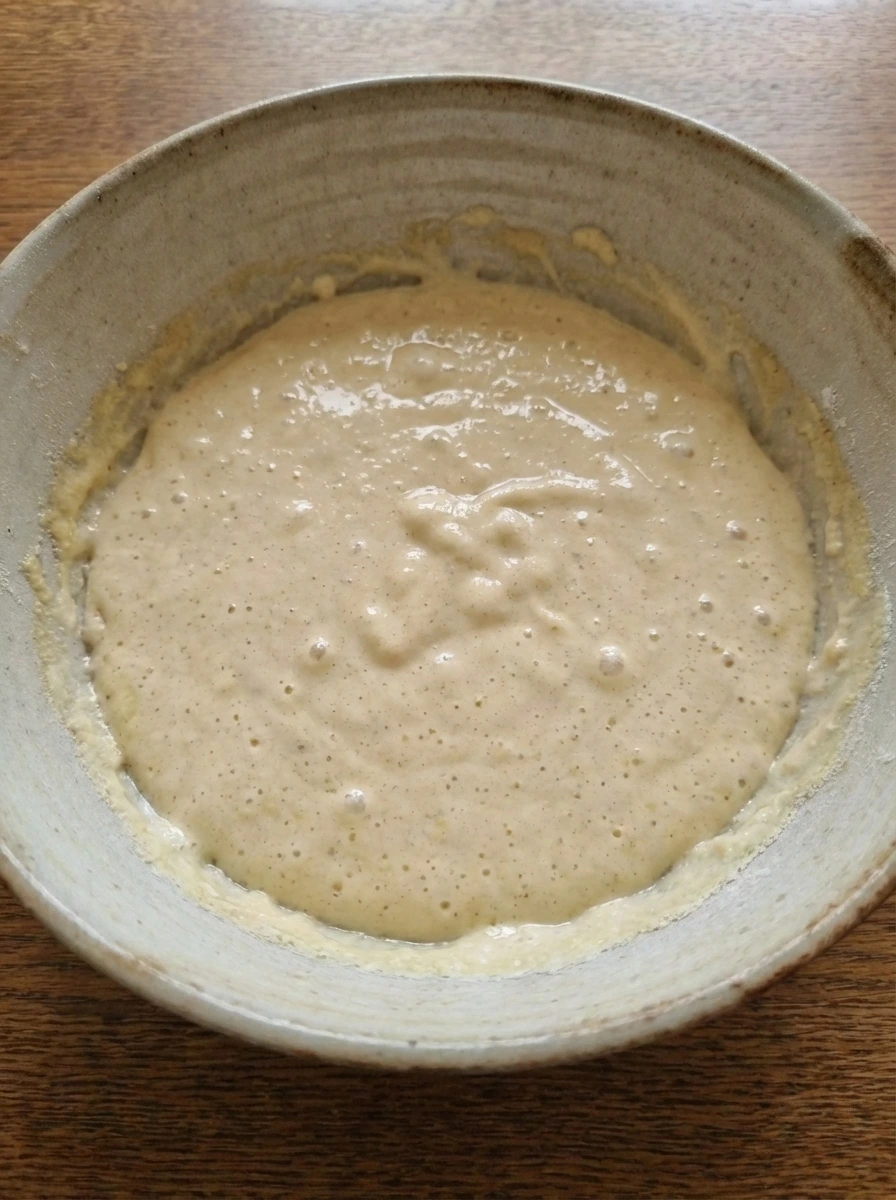
Let the batter sit for several minutes so the flour hydrates and the leavening begins to wake up. The rough surface softens and the batter relaxes into a thicker smoother mass with tiny bubbles rising here and there. This brief resting stage acts like a quiet pause in the process and it gives the pancakes a softer interior once cooked.
Tip: A short rest helps the batter thicken naturally and gives you fluffier pancakes without extra mixing.
Step 5: Pour rough rounds and let them set
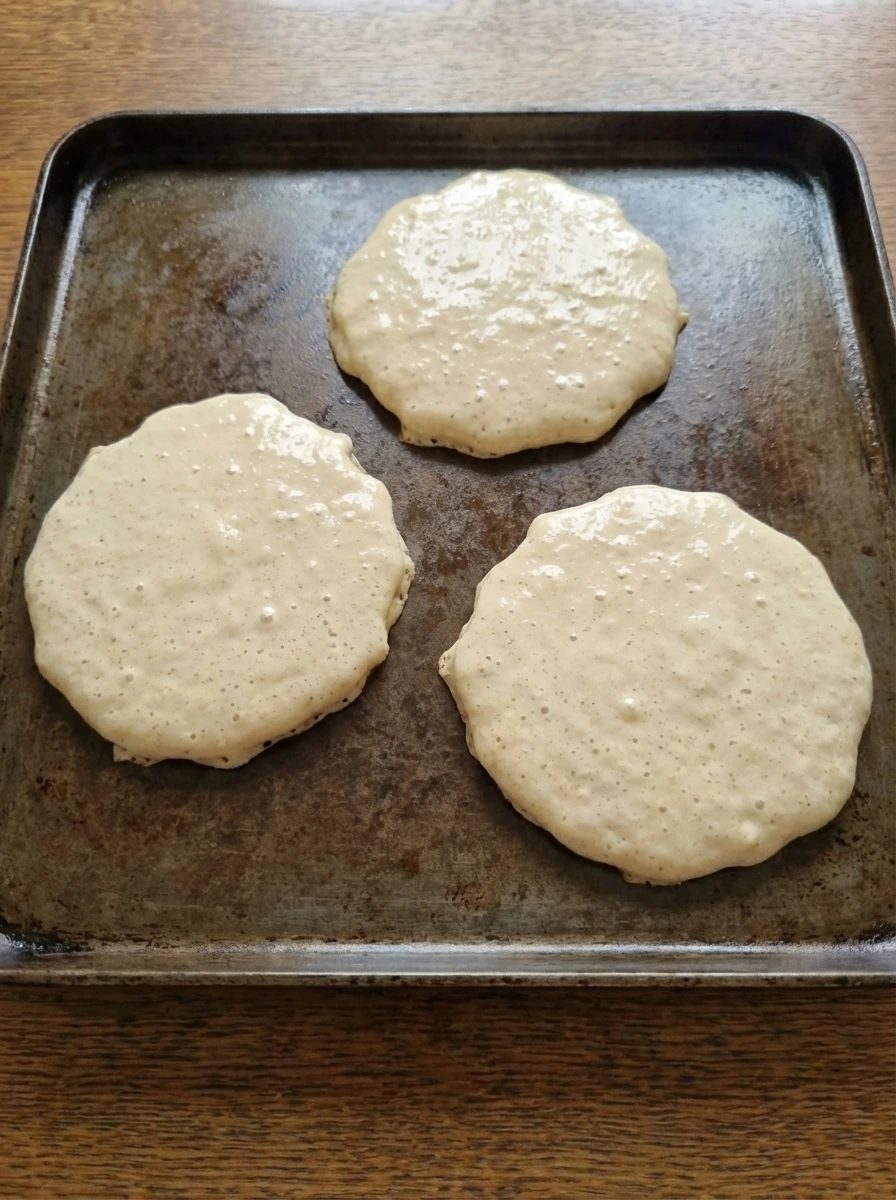
Spoon portions of batter onto a hot flat cooking surface so each round spreads naturally with uneven edges rather than perfect circles. The batter sits pale and glossy at first and then starts to lose its shine as the bottoms begin to set. Tiny bubbles appear across the tops and the edges look slightly drier which shows the pancakes are moving from raw batter toward their first cooked stage.
Tip: Leave a little space between each pancake so they can spread casually without merging together.
Step 6: Flip and cook until lightly browned
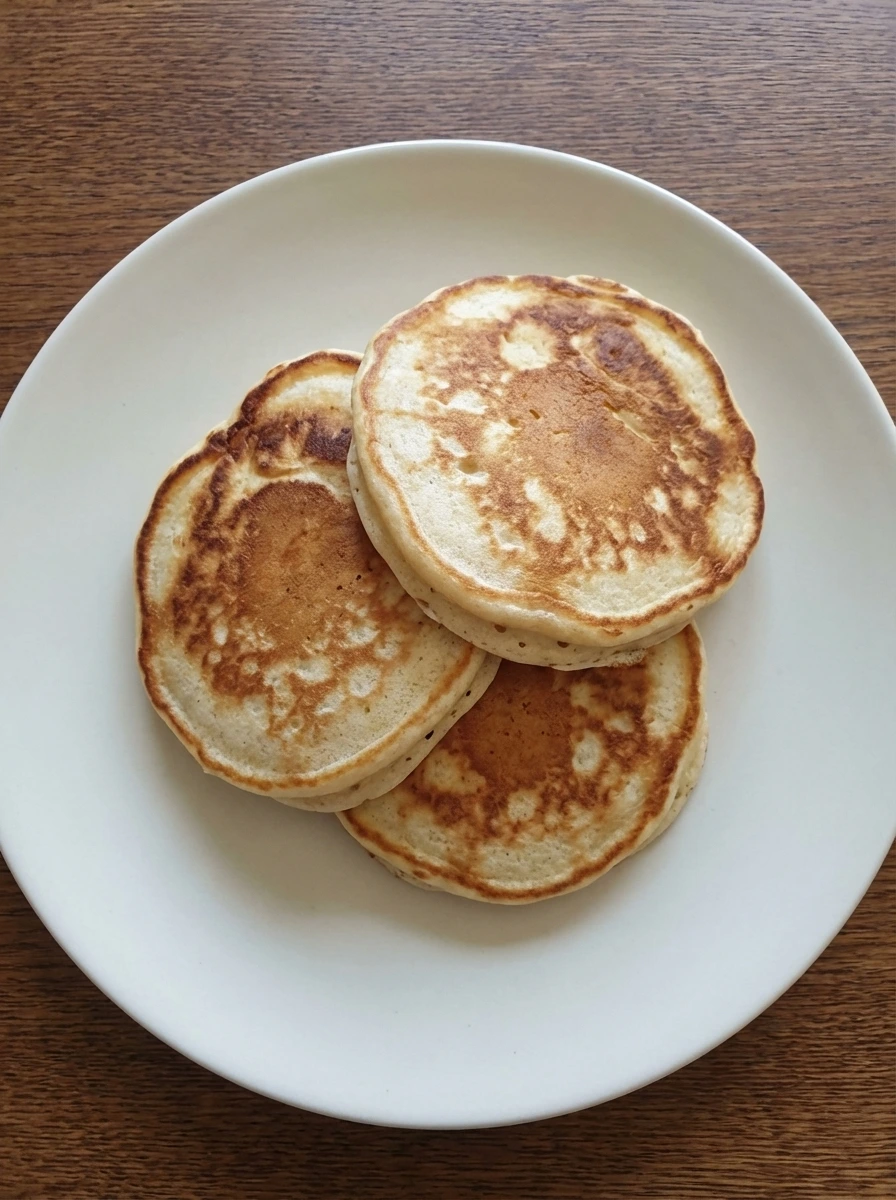
Turn each pancake once the tops are dotted with bubbles and the bottoms release cleanly. The uncooked side meets the heat and quickly changes from glossy pale batter to a soft matte surface while the first side shows gentle golden browning. As they finish cooking the centers puff slightly and the tops and bottoms gain varied golden patches rather than one flat color which gives them that homemade look.
Tip: Flip only once for the best rise and let the second side cook until the centers feel springy.
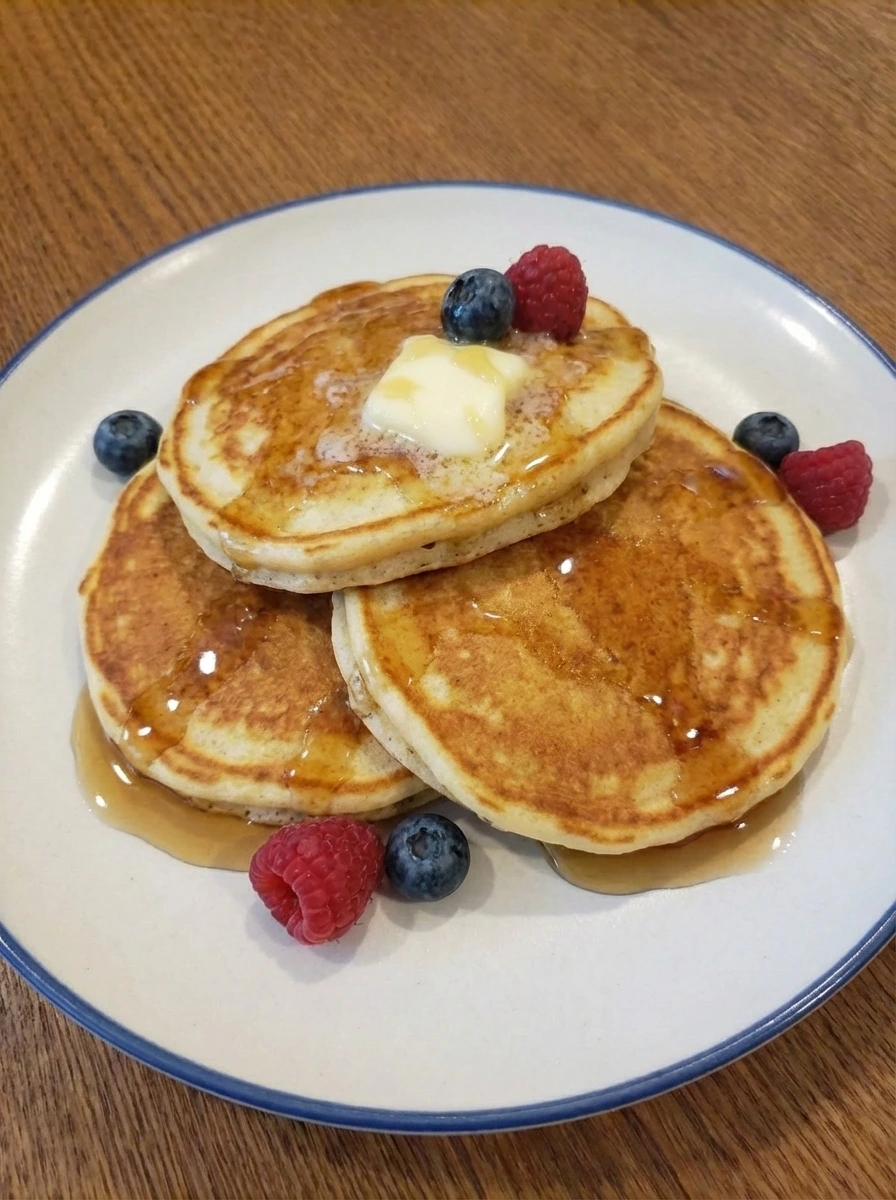
Step 7: Stack and finish with butter and syrup

Arrange the warm pancakes on a plate in a loose stack with slight offsets so the layers are visible. Add butter on top and let it soften and melt unevenly into the hot surfaces while maple syrup is poured over in thin glossy streams that collect more heavily in some spots than others. This finishing step adds shine and richness and the pancakes look softer and more tender as the butter melts into the golden tops.
Tip: Serve the pancakes while warm so the butter melts naturally and the syrup clings to the layers.
Step 8: Plate and garnish for serving
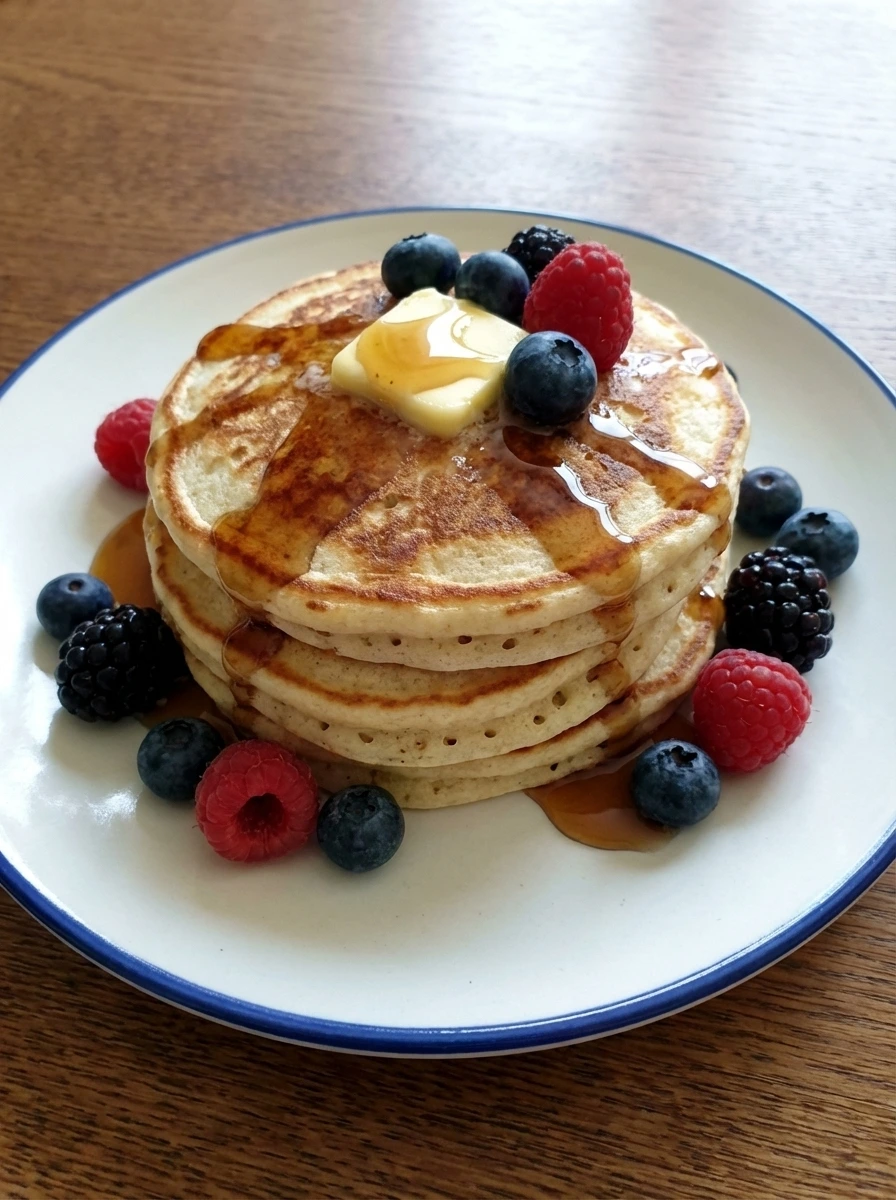
Scatter the berries over and around the stack with natural variation so a few rest on top and others lean against the sides. The finished dish looks fully cooked and inviting with fluffy layers and golden brown surfaces and melting butter and glossy syrup visible in uneven ribbons. The final plate should feel homemade and relaxed rather than perfect with slight variation in color texture and placement across the dish.
Tip: Add the berries at the end so they stay fresh and bright against the warm pancakes.
Pro Tips
- Do not overmix the batter because a few soft lumps help create a lighter pancake.
- Let the batter rest briefly so the flour hydrates and the pancakes cook up fluffier.
- Cook over steady medium heat so the centers cook through before the outsides get too dark.
- Stack the pancakes loosely rather than perfectly so the butter and syrup settle naturally into the layers.
Storage Instructions
Cool the pancakes completely and store them in a covered container in the refrigerator for up to 3 days. Reheat until warm and soft. For longer storage freeze them between layers and warm them straight from frozen when needed.
Frequently Asked Questions
Can I make the batter ahead of time ?
It is better to mix the batter close to cooking time. You can measure the dry ingredients ahead and combine the wet ingredients shortly before mixing everything together.
Why are my pancakes not fluffy ?
The batter may have been mixed too much or the leavening may be old. A short rest and gentle folding help the pancakes rise with a soft airy center.
Can I freeze cooked pancakes ?
Yes you can cool them fully and freeze them in layers. Reheat until warm and soft and then finish with fresh butter and syrup.
What can I serve with these pancakes ?
They are great with berries sliced bananas crispy bacon breakfast sausage or a spoonful of yogurt for an easy brunch plate.
Final Thoughts
This is the kind of recipe I wish I had found years ago. It would have saved me so many rushed breakfast mornings.
But now that I have it I make it all the time and I think you will too. If you enjoyed this check out some of my other popular recipes on the blog.
And leave a comment. I read every single one and it really makes my day.
Print
Fluffy Buttermilk Pancakes
- Total Time: 45 minutes
- Yield: 4 servings 1x
Description
These Fluffy Buttermilk Pancakes are an easy and quick breakfast with simple steps and the best homemade flavor. They are healthy enough for a cozy brunch and flexible enough for meal prep and holiday mornings and potluck brunch tables and casual party spreads. Keep this recipe for easy ideas when you want soft golden pancakes that feel special without making the morning feel busy.
Ingredients
- 2 cups all purpose flour
- 2 tablespoons granulated sugar
- 2 teaspoons baking powder
- 1 teaspoon baking soda
- 1 teaspoon fine sea salt
- 2 large eggs
- 2 cups buttermilk
- 4 tablespoons unsalted butter melted
- 1 teaspoon vanilla extract
- 1 teaspoon neutral oil or melted butter for the batter bowl
- 2 tablespoons butter for finishing
- to serve maple syrup
- 1 cup fresh berries
Instructions
- Add the flour sugar baking powder baking soda and salt into a wide bowl. The pale ingredients sit in loose uneven mounds at first and then become one soft powder as they are lightly stirred together. As the dry mixture blends the color stays creamy white yet the texture looks more even and airy with no large pockets of baking powder or soda left behind.
- In a second bowl whisk the eggs with the buttermilk melted butter and vanilla. At first the yolks streak through the liquid and the butter floats in thin golden ribbons and then the mixture turns smooth and creamy with a pale buttery color. The surface looks lightly glossy and slightly frothy around the edges which shows the wet ingredients are fully combined.
- Pour the creamy wet mixture over the seasoned dry base. The liquid spreads unevenly across the flour and small islands of dry mix remain visible as the batter is folded together. After a few turns the batter looks thick and shaggy with streaks of flour still fading into the mixture. This partial mixing stage keeps the batter from turning heavy and it begins the raw to combined transformation.
- Let the batter sit for several minutes so the flour hydrates and the leavening begins to wake up. The rough surface softens and the batter relaxes into a thicker smoother mass with tiny bubbles rising here and there. This brief resting stage acts like a quiet pause in the process and it gives the pancakes a softer interior once cooked.
- Spoon portions of batter onto a hot flat cooking surface so each round spreads naturally with uneven edges rather than perfect circles. The batter sits pale and glossy at first and then starts to lose its shine as the bottoms begin to set. Tiny bubbles appear across the tops and the edges look slightly drier which shows the pancakes are moving from raw batter toward their first cooked stage.
- Turn each pancake once the tops are dotted with bubbles and the bottoms release cleanly. The uncooked side meets the heat and quickly changes from glossy pale batter to a soft matte surface while the first side shows gentle golden browning. As they finish cooking the centers puff slightly and the tops and bottoms gain varied golden patches rather than one flat color which gives them that homemade look.
- Arrange the warm pancakes on a plate in a loose stack with slight offsets so the layers are visible. Add butter on top and let it soften and melt unevenly into the hot surfaces while maple syrup is poured over in thin glossy streams that collect more heavily in some spots than others. This finishing step adds shine and richness and the pancakes look softer and more tender as the butter melts into the golden tops.
- Scatter the berries over and around the stack with natural variation so a few rest on top and others lean against the sides. The finished dish looks fully cooked and inviting with fluffy layers and golden brown surfaces and melting butter and glossy syrup visible in uneven ribbons. The final plate should feel homemade and relaxed rather than perfect with slight variation in color texture and placement across the dish.
Notes
Pro Tips:
- Do not overmix the batter because a few soft lumps help create a lighter pancake.
- Let the batter rest briefly so the flour hydrates and the pancakes cook up fluffier.
- Cook over steady medium heat so the centers cook through before the outsides get too dark.
- Stack the pancakes loosely rather than perfectly so the butter and syrup settle naturally into the layers.
Storage: Cool the pancakes completely and store them in a covered container in the refrigerator for up to 3 days. Reheat until warm and soft. For longer storage freeze them between layers and warm them straight from frozen when needed.
- Prep Time: 15 minutes
- Cook Time: 30 minutes
- Category: Breakfast
- Cuisine: American
Nutrition
- Serving Size: 1 serving