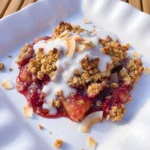
Magnolia Bakery serves one of the best Classic Banana Pudding I have ever tasted. A soft creamy and so delicious dessert with sweet banana slices and tender vanilla wafers. Today I will show how I make my Classic Banana Pudding at home easily just with some easy to find ingredients. Just to know that my Classic Banana Pudding turned out so creamy and so rich almost like the original one.
I really love this dessert. Also I tried the same layering method with shortbread cookies and the result was even better. So I will leave some tasty other variations below you can try using the same ingredients and same process. Usually Classic Banana Pudding is served at family gatherings and Sunday dessert tables and it is so incredible.
I recommend anyone to enjoy it. And if you cannot get your favorite bakery version you can try out my recipe. Also for my recipe I use a homemade custard and a toasted meringue finish. But I recommend chilling it well before serving so the layers can settle and turn even more delicious.
Ingredients
Here’s what I use for this recipe and you can always make substitutions if you prefer.
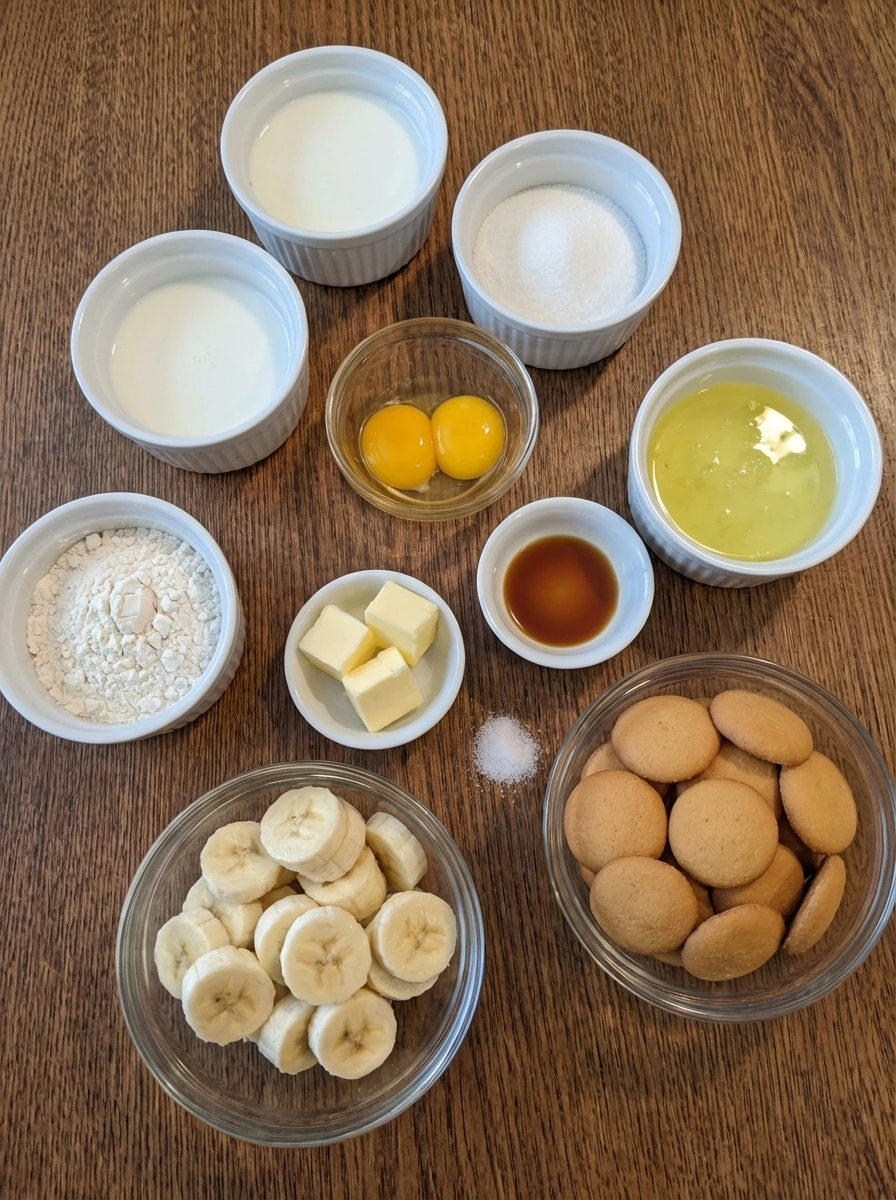
- whole milk: forms the creamy base for the custard
- granulated sugar: sweetens the custard and the meringue
- all purpose flour: thickens the custard
- large eggs: yolks enrich the custard while whites make the topping
- unsalted butter: adds richness and a glossy finish
- vanilla extract: gives warm classic flavor
- fine sea salt: balances sweetness
- ripe bananas: bring soft sweet fruit layers
- vanilla wafers: create tender cookie layers
- cream of tartar: stabilizes the meringue
Tools You’ll Need
- mixing bowl: for combining and layering components
- whisk: for smoothing the custard base
- saucepan: for thickening the custard
- trifle dish or serving dish: for building and presenting the layers
- spatula or spoon: for spreading custard and meringue
Instructions
Step 1: Measure the custard ingredients
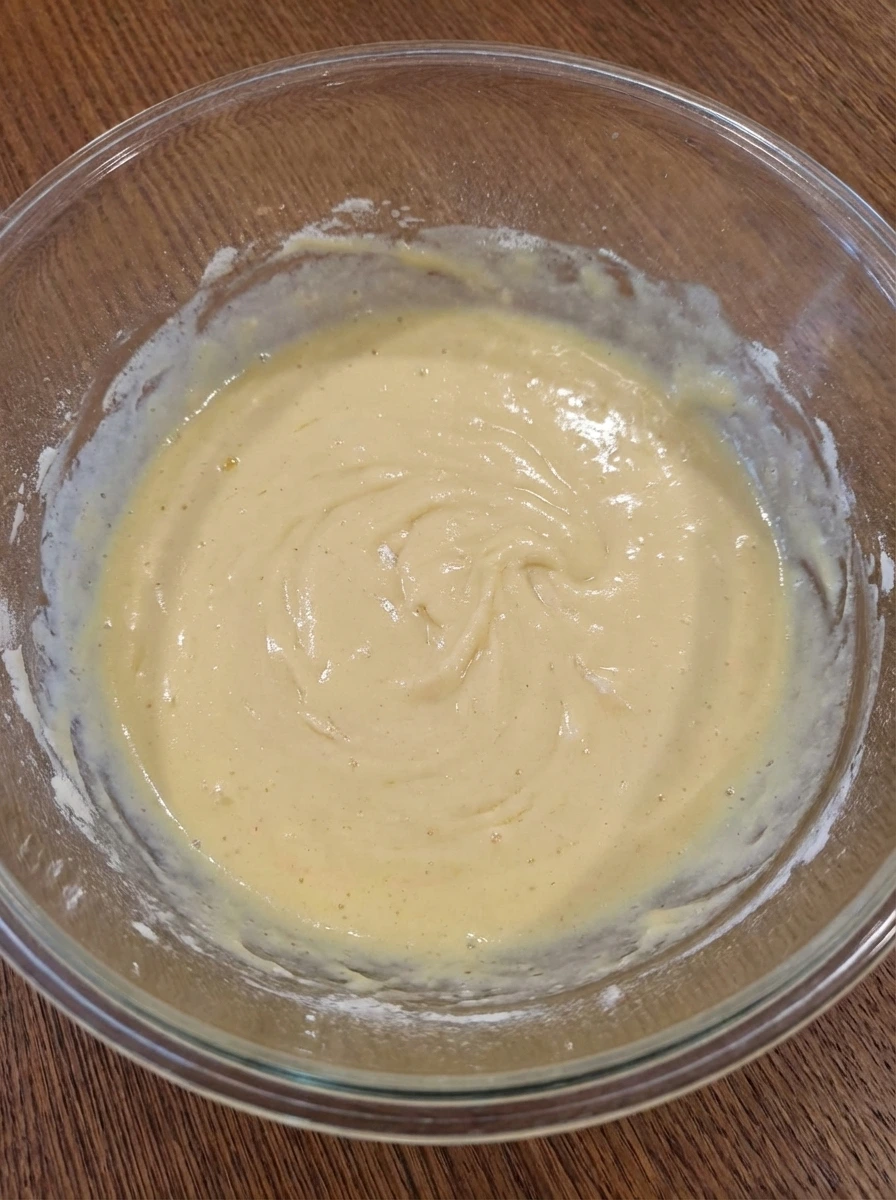
Add the milk sugar flour egg yolks and salt together so the pale ingredients begin as separate parts and then start to blur into one creamy yellow base. The sugar looks grainy at first and the flour leaves soft cloudy streaks before the mixture smooths out. This first stage should still look loose and pourable with a light buttery yellow color. Nothing is thick yet and the surface will show tiny specks and uneven swirls as everything is only just combined.
Tip: Break up any visible flour pockets early so the custard starts smooth.
Step 2: Mix until the custard base turns silky
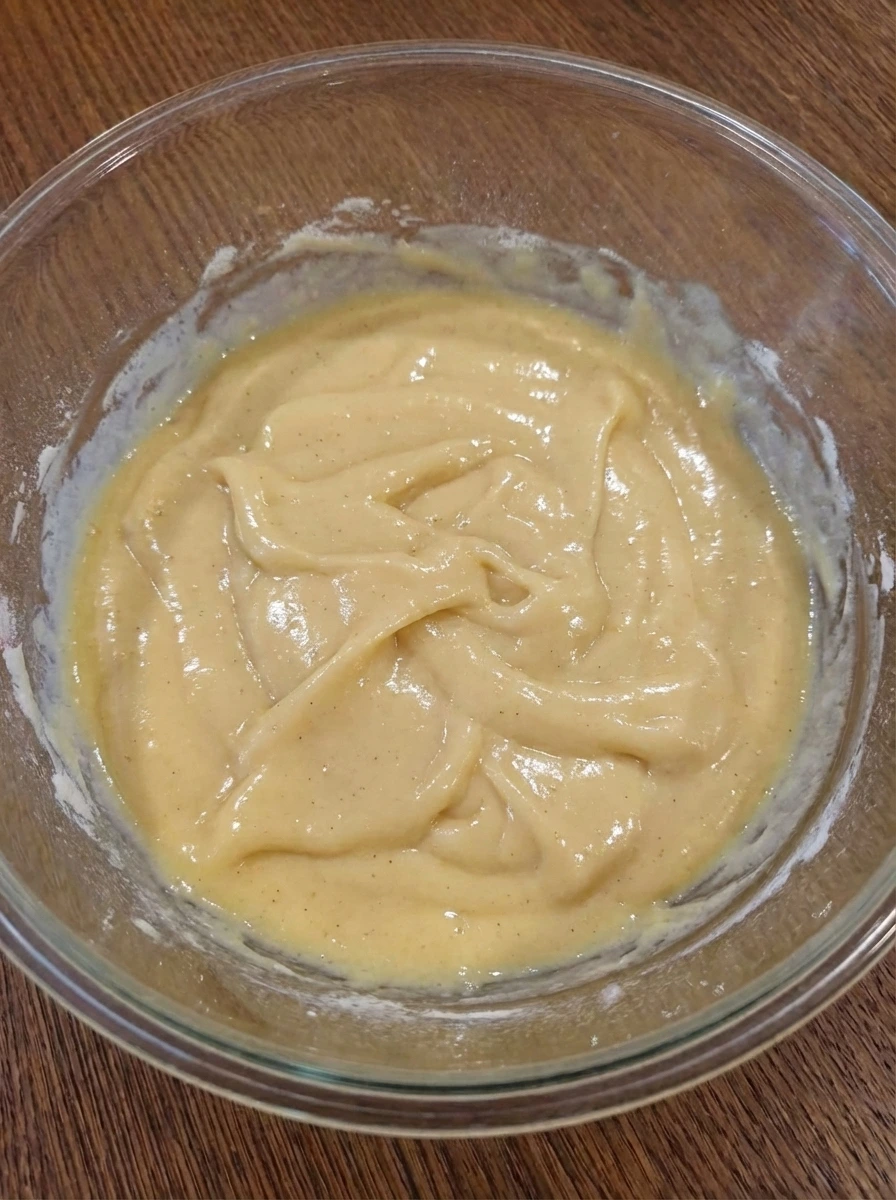
Continue mixing until the grainy look fades and the mixture becomes smoother and more unified. The color deepens slightly to a richer yellow and the surface turns glossy with only a few soft ripples left behind. At this stage the custard base still flows easily yet it looks more cohesive and creamy than before. The raw separated look is gone and the mixture now has a soft silky appearance.
Tip: A fully mixed base should look smooth and lightly glossy before it thickens.
Step 3: Thicken the custard and finish with butter and vanilla
As the mixture cooks it changes from fluid to softly thick and spoonable. The pale yellow base becomes richer and glossier and the ripples hold their shape longer as the sauce thickens. Stir in the butter and vanilla so the custard turns even silkier with a mellow shine. The final look here should be smooth and lush with gentle folds rather than a runny pour. It should feel like a rich pudding base that coats itself unevenly in soft ribbons.
Tip: Stop when the custard looks thick enough to leave soft trails instead of running flat right away.
Step 4: Slice the bananas
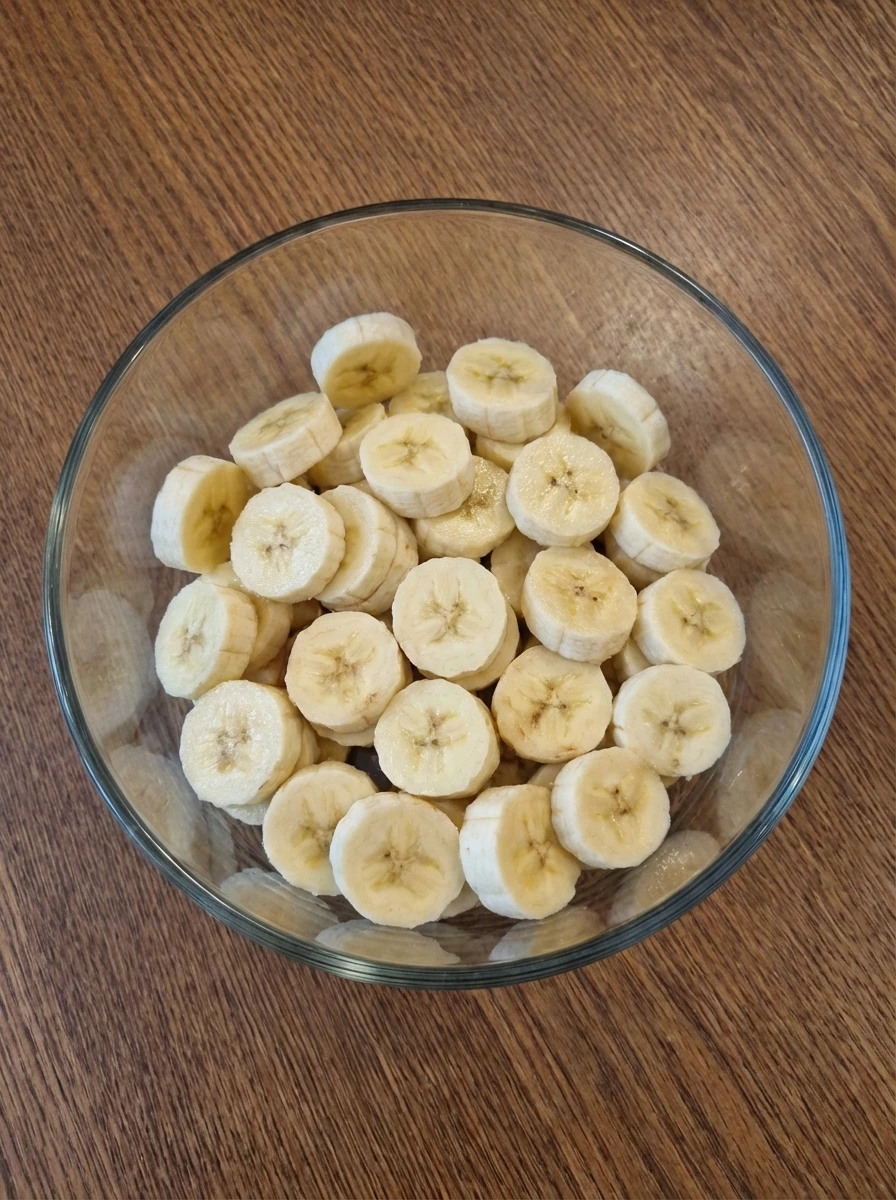
Cut the bananas into coins with slight variation in thickness so the slices look natural and home cut rather than identical. The fresh pieces show creamy centers and pale edges with a soft moist surface. This stage keeps the fruit simple and visible. The slices should look ready to layer with enough variation to make the final dessert feel casual and real.
Tip: Use ripe bananas with yellow skins and a few freckles for the sweetest flavor and softest texture.
Step 5: Start the first layer with wafers and bananas
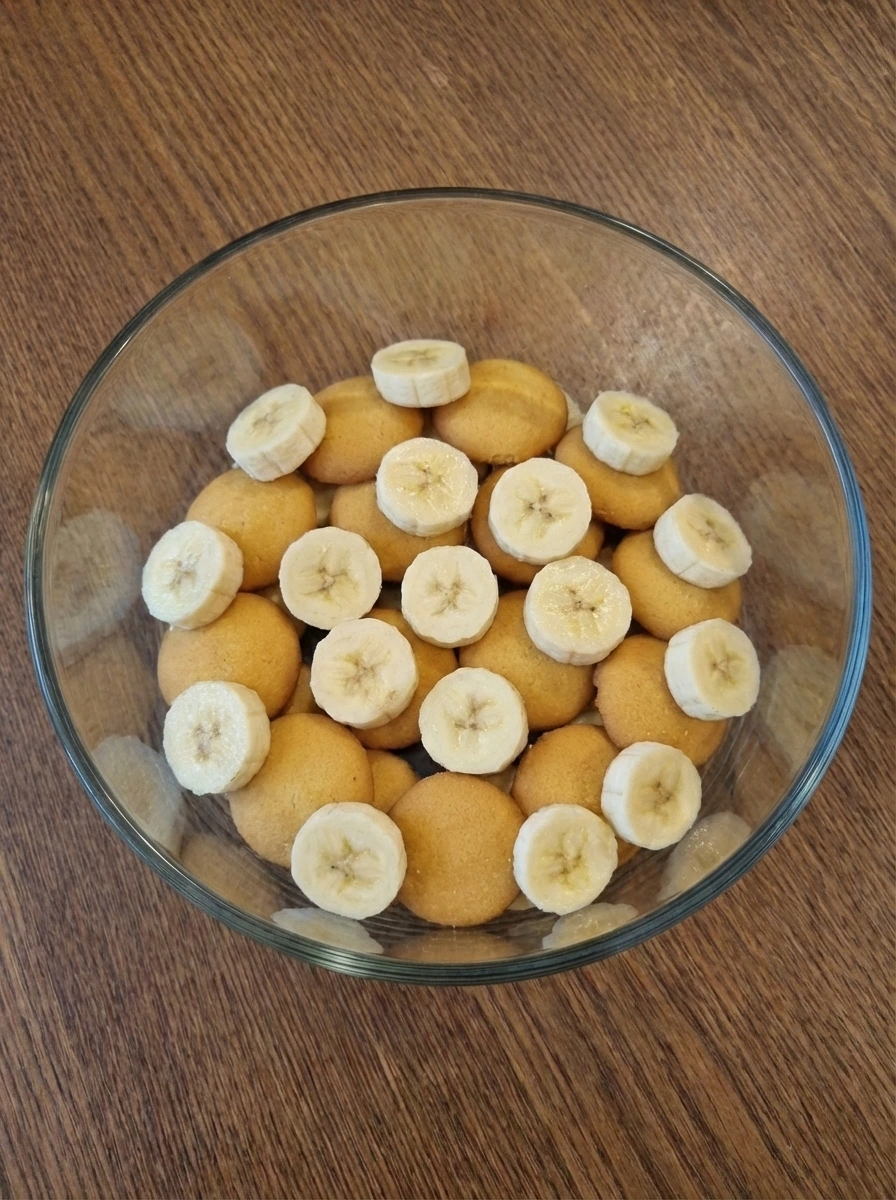
Arrange the vanilla wafers loosely in the dish and scatter the banana slices over them so the pieces overlap naturally. Some cookie edges stay visible while other spots are partially covered by fruit. This layer should look casual and imperfect with little gaps and uneven spacing. The dry wafers and fresh bananas are still clearly separate and the dessert has only just begun to take shape.
Tip: Do not press the layers flat because a loose arrangement helps the pudding settle naturally.
Step 6: Pour over the first layer of warm custard

Spoon and pour the warm custard over the wafers and bananas so the sauce falls unevenly across the surface. Some spots get more coverage while a few wafer edges and banana curves still peek through. The visual change is immediate because the dry cookies start to look coated and slightly softened. The layer becomes glossy and creamy while the fruit looks tucked into the custard instead of sitting sharply on top.
Tip: Leave a few small peaks and valleys in the custard rather than smoothing it perfectly.
Step 7: Build the remaining layers
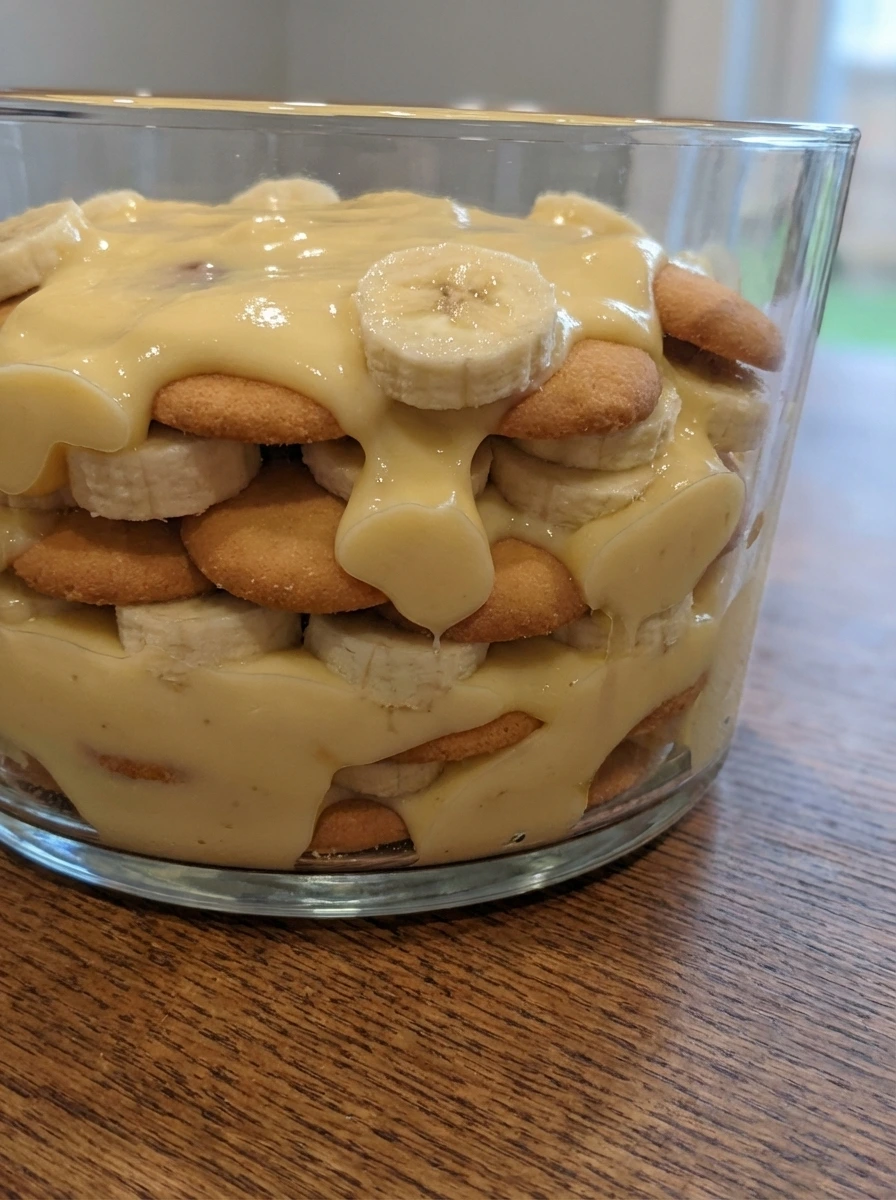
Add more wafers then more banana slices and another layer of custard in the same loose way. The layers stack with a natural homemade look and the custard slips into some spaces more than others. Now the dessert starts to look fuller and more blended. The lower wafers appear more tender and the bananas look softly framed by creamy pale golden pudding all through the dish.
Tip: Keep the layering relaxed so the pudding settles with a soft uneven texture instead of distinct rigid stripes.
Step 8: Whip the meringue until glossy peaks form
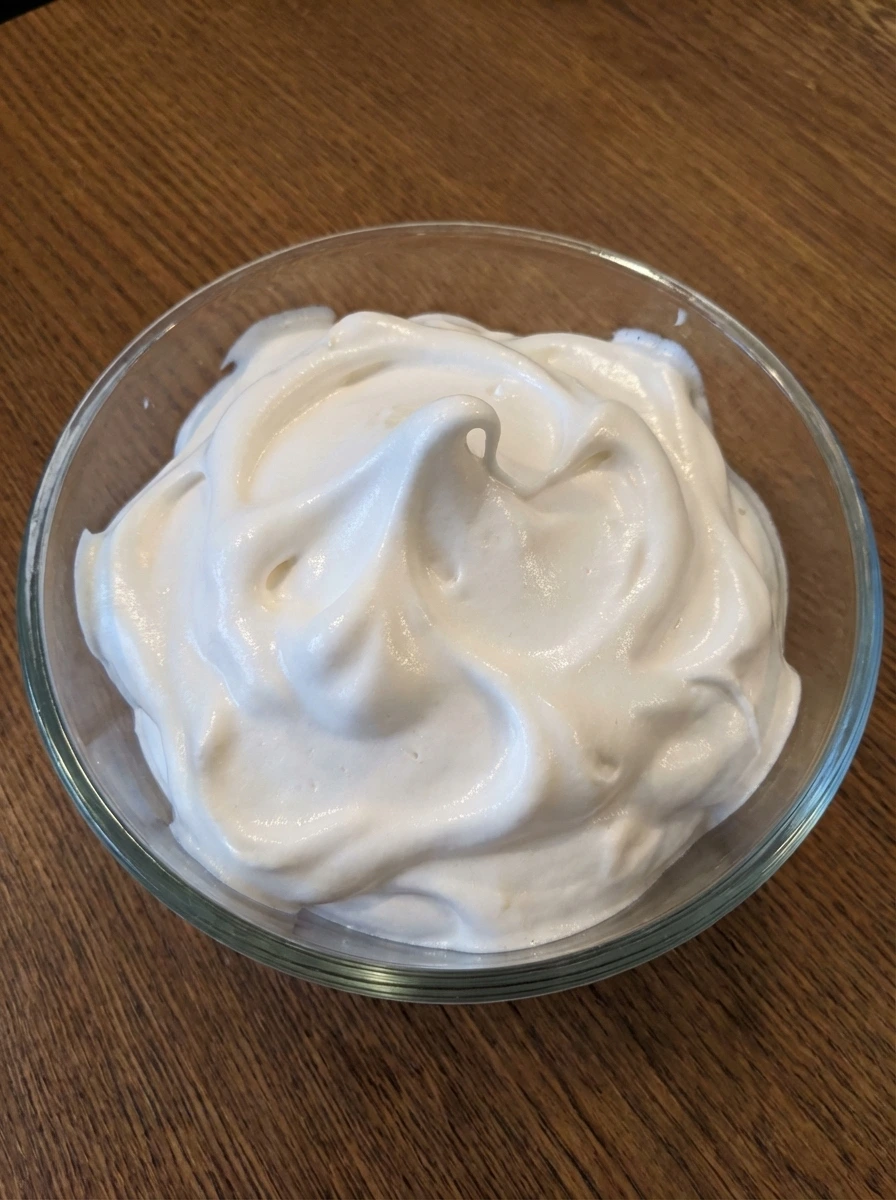
Beat the egg whites with the remaining sugar and cream of tartar until the foamy mixture transforms into a bright glossy topping. It changes from loose bubbles into soft white folds and then into peaks that stand with slight curves at the tips. The finished meringue should look smooth yet airy with a cloudlike body. It is no longer watery or bubbly and instead holds shape in thick white swirls.
Tip: Stop when the peaks stand tall with a gentle bend so the topping stays light and spreads well.
Step 9: Spread the meringue over the pudding
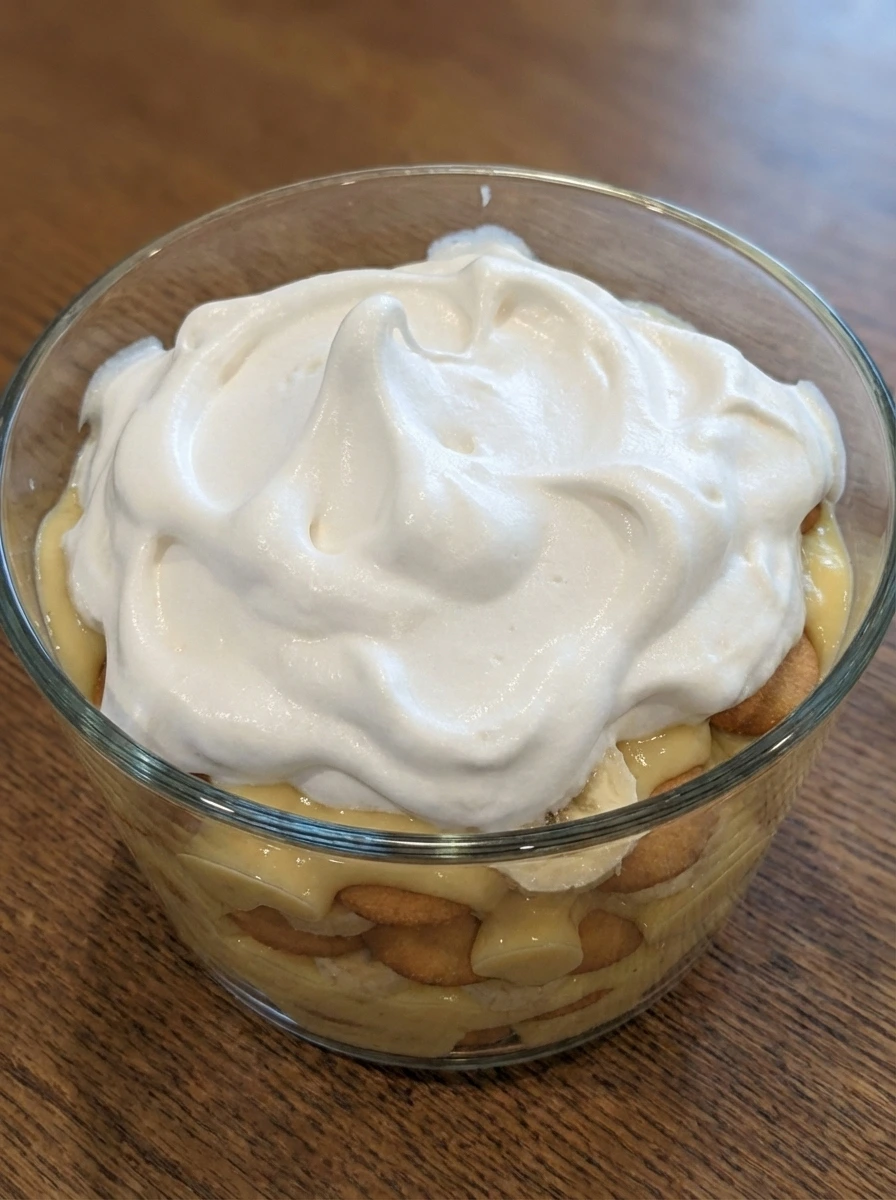
Spoon the meringue over the top of the layered pudding and spread it loosely so the topping forms natural waves and uneven peaks. Some swirls sit higher while other areas are thinner and softer. This stage gives the dessert a fuller and softer top without looking polished. The creamy white layer should feel hand spread and organic with visible movement in the surface.
Tip: Let the meringue touch the edges so it settles into the top layer instead of sliding away.
Step 10: Toast the topping until lightly browned

As the meringue toasts the bright white peaks turn softly golden in random spots while other areas stay creamy white. The surface dries slightly and the tallest ridges pick up the deepest color first. This visual change makes the dessert look fully finished and warm from the oven. The top should show natural variation with uneven browning and a few deeper caramel tinted tips rather than one flat color.
Tip: Look for a mix of golden ridges and white valleys for the most natural homemade finish.
Step 11: Chill until the layers soften and settle
After chilling the custard firms slightly and the vanilla wafers absorb moisture so they lose their dry edges and turn tender. The layered sides look more unified and creamy while the bananas settle into the pudding. The browned meringue remains airy on top yet the dessert underneath looks softer and more spoonable. It now has that classic set texture that slices and scoops with gentle resistance.
Tip: A good chill gives the wafers time to soften without making the dessert watery.
Step 12: Plate and garnish the finished pudding
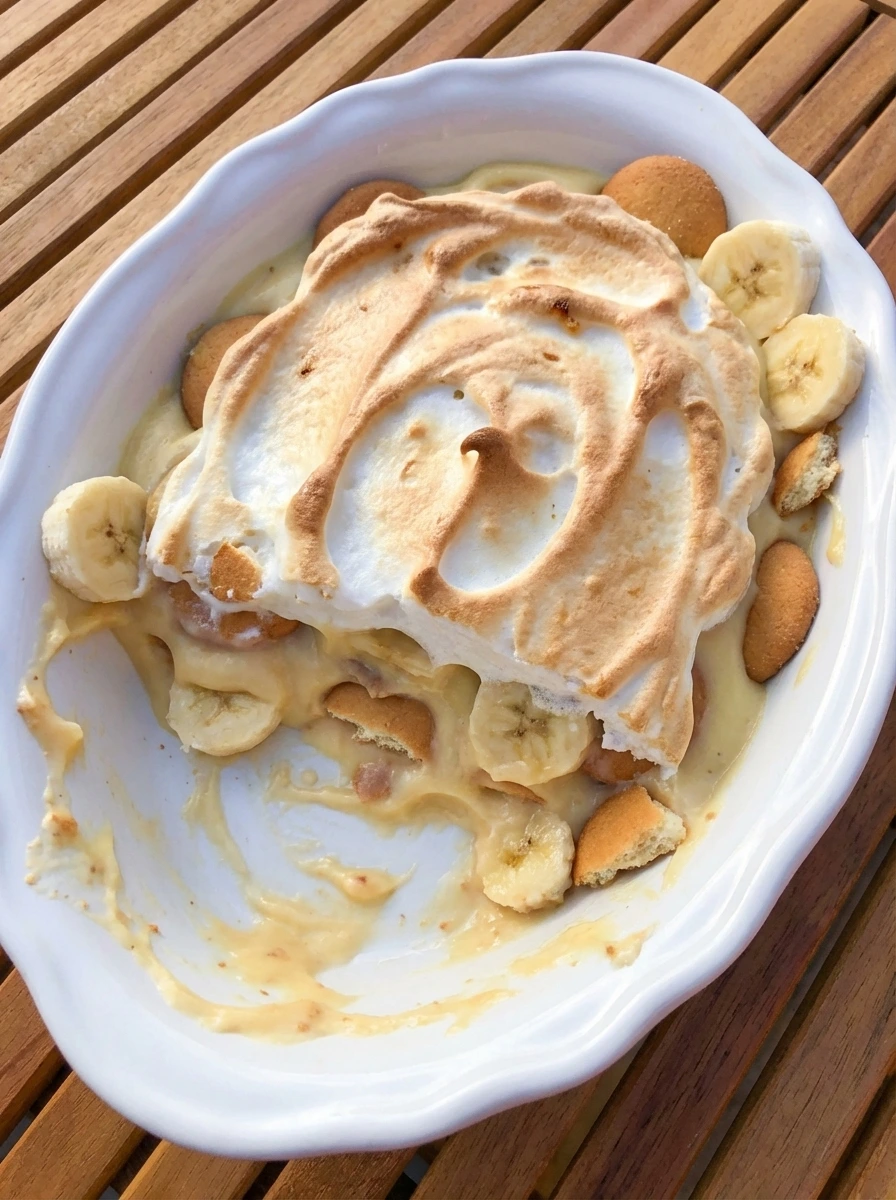
Spoon the fully finished banana pudding into a shallow vintage white oval ceramic serving dish so the creamy layers mound naturally with slight collapse at the edges. Add a few banana slices and a little crushed wafer over the top in a loose scattered way. The final dish should look rich and ready to serve with pale golden custard tender cookies soft fruit and toasted meringue with uneven golden brown peaks. It looks homemade and appetizing with natural variation in color texture and topping placement.
Tip: Serve soon after garnishing so the banana slices stay fresh and bright.
Pro Tips
- Use bananas that are ripe and sweet but not mushy so the slices stay visible in the layers.
- Let the custard cool slightly before layering so it coats the wafers well without turning the bananas too soft too fast.
- Spread the meringue loosely and keep the peaks uneven so the browning looks natural and homemade.
- Chill the pudding long enough for the wafers to soften into the custard while the top still keeps its airy texture.
Storage Instructions
Cover and refrigerate for up to 3 days. The wafers will continue to soften and the banana slices may darken a little over time yet the flavor stays delicious. For the best texture serve it chilled within the first 24 hours.
Frequently Asked Questions
Can I make Classic Banana Pudding ahead of time
Yes and it is even better after a few hours in the fridge because the wafers soften and the custard settles into the layers.
Can I use whipped cream instead of meringue
Yes you can top it with softly whipped cream if you want a no bake finish although the toasted meringue gives the dessert that slight browned top.
How do I keep the bananas from turning dark
Use ripe but firm bananas and layer them into the custard quickly because the creamy pudding helps protect the slices from too much air.
Can I make it in individual portions
Yes and small dessert cups work very well because the layers still look beautiful and the pudding is easy to serve at a party or potluck.
Final Thoughts
So there you go. A recipe that is simple enough for a Tuesday night but good enough to serve at a gathering.
I have made this Classic Banana Pudding more times than I can count and it never disappoints. Save this one and share it with a friend and let me know in the comments if you made any fun changes.
I am always curious to see how people put their own spin on things.
Print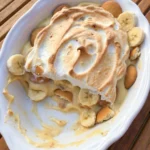
Classic Banana Pudding
- Total Time: 45 minutes
- Yield: 4 servings 1x
Description
This easy Classic Banana Pudding is packed with simple layers of vanilla wafers ripe bananas silky custard and a toasted cloud of meringue for one of the best dessert ideas to share. It feels quick to assemble once the custard is ready and it brings healthy homemade comfort to a holiday potluck brunch party meal prep treat or even a cozy weeknight dinner finish.
Ingredients
- 3 cups whole milk
- 3/4 cup granulated sugar
- 1/3 cup all purpose flour
- 4 separated large eggs
- 2 tablespoons unsalted butter
- 2 teaspoons vanilla extract
- 1/4 teaspoon fine sea salt
- 4 medium ripe bananas
- 11 ounces vanilla wafers
- 1/4 teaspoon cream of tartar
Instructions
- Add the milk sugar flour egg yolks and salt together so the pale ingredients begin as separate parts and then start to blur into one creamy yellow base. The sugar looks grainy at first and the flour leaves soft cloudy streaks before the mixture smooths out. This first stage should still look loose and pourable with a light buttery yellow color. Nothing is thick yet and the surface will show tiny specks and uneven swirls as everything is only just combined.
- Continue mixing until the grainy look fades and the mixture becomes smoother and more unified. The color deepens slightly to a richer yellow and the surface turns glossy with only a few soft ripples left behind. At this stage the custard base still flows easily yet it looks more cohesive and creamy than before. The raw separated look is gone and the mixture now has a soft silky appearance.
- As the mixture cooks it changes from fluid to softly thick and spoonable. The pale yellow base becomes richer and glossier and the ripples hold their shape longer as the sauce thickens. Stir in the butter and vanilla so the custard turns even silkier with a mellow shine. The final look here should be smooth and lush with gentle folds rather than a runny pour. It should feel like a rich pudding base that coats itself unevenly in soft ribbons.
- Cut the bananas into coins with slight variation in thickness so the slices look natural and home cut rather than identical. The fresh pieces show creamy centers and pale edges with a soft moist surface. This stage keeps the fruit simple and visible. The slices should look ready to layer with enough variation to make the final dessert feel casual and real.
- Arrange the vanilla wafers loosely in the dish and scatter the banana slices over them so the pieces overlap naturally. Some cookie edges stay visible while other spots are partially covered by fruit. This layer should look casual and imperfect with little gaps and uneven spacing. The dry wafers and fresh bananas are still clearly separate and the dessert has only just begun to take shape.
- Spoon and pour the warm custard over the wafers and bananas so the sauce falls unevenly across the surface. Some spots get more coverage while a few wafer edges and banana curves still peek through. The visual change is immediate because the dry cookies start to look coated and slightly softened. The layer becomes glossy and creamy while the fruit looks tucked into the custard instead of sitting sharply on top.
- Add more wafers then more banana slices and another layer of custard in the same loose way. The layers stack with a natural homemade look and the custard slips into some spaces more than others. Now the dessert starts to look fuller and more blended. The lower wafers appear more tender and the bananas look softly framed by creamy pale golden pudding all through the dish.
- Beat the egg whites with the remaining sugar and cream of tartar until the foamy mixture transforms into a bright glossy topping. It changes from loose bubbles into soft white folds and then into peaks that stand with slight curves at the tips. The finished meringue should look smooth yet airy with a cloudlike body. It is no longer watery or bubbly and instead holds shape in thick white swirls.
- Spoon the meringue over the top of the layered pudding and spread it loosely so the topping forms natural waves and uneven peaks. Some swirls sit higher while other areas are thinner and softer. This stage gives the dessert a fuller and softer top without looking polished. The creamy white layer should feel hand spread and organic with visible movement in the surface.
- As the meringue toasts the bright white peaks turn softly golden in random spots while other areas stay creamy white. The surface dries slightly and the tallest ridges pick up the deepest color first. This visual change makes the dessert look fully finished and warm from the oven. The top should show natural variation with uneven browning and a few deeper caramel tinted tips rather than one flat color.
- After chilling the custard firms slightly and the vanilla wafers absorb moisture so they lose their dry edges and turn tender. The layered sides look more unified and creamy while the bananas settle into the pudding. The browned meringue remains airy on top yet the dessert underneath looks softer and more spoonable. It now has that classic set texture that slices and scoops with gentle resistance.
- Spoon the fully finished banana pudding into a shallow vintage white oval ceramic serving dish so the creamy layers mound naturally with slight collapse at the edges. Add a few banana slices and a little crushed wafer over the top in a loose scattered way. The final dish should look rich and ready to serve with pale golden custard tender cookies soft fruit and toasted meringue with uneven golden brown peaks. It looks homemade and appetizing with natural variation in color texture and topping placement.
Notes
Pro Tips:
- Use bananas that are ripe and sweet but not mushy so the slices stay visible in the layers.
- Let the custard cool slightly before layering so it coats the wafers well without turning the bananas too soft too fast.
- Spread the meringue loosely and keep the peaks uneven so the browning looks natural and homemade.
- Chill the pudding long enough for the wafers to soften into the custard while the top still keeps its airy texture.
Storage: Cover and refrigerate for up to 3 days. The wafers will continue to soften and the banana slices may darken a little over time yet the flavor stays delicious. For the best texture serve it chilled within the first 24 hours.
- Prep Time: 15 minutes
- Cook Time: 30 minutes
- Category: Dessert
- Cuisine: American
Nutrition
- Serving Size: 1 serving