You guys! When my mom tasted this recipe, she said…” I think that’s one of the best things you’ve ever done”! I have to say, it’s one of my top five favorites! A Saturday morning experiment turned into the best Soft Peanut Butter Cookies ever!

They have the same texture as a bakery-style peanut butter cookie, but they’re made with simple pantry ingredients, and they’re soft, rich, and full of classic peanut butter flavor. These cookies are sweetened with brown sugar and granulated sugar, and their base is all-purpose flour.
I think you all know I’m a chocolate lover, I already tasted Peanut Butter Chocolate Marble Muffins and so many chocolate desserts before, I rarely love a recipe that doesn’t have chocolate in the name, but these are just to die for! The recipe makes 16 cookies, I typically like to make things in smaller batches since I do so much baking, but if you have a bigger group or want to make more, you can double the batch and make 32!
These cookies can be a dessert, or you can pair them with some fresh fruit and coffee for a tasty breakfast treat. They’re also great for meal prep, if you want to make a large batch, store them in the freezer, and take them out for snacks and sweet cravings during the week!
Ingredients
Here’s what I use for this recipe and you can always make substitutions if you prefer.
- creamy peanut butter: This gives the cookies their rich flavor, tender texture, and signature softness.
- unsalted butter, softened: Softened butter helps create a smooth dough and a soft, delicate crumb.
- light brown sugar: Brown sugar adds moisture and keeps the cookies soft after cooling.
- granulated sugar: This balances the sweetness and helps the cookies hold their shape.
- large egg: The egg binds the dough and gives the cookies structure.
- vanilla extract: Vanilla rounds out the peanut butter flavor with warm sweetness.
- all-purpose flour: Flour gives the dough body and turns the mixture into scoopable cookie dough.
- baking soda: Baking soda helps the cookies puff slightly and stay tender.
- baking powder: A small amount of baking powder supports a lighter, softer texture.
- salt: Salt sharpens the peanut butter flavor and balances the sweetness.
- granulated sugar for rolling: Rolling the dough in sugar adds a delicate sparkle and light exterior crunch.
Tools You’ll Need
- mixing bowls: Use one for dry ingredients and one for the peanut butter mixture.
- whisk: Helpful for evenly blending the dry ingredients.
- hand mixer or sturdy spoon: Use either to mix the dough until smooth.
- measuring cups and spoons: Accurate measuring keeps the cookies soft and balanced.
- cookie scoop: Makes evenly sized dough portions.
- fork: Creates the classic crisscross pattern.
- baking sheet or tray: Needed for arranging the cookies before and after baking.
Instructions
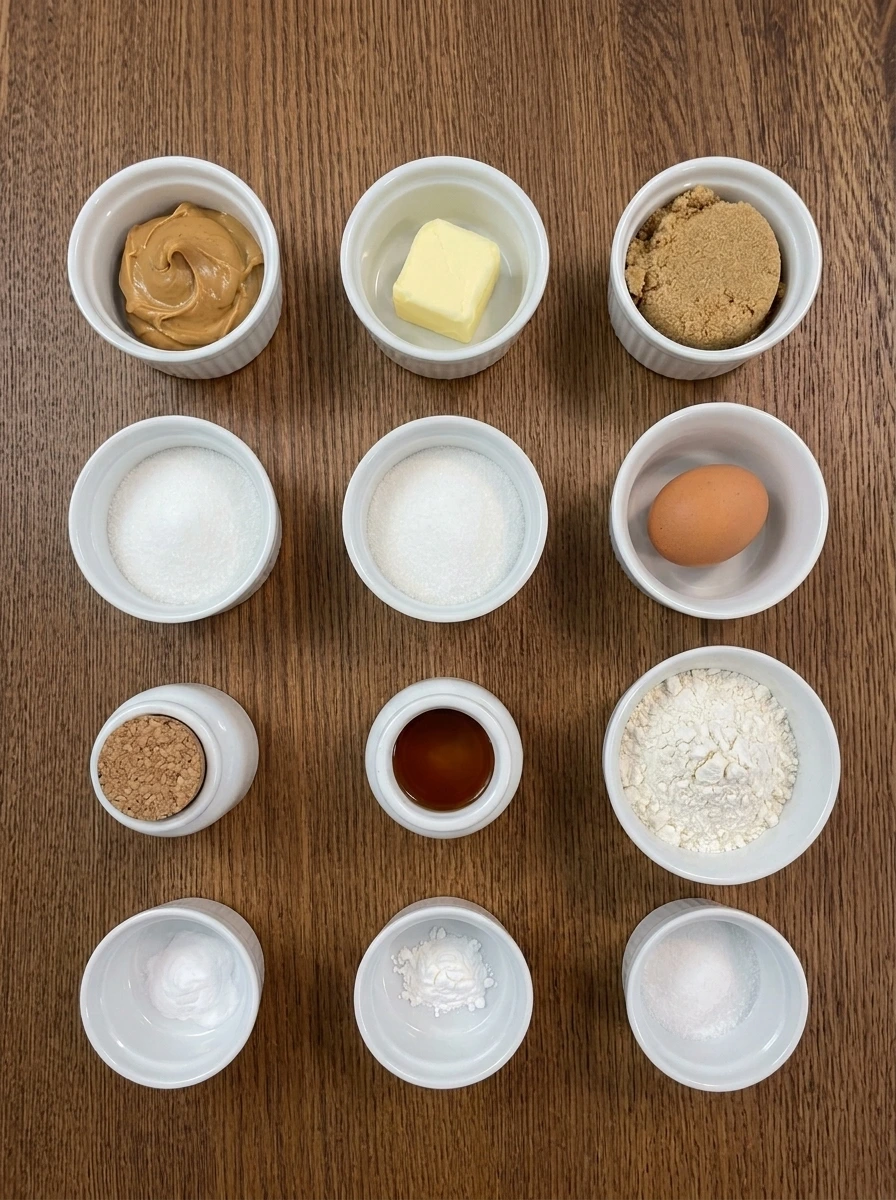
Step 1: Measure the ingredients
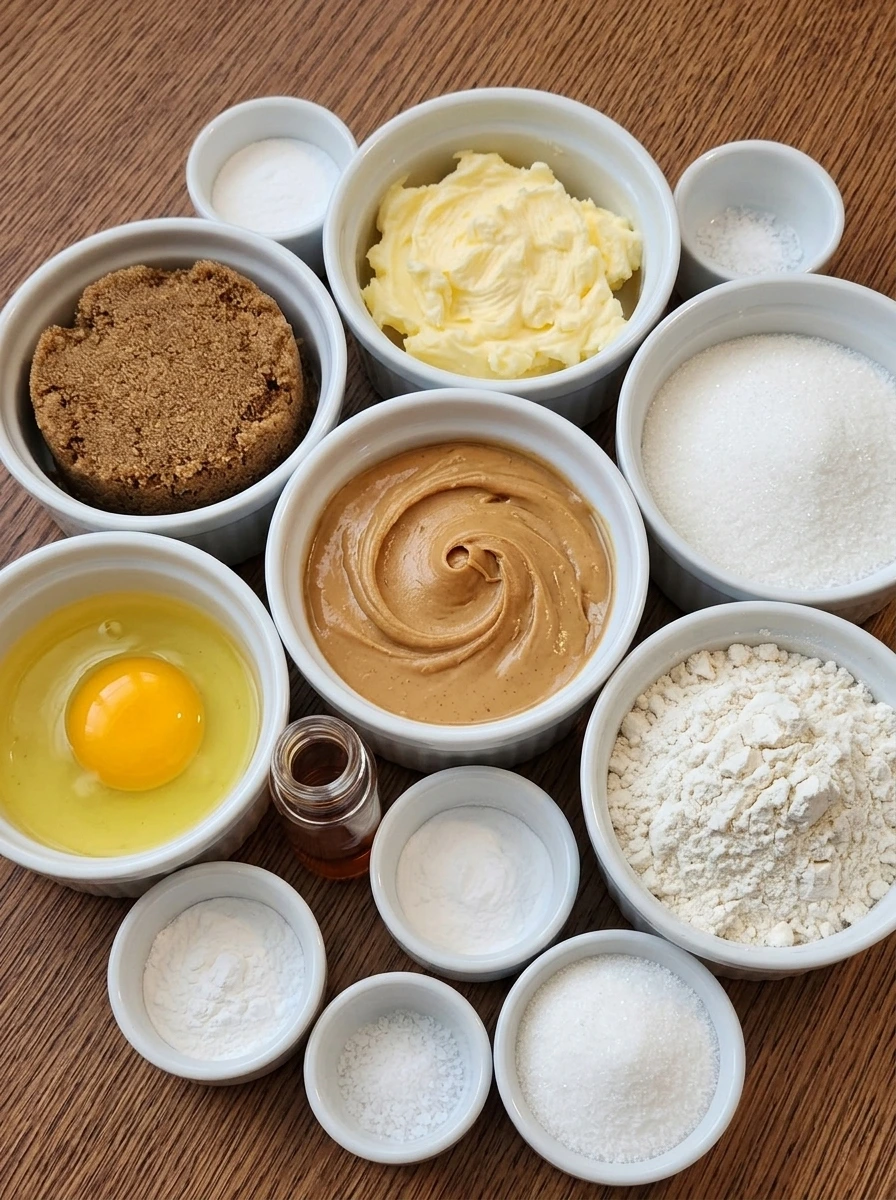
Start by measuring every ingredient into separate containers so the dough comes together smoothly once you begin mixing. You should see creamy peanut butter, softened butter, both sugars, flour, leavening, salt, vanilla, the egg, and the extra sugar for rolling all portioned and ready. At this stage, nothing has been mixed yet. The ingredients are still in their raw state, with the peanut butter thick and glossy, the butter soft and pale, and the dry ingredients light and powdery in their own bowls.
Tip: Having everything measured first makes the dough easier to mix without overworking it.
Step 2: Whisk the dry ingredients
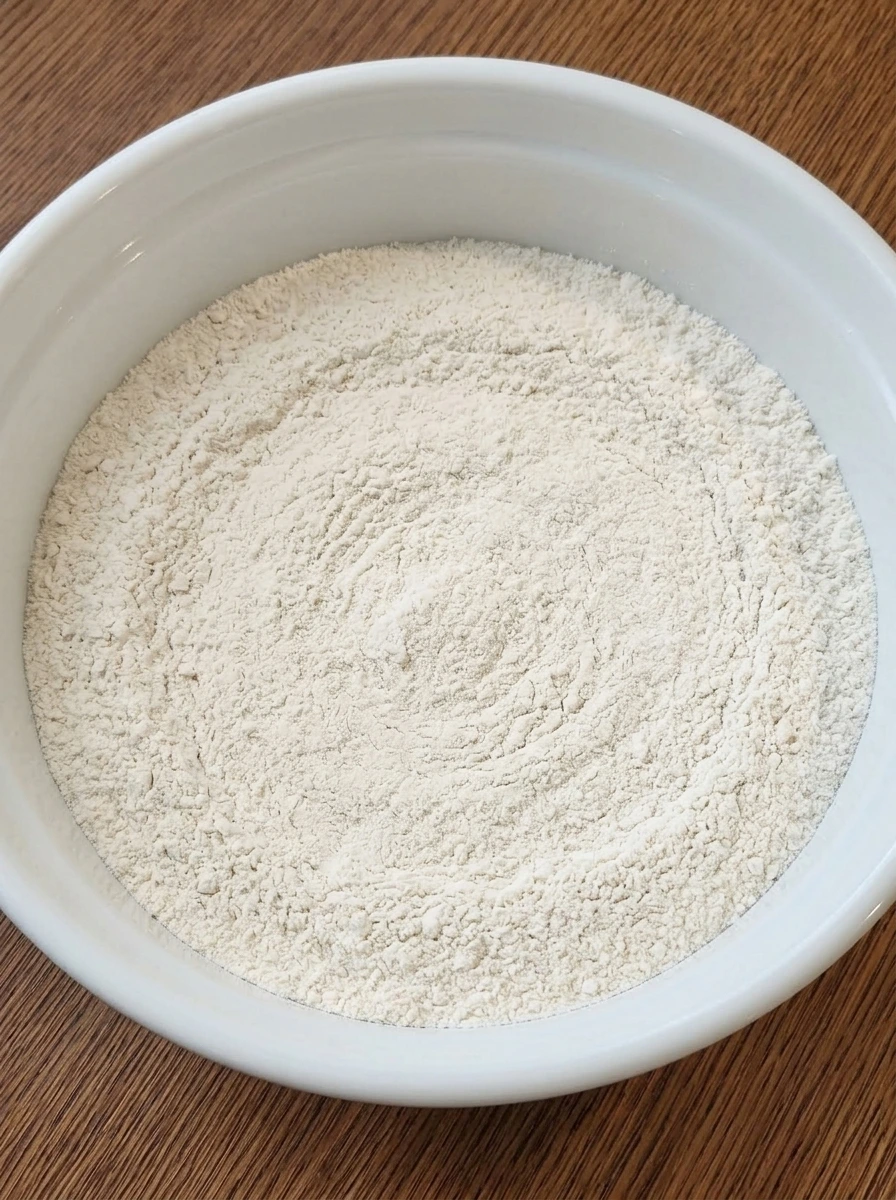
Add the flour, baking soda, baking powder, and salt to a white mixing bowl and whisk until everything looks evenly blended. The mixture should become uniform in color with no visible streaks of baking soda or baking powder. This is still a completely raw stage. The dry mix remains loose, soft, and powdery, with a pale off-white color and a fine, fluffy texture.
Tip: Whisk well so the leavening is evenly distributed through the flour.
Step 3: Mix the peanut butter, butter, and sugars
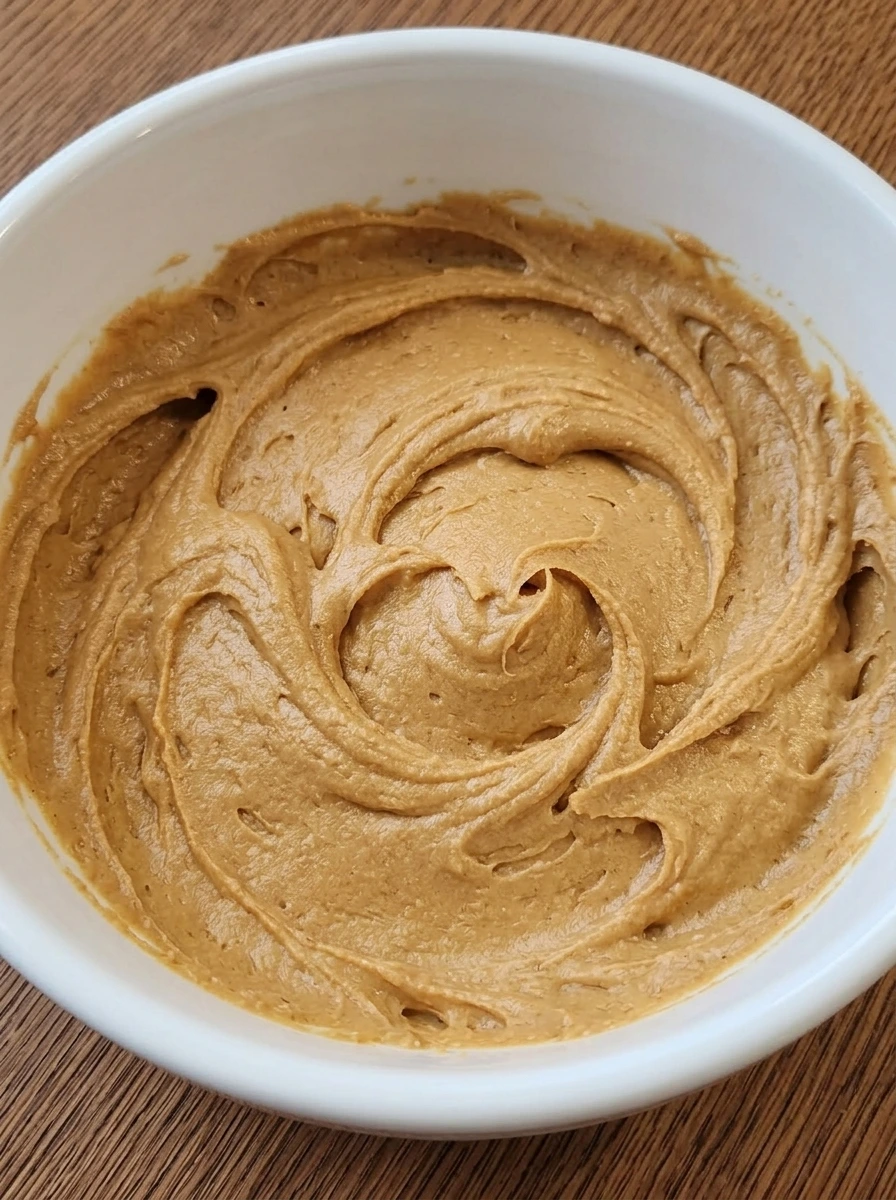
In another white mixing bowl, combine the creamy peanut butter, softened butter, brown sugar, and granulated sugar. Mix until the mixture looks thick, smooth, and fluffy, with the sugar fully worked into the peanut butter and butter. Visually, the mixture changes from separate ingredients into a creamy tan base. It should look soft and spreadable with a slightly whipped texture and no visible chunks of butter.
Tip: Use softened butter so the mixture turns smooth instead of lumpy.
Step 4: Add the egg and vanilla
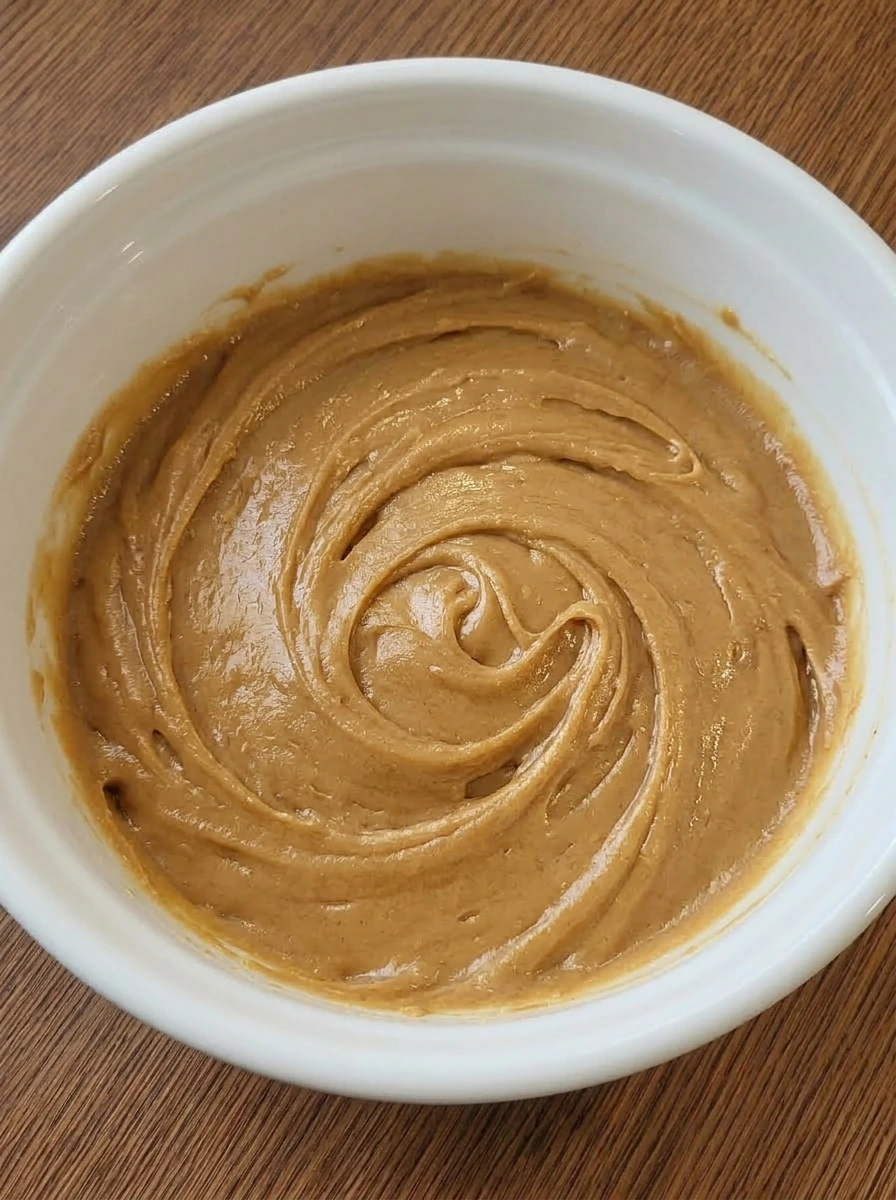
Add the egg and vanilla to the peanut butter mixture and stir until fully incorporated. The mixture should become silkier and looser, with a glossy finish and a more even tan color throughout. Once mixed, the bowl should hold a smooth, creamy batter-like base that looks rich and cohesive. There should be no visible streaks of egg left in the mixture.
Tip: Scrape the sides of the bowl so the egg blends in evenly.
Step 5: Combine the wet and dry mixtures
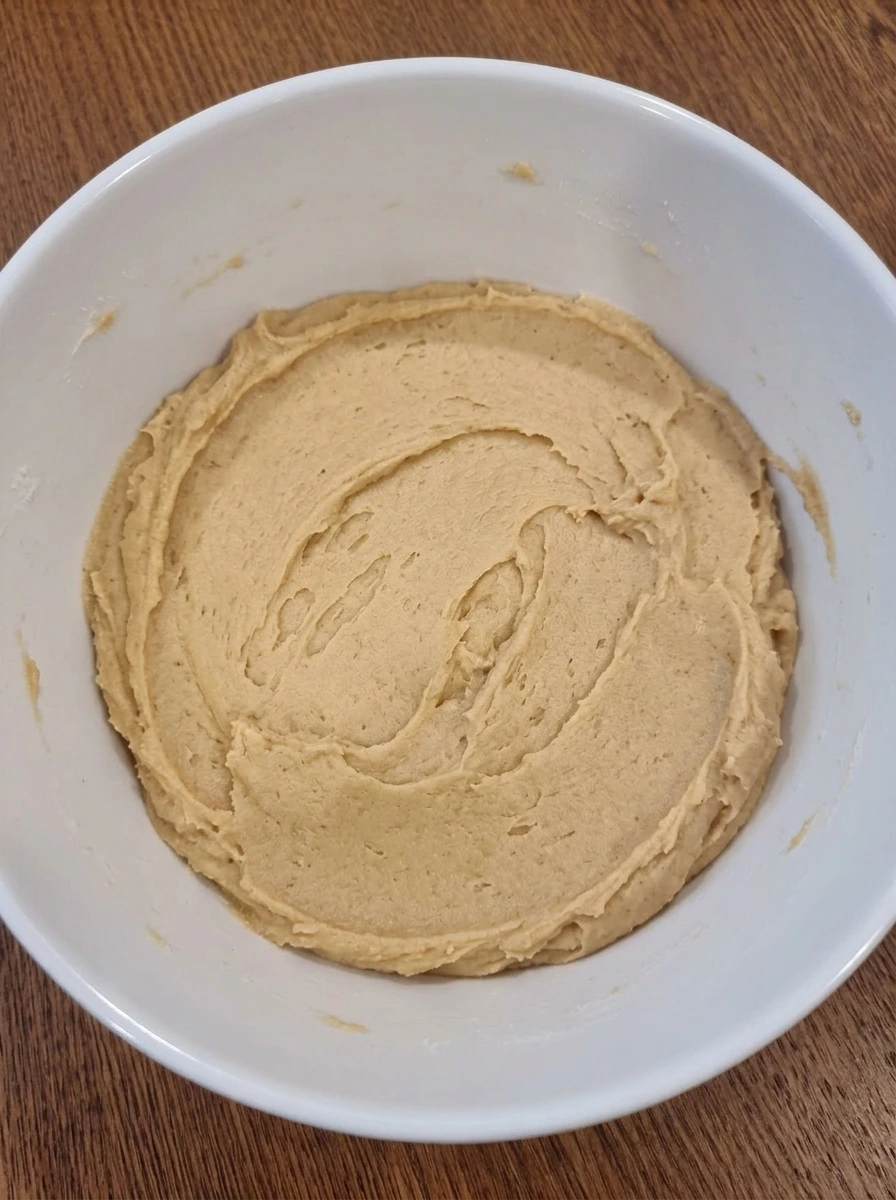
Add the dry ingredients to the peanut butter mixture and stir until a soft dough forms. The dough should look thicker and less glossy, with a dense but tender texture that holds its shape when pressed. By the end of this step, the mixture has clearly changed from creamy to dough-like. It should be evenly blended, pale golden tan, and free of dry flour pockets.
Tip: Stop mixing as soon as the flour disappears to keep the cookies tender.
Step 6: Portion and roll the dough
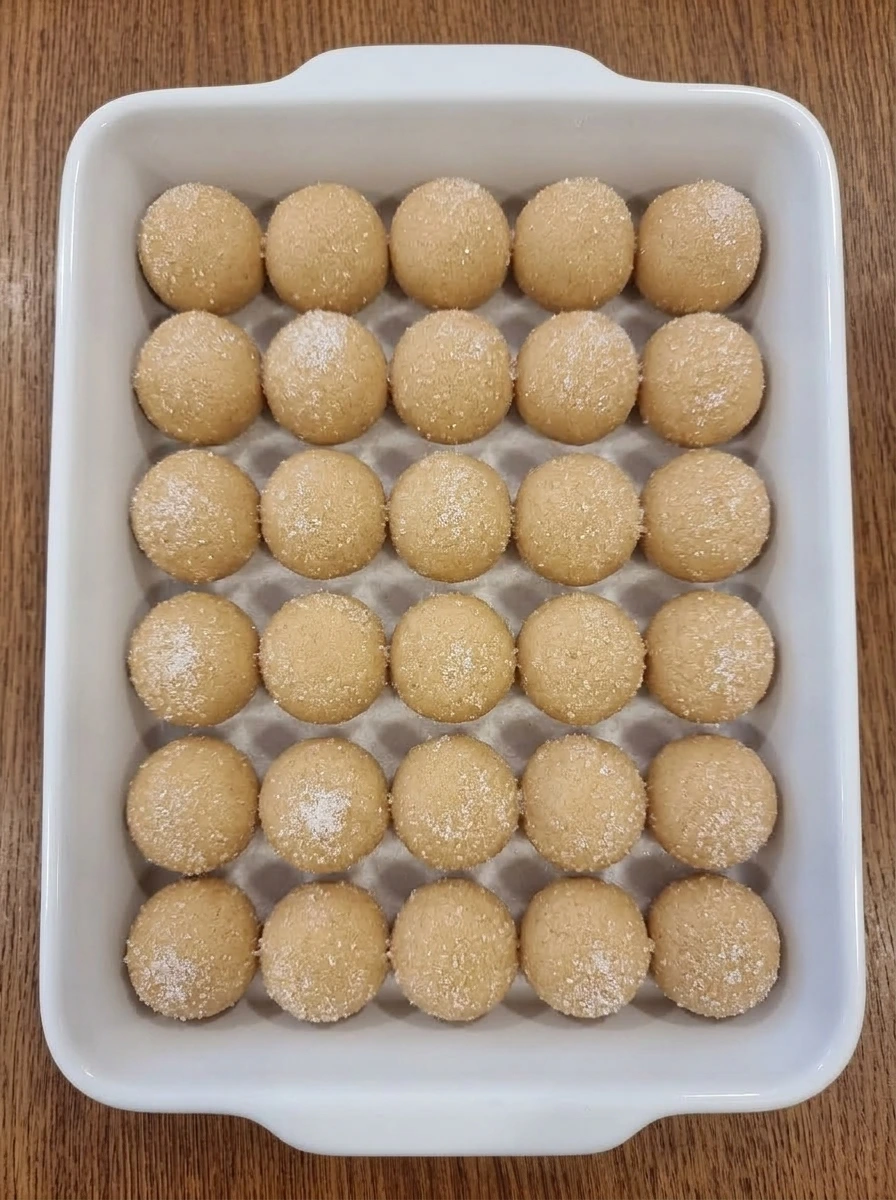
Scoop the dough into even portions, then roll each one into a smooth ball. Roll the balls lightly in the extra granulated sugar so each piece has a thin sparkling coating. At this stage, the dough is still completely raw and soft. The balls should look round, uniform, and slightly glossy from the sugar on the outside.
Tip: Use a cookie scoop for evenly sized cookies that bake at the same rate.
Step 7: Shape the cookies with a crisscross pattern
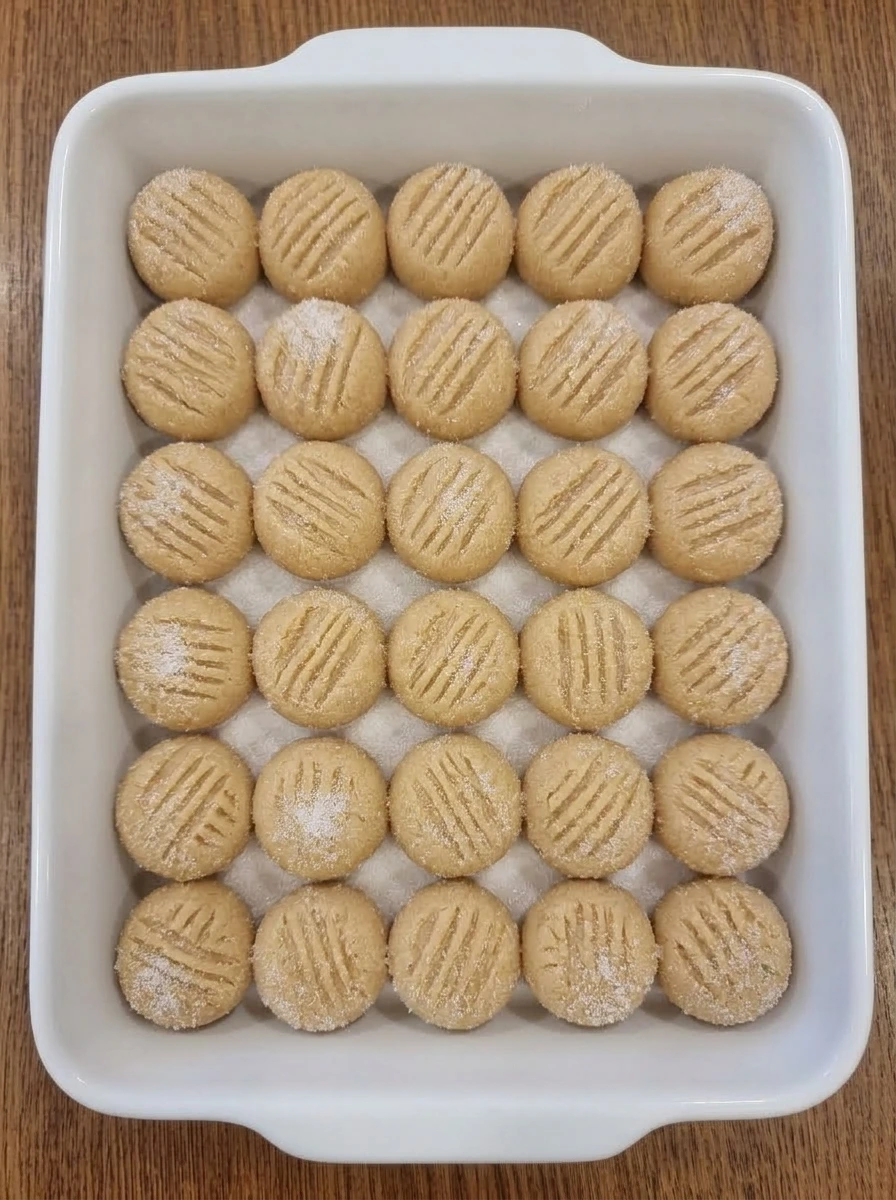
Arrange the dough balls with space between them and press each one gently with a fork in one direction, then again in the opposite direction. This creates the classic crisscross top while flattening the dough into thick cookie rounds. The cookies are still raw here, but their final shape is now visible. Each piece should look slightly flattened with defined ridges across the top and tidy rounded edges.
Tip: Dip the fork in a little sugar if it starts sticking to the dough.
Step 8: Cool the baked cookies
After baking, let the cookies rest until they are no longer fragile and the tops settle. The cookies should look lightly golden at the edges, softly puffed in the center, and slightly crinkled around the fork marks. As they cool, the texture becomes more set while still looking tender. They remain thick and soft, with a smooth peanut butter color and a delicate sugar finish on top.
Tip: Let the cookies cool fully before stacking so they keep their soft shape.
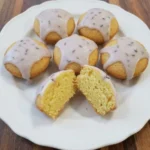
Step 9: Plate and serve the cookies
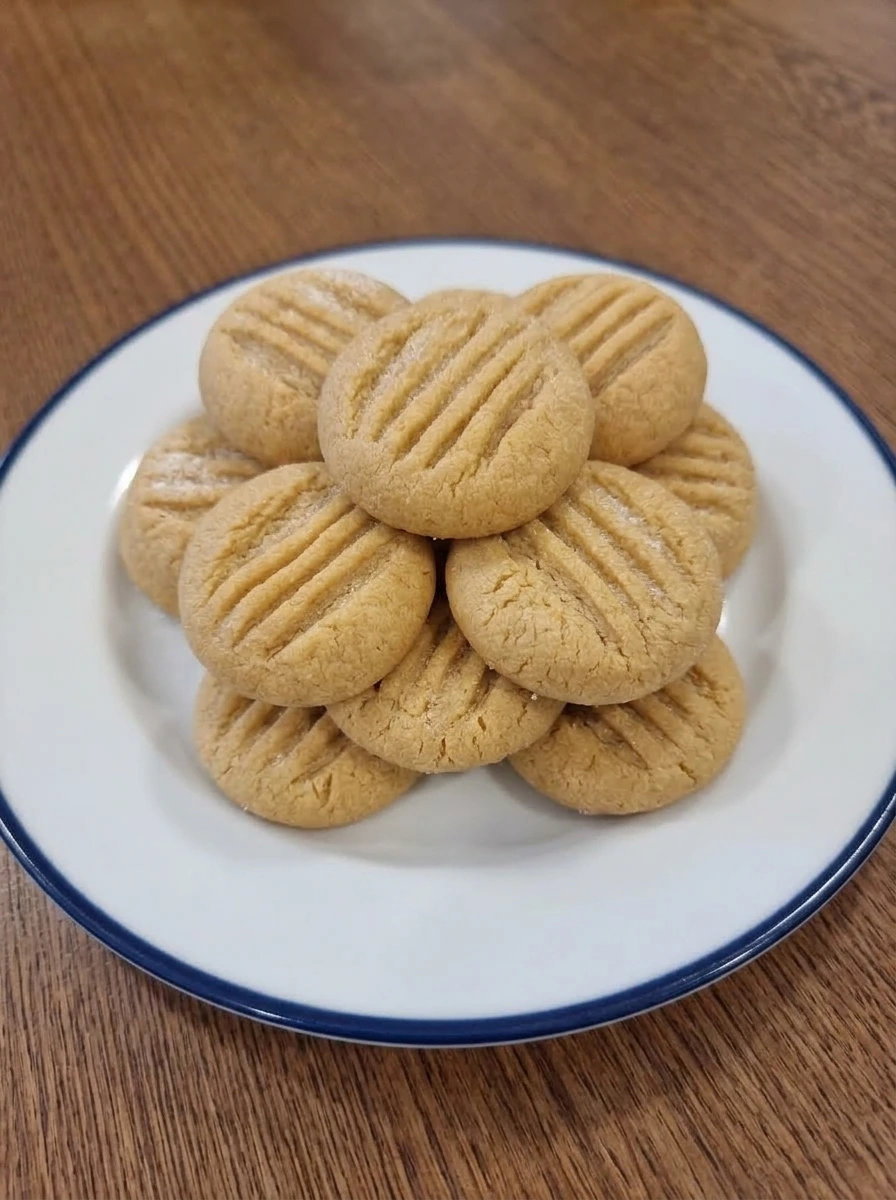
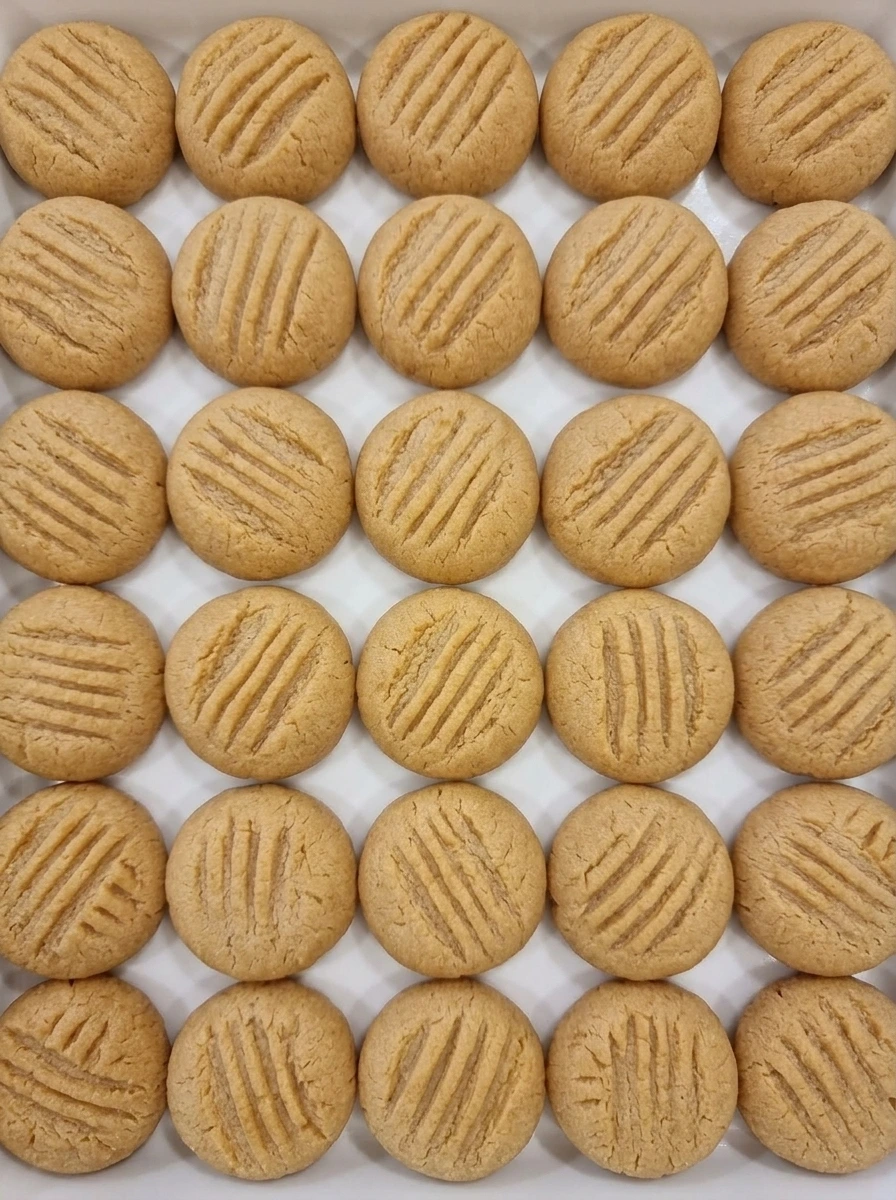
Transfer the cooled cookies to a serving plate and stack or fan them out so the crisscross tops stay visible. The finished cookies should look soft, thick, and tender, with light golden edges and warm peanut butter color throughout. This final step shows the completed dish ready to enjoy. The cookies are fully baked, fully cooled, and plated for serving, with their soft centers and classic shape clearly visible.
Tip: Serve them once fully cooled for the best soft texture and clean shape.
Pro Tips
- Use commercial creamy peanut butter for the softest, most consistent texture.
- Do not overmix after adding the flour or the cookies can turn dense.
- Roll the dough balls evenly so the cookies finish with a uniform shape.
- Pull the cookies once the edges are lightly golden to keep the centers soft.
Storage Instructions
Store the cookies in an airtight container at room temperature for up to 4 days to keep them soft and tender. For longer storage, refrigerate them for up to 1 week or freeze them in a sealed container or freezer bag for up to 2 months. To refresh the texture, let chilled cookies come to room temperature or warm a frozen cookie briefly until it is soft again.
Frequently Asked Questions
Why are my peanut butter cookies dry instead of soft?
Dry peanut butter cookies usually come from too much flour or baking them too long. Measure the flour carefully and mix just until the dough comes together. The cookies should still look soft in the center when they come out because they continue to set as they cool.
Can I make the dough ahead of time?
Yes, this dough works very well as a make-ahead option. You can portion and shape the dough, then keep it chilled before baking or freeze the shaped dough for later. Let the dough sit for a few minutes if it becomes too firm to press with a fork.
Can I use natural peanut butter?
You can, but the texture may change depending on how oily or loose it is. Stir it extremely well before measuring so the oils are fully incorporated. For the softest and most predictable cookies, a creamy no-stir peanut butter is the easiest choice.
How do I keep the cookies soft after baking?
Let the cookies cool completely, then store them in a tightly sealed container. Keeping air out is the key to maintaining that tender texture. You can also place a small piece of bread in the container to help hold moisture over the next few days.
Final Thoughts
If you try this recipe, I really hope you love it as much as my family does. It has become one of those cookie recipes we just keep coming back to, no matter the season.
Drop a comment below and let me know how yours turned out. And if you are looking for more easy dessert ideas, make sure to bookmark this page.
I am always adding new recipes that are simple, satisfying, and perfect for busy weeknights.
Print
Soft Peanut Butter Cookies
- Total Time: 45 minutes
- Yield: 4 servings
Description
Looking for the best soft peanut butter cookies? This one is quick, easy, and simple with a tender, rich bite everyone loves. Whether you are after a healthy dessert idea or a simple holiday treat, this delivers every time. Great for weeknight dinner dessert, meal prep snacks, brunch spreads, potluck trays, and party platters. Save this easy soft peanut butter cookies recipe for your next holiday or party!
Ingredients
- 1 cup creamy peanut butter
- 1/2 cup unsalted butter, softened
- 3/4 cup light brown sugar
- 1/4 cup granulated sugar
- 1 large egg
- 1 teaspoon vanilla extract
- 1 1/4 cups all-purpose flour
- 3/4 teaspoon baking soda
- 1/4 teaspoon baking powder
- 1/4 teaspoon salt
- 2 tablespoons granulated sugar for rolling
Instructions
- Start by measuring every ingredient into separate containers so the dough comes together smoothly once you begin mixing. You should see creamy peanut butter, softened butter, both sugars, flour, leavening, salt, vanilla, the egg, and the extra sugar for rolling all portioned and ready. At this stage, nothing has been mixed yet. The ingredients are still in their raw state, with the peanut butter thick and glossy, the butter soft and pale, and the dry ingredients light and powdery in their own bowls.
- Add the flour, baking soda, baking powder, and salt to a white mixing bowl and whisk until everything looks evenly blended. The mixture should become uniform in color with no visible streaks of baking soda or baking powder. This is still a completely raw stage. The dry mix remains loose, soft, and powdery, with a pale off-white color and a fine, fluffy texture.
- In another white mixing bowl, combine the creamy peanut butter, softened butter, brown sugar, and granulated sugar. Mix until the mixture looks thick, smooth, and fluffy, with the sugar fully worked into the peanut butter and butter. Visually, the mixture changes from separate ingredients into a creamy tan base. It should look soft and spreadable with a slightly whipped texture and no visible chunks of butter.
- Add the egg and vanilla to the peanut butter mixture and stir until fully incorporated. The mixture should become silkier and looser, with a glossy finish and a more even tan color throughout. Once mixed, the bowl should hold a smooth, creamy batter-like base that looks rich and cohesive. There should be no visible streaks of egg left in the mixture.
- Add the dry ingredients to the peanut butter mixture and stir until a soft dough forms. The dough should look thicker and less glossy, with a dense but tender texture that holds its shape when pressed. By the end of this step, the mixture has clearly changed from creamy to dough-like. It should be evenly blended, pale golden tan, and free of dry flour pockets.
- Scoop the dough into even portions, then roll each one into a smooth ball. Roll the balls lightly in the extra granulated sugar so each piece has a thin sparkling coating. At this stage, the dough is still completely raw and soft. The balls should look round, uniform, and slightly glossy from the sugar on the outside.
- Arrange the dough balls with space between them and press each one gently with a fork in one direction, then again in the opposite direction. This creates the classic crisscross top while flattening the dough into thick cookie rounds. The cookies are still raw here, but their final shape is now visible. Each piece should look slightly flattened with defined ridges across the top and tidy rounded edges.
- After baking, let the cookies rest until they are no longer fragile and the tops settle. The cookies should look lightly golden at the edges, softly puffed in the center, and slightly crinkled around the fork marks. As they cool, the texture becomes more set while still looking tender. They remain thick and soft, with a smooth peanut butter color and a delicate sugar finish on top.
- Transfer the cooled cookies to a serving plate and stack or fan them out so the crisscross tops stay visible. The finished cookies should look soft, thick, and tender, with light golden edges and warm peanut butter color throughout. This final step shows the completed dish ready to enjoy. The cookies are fully baked, fully cooled, and plated for serving, with their soft centers and classic shape clearly visible.
Notes
Pro Tips:
- Use commercial creamy peanut butter for the softest, most consistent texture.
- Do not overmix after adding the flour or the cookies can turn dense.
- Roll the dough balls evenly so the cookies finish with a uniform shape.
- Pull the cookies once the edges are lightly golden to keep the centers soft.
Storage: Store the cookies in an airtight container at room temperature for up to 4 days to keep them soft and tender. For longer storage, refrigerate them for up to 1 week or freeze them in a sealed container or freezer bag for up to 2 months. To refresh the texture, let chilled cookies come to room temperature or warm a frozen cookie briefly until it is soft again.
- Prep Time: 15 minutes
- Cook Time: 30 minutes
- Category: Dessert
- Cuisine: American