Description
Juicy Baked Chicken Breast is one of the best easy dinner ideas for busy nights when you need something quick and simple yet still healthy and filling. The chicken turns tender and flavorful with a light buttery finish and gentle browning. It works well for weeknight dinner and meal prep and also fits a holiday spread or potluck table. You can even slice it for brunch plates or serve it warm at a casual party with your favorite sides.
Ingredients
Scale
- 4 large pieces about 2 pounds boneless skinless chicken breasts
- 2 tablespoons olive oil
- 2 tablespoons melted unsalted butter
- 1 1/2 teaspoons kosher salt
- 3/4 teaspoon black pepper
- 1 teaspoon garlic powder
- 1 teaspoon onion powder
- 1 teaspoon smoked paprika
- 1 teaspoon dried oregano
- 1 teaspoon brown sugar
- 1 tablespoon lemon juice
- 2 tablespoons chopped fresh parsley
- 4 wedges lemon wedges
Instructions
- Place the raw chicken breasts in a shallow dish and trim away any loose bits. Slice the thicker breasts horizontally so the pieces are closer in thickness and look more even though still naturally imperfect. After cutting the chicken should look smoother and flatter with some pieces slightly larger and some slightly smaller. This first change helps the meat cook more evenly and keeps the finished texture juicier.
- Add the salt and black pepper and garlic powder and onion powder and smoked paprika and dried oregano and brown sugar to a small bowl. Stir until the colors blend into a rusty tan mixture with darker specks running through it. The seasoning should change from separate little piles into one loose blend that looks evenly combined yet still textured. This makes the flavor easier to scatter over the chicken without heavy patches of just one spice.
- In another small bowl stir the olive oil and melted butter and lemon juice together. The mixture will look glossy and lightly clouded with the butter softening into the oil instead of sitting in separate layers. This stage gives the chicken a richer coating and helps the dry seasoning cling. The liquid should look smooth with a few natural streaks and not perfectly uniform.
- Pour the glossy mixture over the chicken in the shallow dish. Turn the pieces so the tops and sides become slick and lightly coated with a buttery sheen while small puddles gather in the low spots. The chicken should now look more hydrated and glossy than raw and plain. Some areas will have more coating than others and that uneven coverage is exactly what gives the dish a natural home cooked look.
- Scatter the mixed seasoning over the coated chicken and rub it in with your hands so the spice blend sticks to the surface. Flip the pieces and repeat until the chicken is fully seasoned with darker patches and lighter gaps that look casual instead of perfectly covered. The chicken should shift from glossy pale pink to a warm brick tinted surface with herb flecks all over. The spices will begin to melt slightly into the coating and form a deeper colored paste in spots.
- Leave the seasoned chicken in the dish so the coating can settle into the surface. As it rests the spice paste will darken slightly and the chicken will look less powdery and more evenly moistened. This short marinating stage helps the seasoning soften and cling better. The surface should look glossy in some spots and more matte in others with the color deepening naturally.
- Transfer the chicken pieces into a rectangular white baking dish and arrange them in a loose single layer with small gaps between some pieces and slight overlap where the thinner ends fall naturally. Spoon any remaining seasoned butter from the dish over the top in uneven streaks. At this point the chicken should look fully assembled and ready to bake with a textured coating and glossy spots. Nothing should look perfectly lined up or evenly covered.
- Bake the chicken until the coating begins to soften and the juices start to collect around the pieces. The surface will lose its raw look and become more opaque and slightly puffed with buttery juices moving into the dish. This is the first cooked transformation. The color deepens and the spice layer looks moist rather than dry while the chicken edges begin to firm up.
- Continue baking until the tops show light golden brown patches and the edges look slightly darker than the centers. The juices in the dish will look richer and a little thicker while the chicken surface stays glossy in some places and gently browned in others. The final baked color should be appetizing and natural instead of perfectly even. Some pieces may brown more on the thinner edges while thicker sections stay a little lighter.
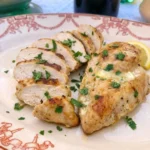
- Let the chicken rest briefly so the juices settle back into the meat. Slice one or two pieces and leave the others whole then transfer them to a round white stoneware dinner plate with a thin charcoal rim. Spoon a little of the buttery pan juices over the top and scatter chopped parsley loosely so some sections stay bare. The finished dish should look fully cooked and juicy with uneven golden brown color and visible moisture along the slices. Add a lemon wedge on the side and serve right away while the chicken still looks glossy and tender.
Notes
Pro Tips:
- Slice thick breasts horizontally so the pieces cook more evenly and stay juicy.
- Let the seasoning sit on the chicken for a short rest so the coating softens and clings better.
- Spoon the pan juices back over the chicken before serving for extra moisture and flavor.
- Rest the baked chicken before slicing so more juices stay inside the meat.
Storage: Store cooled chicken in a sealed container in the refrigerator for up to 4 days. Keep a spoonful of the pan juices with it for better moisture. Reheat gently until warmed through.
- Prep Time: 15 minutes
- Cook Time: 30 minutes
- Category: Dinner
- Cuisine: American
Nutrition
- Serving Size: 1 serving