If you have ever made a pan of Mini Grilled Cheese Sliders for lunch or dinner you know they are the kind of meal that stands out with warm cheesy flavor. In this article we have the Mini Grilled Cheese Sliders recipe for you to try at home with this easy step by step guide and if you love fun sandwich ideas you should also try Blueberry Grilled Cheese for a sweet and savory twist.
This classic comfort food recipe has soft rolls and gooey melted cheese with buttery tops that turn crisp and golden as they cook. This recipe is great for a weeknight meal or a casual party and this recipe is sure to win over both kids and adults.
Ingredients
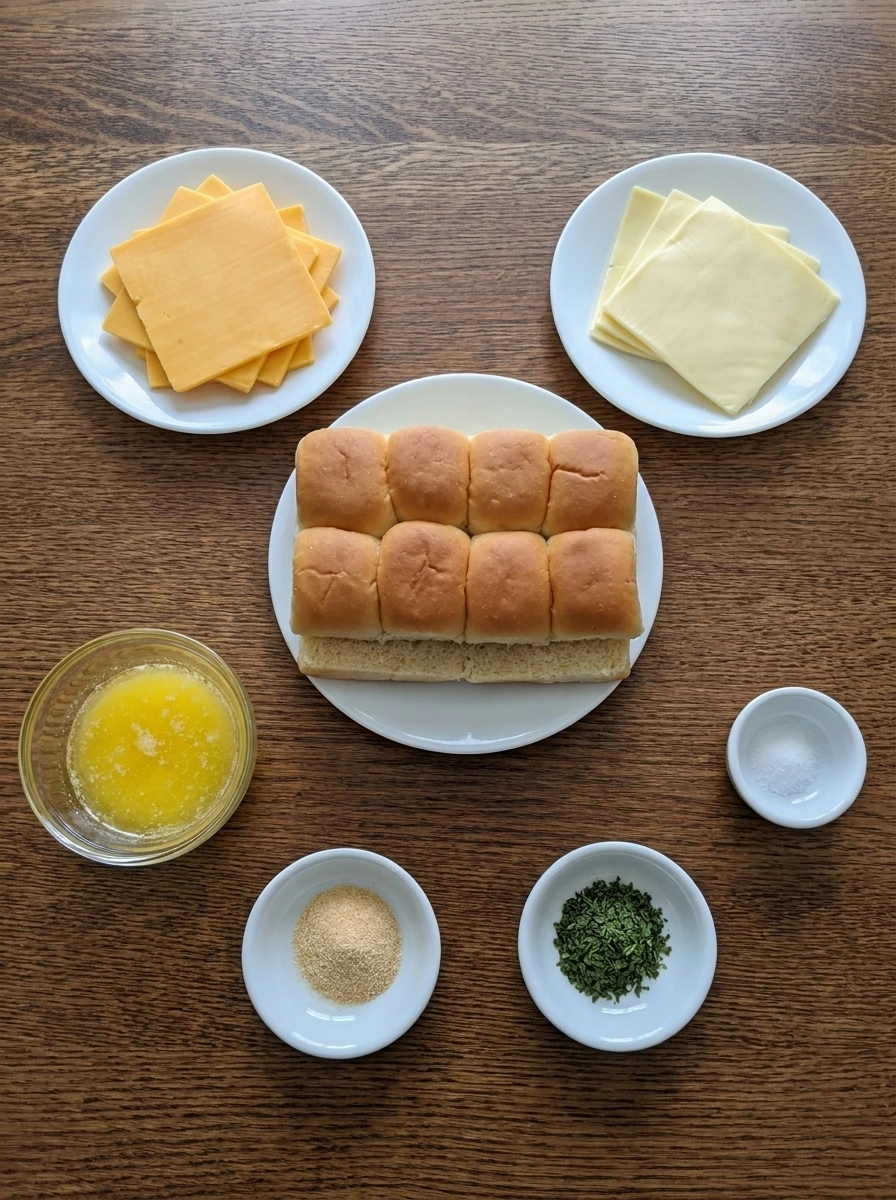
Here’s what I use for this recipe and you can always make substitutions if you prefer.
- Sweet dinner rolls: These create the soft slider base and hold together well for easy slicing and baking.
- Cheddar cheese slices: These melt into the center and give the sliders a rich sharp cheesy pull.
- American cheese slices: These add extra creaminess and help the filling melt smoothly.
- Unsalted butter: This coats the tops and helps the rolls brown with a buttery finish.
- Garlic powder: This adds savory depth and boosts the flavor of the butter topping.
- Dried parsley: This adds color and a light herby note across the top.
- Salt: This sharpens the cheese flavor without overpowering the sliders.
Tools You’ll Need
- Wooden cutting board: Used for slicing the connected rolls cleanly.
- Sharp knife: Used to split the rolls into even top and bottom slabs.
- Pastry brush: Used to spread the seasoned butter across the tops.
- Large skillet: Used to crisp the bread and melt the cheese.
Instructions
Step 1: Slice the rolls into one top slab and one bottom slab
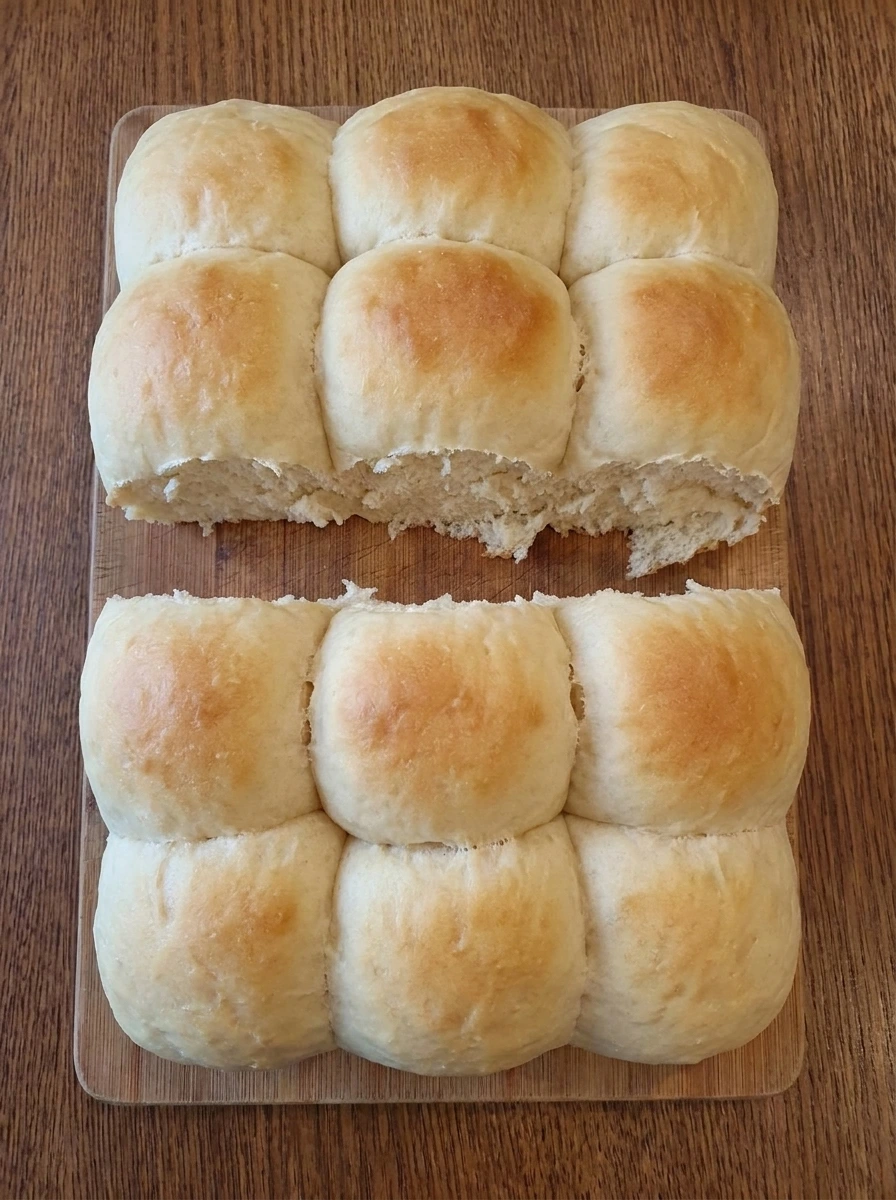
Use a sharp knife to cut the connected rolls through the middle so you have one full top slab and one full bottom slab. The shape stays together while the cut edges look soft and slightly rough and the rolls separate a little at the seams. This first change sets up the whole recipe because the bread goes from a sealed pack of rolls to two layers ready for filling. Keep the slabs close together so they stay easy to move and keep the edges uneven for a natural homemade look.
Tip: Try to keep the cut level so the cheese melts evenly from edge to edge.
Step 2: Layer the cheese and brush the tops
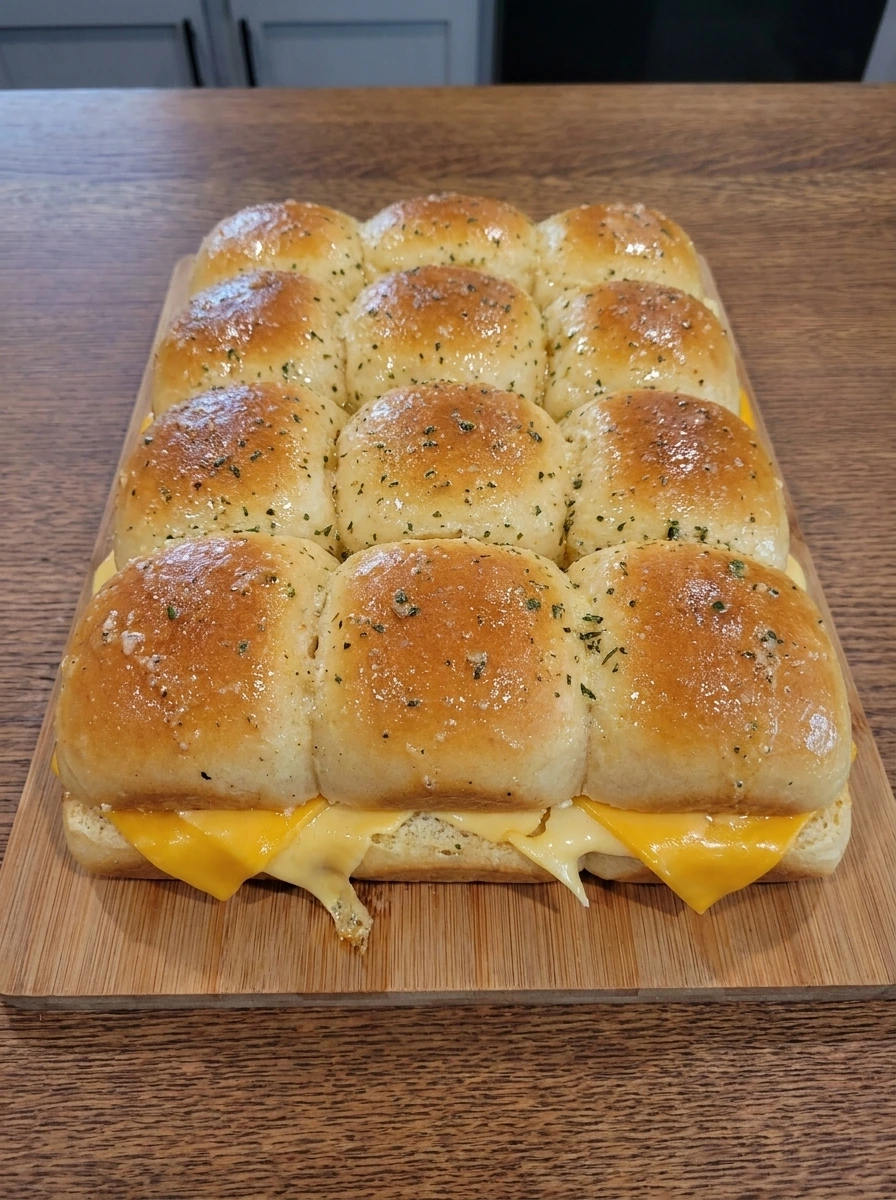
Place the cheddar and American cheese across the bottom slab with slight overlap and folded corners so the filling looks loose and generous instead of perfect. Set the top slab back in place and brush the melted butter mixed with garlic powder and parsley over the surface so the tops look glossy with green flecks. Now the bread changes from plain sliced rolls to fully assembled sliders with visible layers and a seasoned top. The cheese sits unevenly at the edges and that little bit of irregularity makes the finished sliders look real and inviting.
Tip: Let a few cheese corners peek out so you get crispy cheesy bits after cooking.
Step 3: Cook until the bottom turns crisp
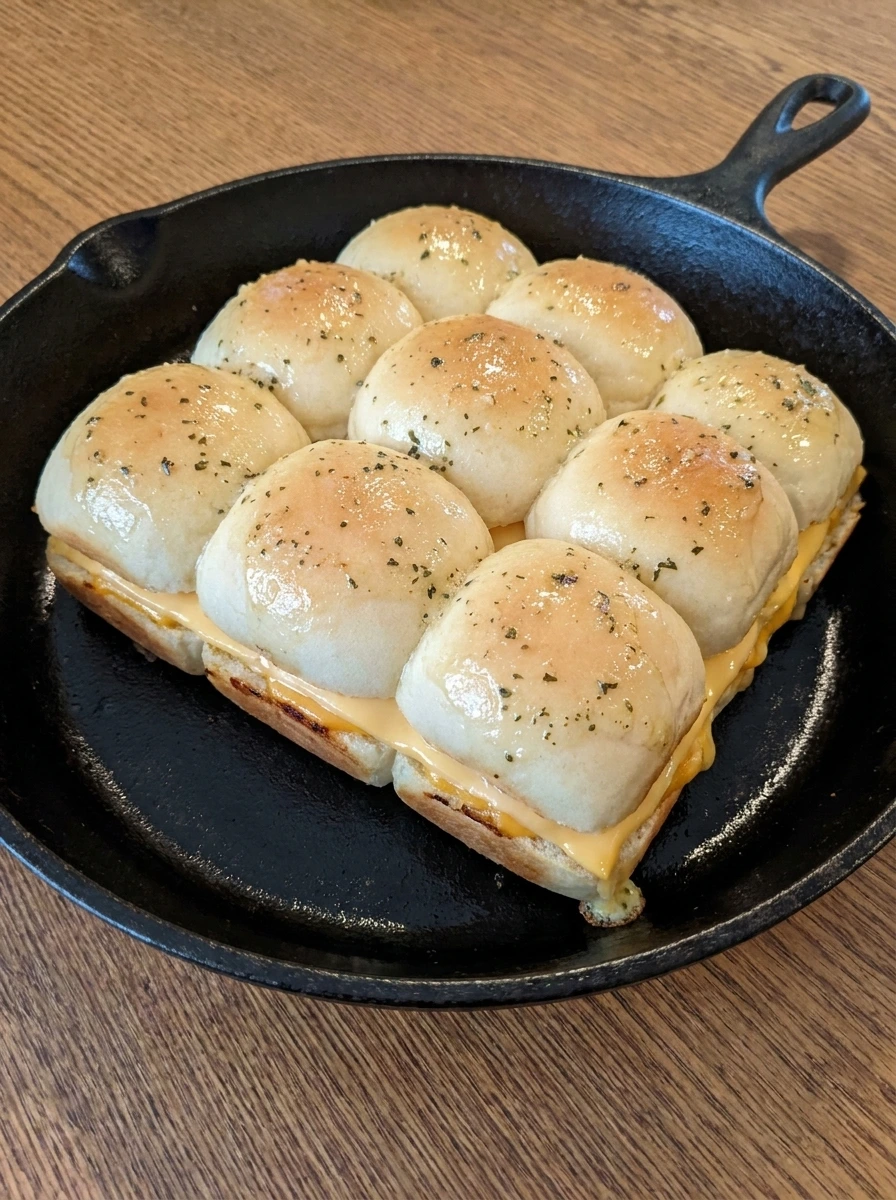
Set the assembled sliders over the heat and let the bottom make contact until the bread starts to toast and the cheese begins to soften. The lower edges deepen in color while the top stays pale and glossy and the cheese inside loosens enough to sag slightly between the layers. This is the moment when the sliders start to look like grilled cheese instead of assembled rolls. You should see the structure tighten a little and the bottom become more defined with early golden patches and a few darker spots.
Tip: A gentle cook gives the cheese time to soften before the bread gets too dark.
Step 4: Flip and finish until the tops are golden and the cheese melts
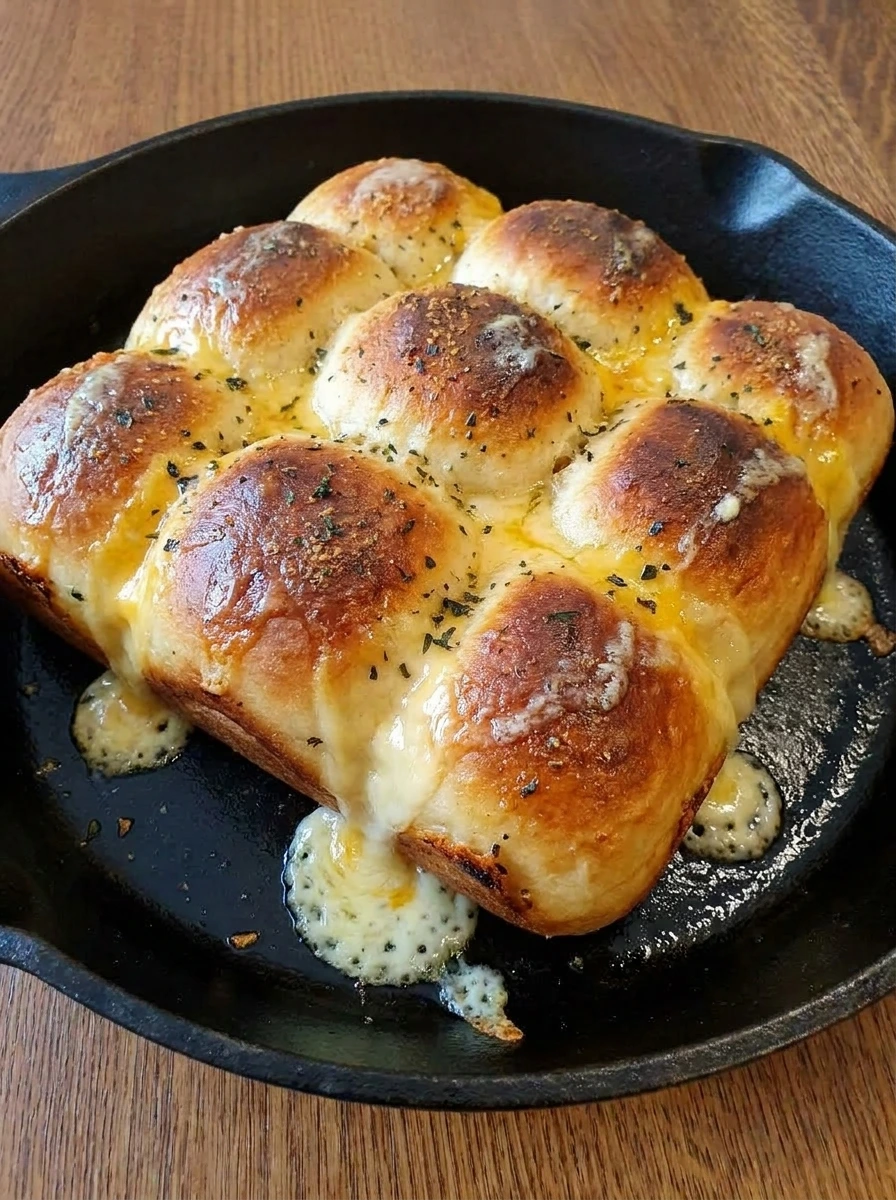
Turn the sliders so the second side can brown and finish cooking. The tops become deeply golden with darker buttery streaks and the cheese melts fully so it pushes out at the seams in shiny uneven drips. This is the biggest visual change in the recipe because the sliders move from lightly cooked to fully finished. The bread now has crisp edges and the center looks soft while the cheese stretches and pools in small spots around the rolls.
Tip: Press very lightly so the tops make contact while the sliders still keep some height.
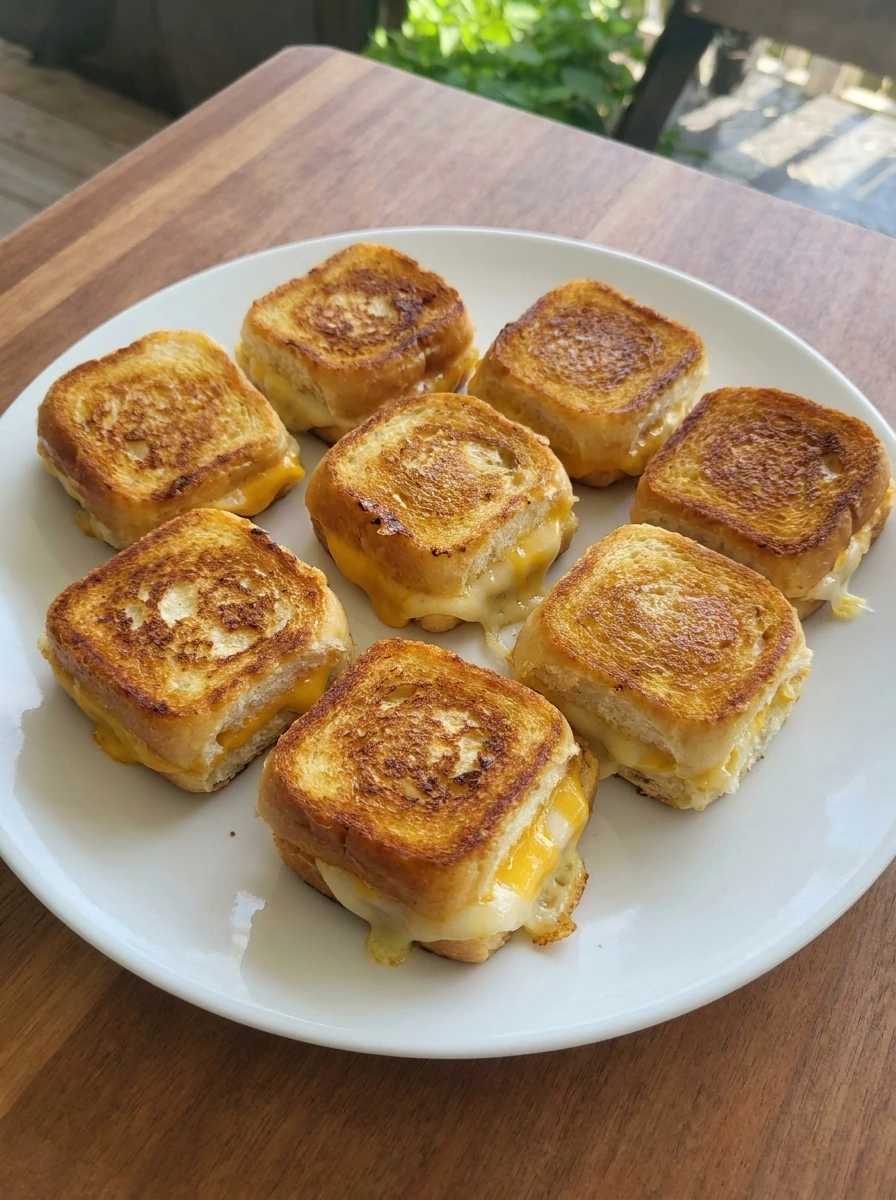
Step 5: Separate and serve the sliders warm
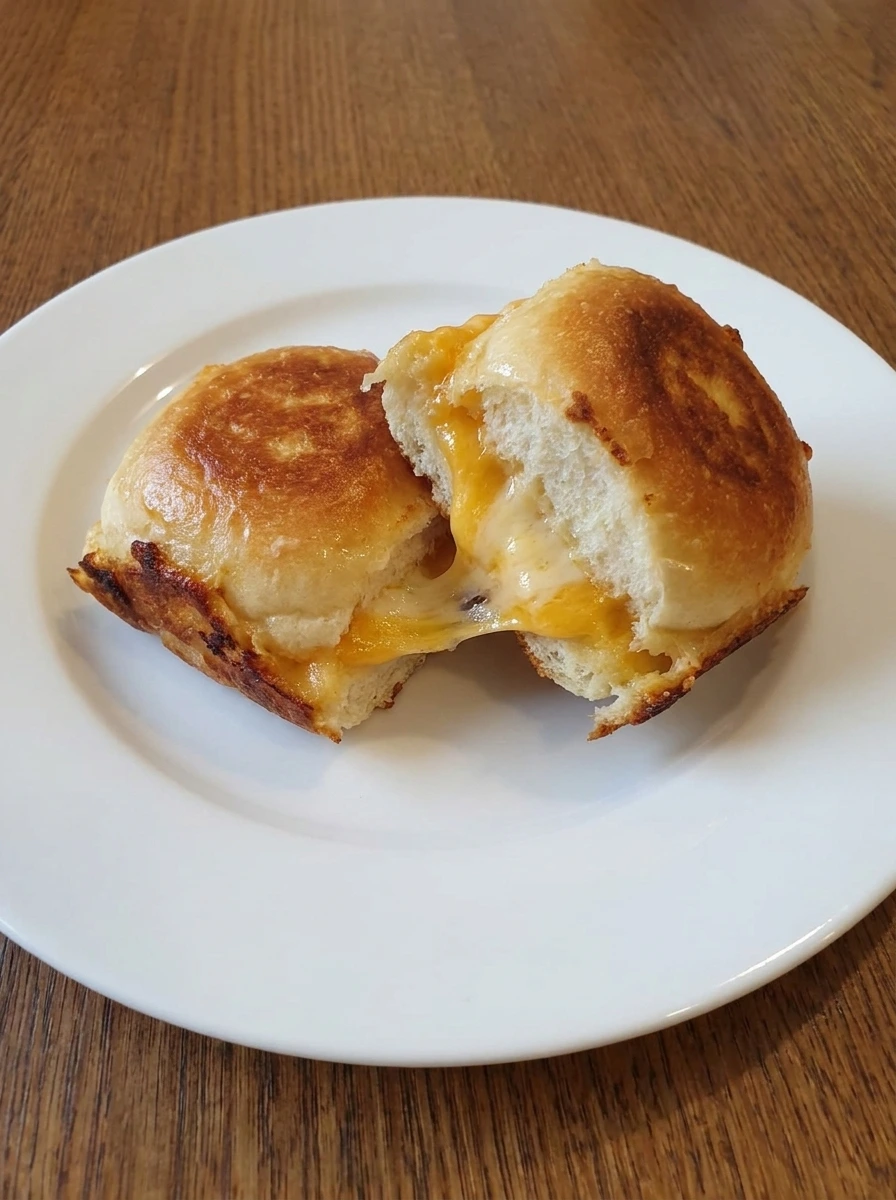
Move the finished sliders to a plate and pull them apart into portions while the cheese is still hot and stretchy. The tops stay crisp and browned while the inside looks soft and gooey and each slider sits a little differently with casual spacing and slight overlap. The final dish should look comforting and homemade rather than neat and uniform. A few melted edges and uneven browning make these Mini Grilled Cheese Sliders feel fresh from the kitchen and ready to eat.
Tip: Serve right away so the cheese stays melty and the tops stay crisp.
Pro Tips
- Use a mix of cheddar and American cheese for both flavor and the best melt.
- Keep the rolls connected while slicing so assembly stays fast and neat.
- Let a little cheese peek out at the edges so you get crisp cheesy bits.
- Serve the sliders right after cooking so the tops stay crisp and the centers stay gooey.
Storage Instructions
Let the sliders cool and then store them in a covered container in the fridge for up to three days. Reheat until the cheese softens again and the bread turns warm and crisp. For the best texture avoid stacking them too tightly while they cool because trapped steam can soften the tops. A quick reheat brings back the crisp edges better than a slow warm up.
Frequently Asked Questions
You can slice and assemble them a few hours ahead and then cook them just before serving so the bread stays crisp and the cheese stays melty.
A mix of cheddar and American works really well because you get bold flavor and also a smooth creamy melt.
Yes and thin tomato slices or cooked bacon or a swipe of mustard all work well as long as you do not overfill the rolls.
Use just enough butter on top and cook over steady heat so the bread browns while the cheese melts without steaming too much.
Final Thoughts
This is the kind of recipe I wish I had found years ago. It would have saved me so many rushed lunch plans and busy party trays.
But now that I have it I make it all the time and I think you will too. If you enjoyed this check out some of my other popular recipes on the blog like Egg and Cheese Breakfast Sandwich and Easy Breakfast Burritos and leave a comment because I read every single one and it really makes my day.
Print
Mini Grilled Cheese Sliders
- Total Time: 45 minutes
- Yield: 4 servings 1x
Description
Mini Grilled Cheese Sliders are the easy answer when you need quick lunch ideas or a simple family meal that still feels fun. These little sandwiches bake up crisp on top and soft in the center with plenty of melty cheese in every bite. They are one of the best healthy comfort food options to keep on your list for meal prep and brunch and party trays and even a cozy weeknight dinner when everyone wants something warm and fast.
Ingredients
- 1 package and 8 connected rolls Sweet dinner rolls
- 8 slices Cheddar cheese slices
- 4 slices American cheese slices
- 3 tablespoons and melted Unsalted butter
- 1 teaspoon Garlic powder
- 1 teaspoon Dried parsley
- 1 pinch Salt
Instructions
- Use a sharp knife to cut the connected rolls through the middle so you have one full top slab and one full bottom slab. The shape stays together while the cut edges look soft and slightly rough and the rolls separate a little at the seams. This first change sets up the whole recipe because the bread goes from a sealed pack of rolls to two layers ready for filling. Keep the slabs close together so they stay easy to move and keep the edges uneven for a natural homemade look.
- Place the cheddar and American cheese across the bottom slab with slight overlap and folded corners so the filling looks loose and generous instead of perfect. Set the top slab back in place and brush the melted butter mixed with garlic powder and parsley over the surface so the tops look glossy with green flecks. Now the bread changes from plain sliced rolls to fully assembled sliders with visible layers and a seasoned top. The cheese sits unevenly at the edges and that little bit of irregularity makes the finished sliders look real and inviting.
- Set the assembled sliders over the heat and let the bottom make contact until the bread starts to toast and the cheese begins to soften. The lower edges deepen in color while the top stays pale and glossy and the cheese inside loosens enough to sag slightly between the layers. This is the moment when the sliders start to look like grilled cheese instead of assembled rolls. You should see the structure tighten a little and the bottom become more defined with early golden patches and a few darker spots.
- Turn the sliders so the second side can brown and finish cooking. The tops become deeply golden with darker buttery streaks and the cheese melts fully so it pushes out at the seams in shiny uneven drips. This is the biggest visual change in the recipe because the sliders move from lightly cooked to fully finished. The bread now has crisp edges and the center looks soft while the cheese stretches and pools in small spots around the rolls.
- Move the finished sliders to a plate and pull them apart into portions while the cheese is still hot and stretchy. The tops stay crisp and browned while the inside looks soft and gooey and each slider sits a little differently with casual spacing and slight overlap. The final dish should look comforting and homemade rather than neat and uniform. A few melted edges and uneven browning make these Mini Grilled Cheese Sliders feel fresh from the kitchen and ready to eat.
Notes
Pro Tips:
- Use a mix of cheddar and American cheese for both flavor and the best melt.
- Keep the rolls connected while slicing so assembly stays fast and neat.
- Let a little cheese peek out at the edges so you get crisp cheesy bits.
- Serve the sliders right after cooking so the tops stay crisp and the centers stay gooey.
Storage: Let the sliders cool and then store them in a covered container in the fridge for up to three days. Reheat until the cheese softens again and the bread turns warm and crisp. For the best texture avoid stacking them too tightly while they cool because trapped steam can soften the tops. A quick reheat brings back the crisp edges better than a slow warm up.
- Prep Time: 15 minutes
- Cook Time: 30 minutes
- Category: Lunch
- Cuisine: American
Nutrition
- Serving Size: 1 serving