This Classic Homemade Meatloaf recipe is packed with flavor and so easy to make. It is a budget friendly recipe that you can make with simple pantry staples! Make this comforting meatloaf recipe for dinner tonight.
If you love cozy family dinners, you are going to love this Classic Homemade Meatloaf recipe. It’s a hearty beef dinner that is tender, flavorful, and always satisfying. With a sweet and tangy glaze like this, you’re going to want every slice served with all your favorite sides.
If you’re looking for other comforting dinner recipes like my classic homemade meatloaf, why not also try this Classic Spaghetti Bolognese or Juicy Baked Chicken Breast. Both of these recipes are simple to make, making them perfect for a quick weeknight meal.
Ingredients
Here’s what I use for this recipe and you can always make substitutions if you prefer.
- ground beef: Ground beef forms the hearty base of the meatloaf and gives it a rich, classic flavor.
- yellow onion: Onion adds moisture, sweetness, and savory depth throughout the loaf.
- garlic: Garlic brings bold aromatic flavor that balances the richness of the beef.
- breadcrumbs: Breadcrumbs help bind the mixture and keep the texture tender instead of dense.
- whole milk: Milk softens the breadcrumbs and adds moisture to the meat mixture.
- large eggs: Eggs help hold the loaf together so it slices neatly after resting.
- Worcestershire sauce: Worcestershire adds savory depth and a subtle tangy note.
- ketchup: Ketchup flavors the meat mixture and also forms the base of the glaze.
- fresh parsley: Parsley adds a fresh pop of color and lightens the overall flavor.
- salt: Salt seasons the meatloaf evenly and helps all the other flavors stand out.
- black pepper: Black pepper adds gentle warmth and balance to the rich beef.
- paprika: Paprika gives the loaf a deeper savory flavor and warm color.
- brown sugar: Brown sugar sweetens the glaze and balances the tang of the ketchup.
- yellow mustard: Mustard adds sharpness to the glaze and keeps it from tasting flat.
Tools You’ll Need
- large mixing bowl: For combining the meatloaf mixture evenly.
- small bowl: For whisking the glaze.
- knife: Use for dicing onion, mincing garlic, and slicing the finished loaf.
- cutting board: A stable board makes prep easier and cleaner.
- white ceramic baking tray: Use the same tray style for shaping, glazing, and resting the loaf.
Instructions
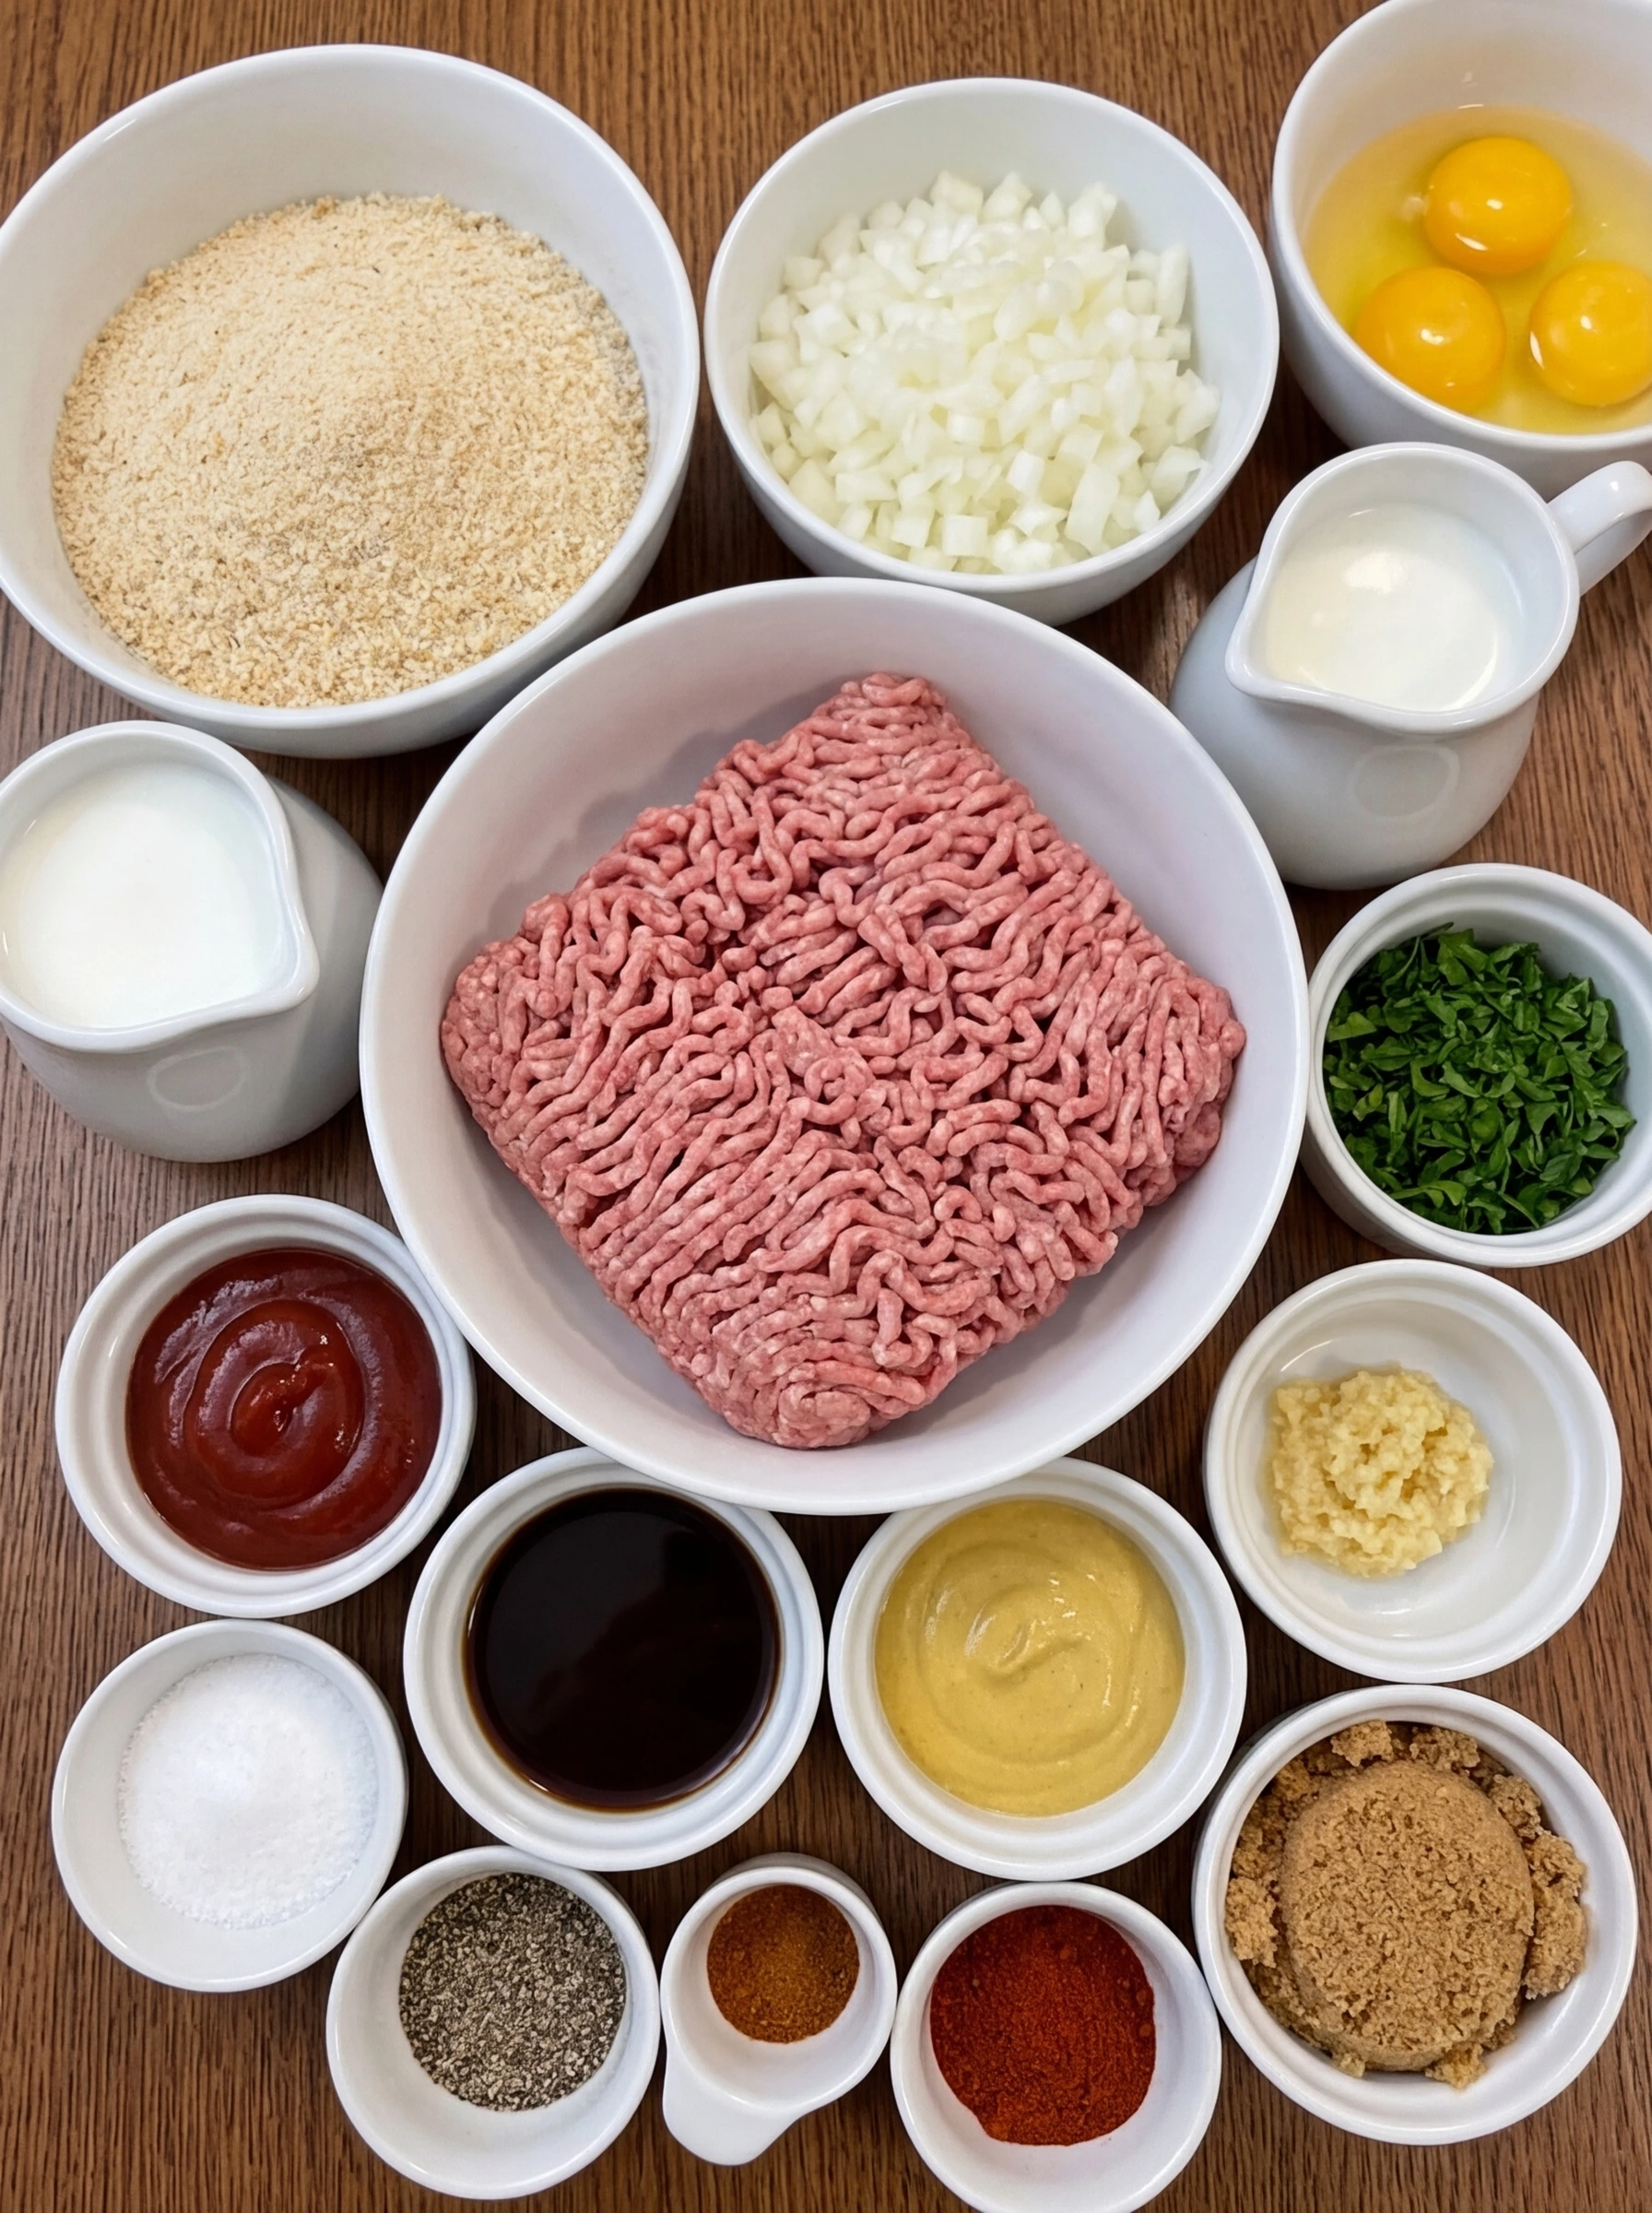
Step 1: Measure and prepare the ingredients
Place the ground beef, breadcrumbs, milk, eggs, ketchup, Worcestershire sauce, and seasonings into separate containers so everything is ready to use. Finely dice the onion, mince the garlic, and chop the parsley until each ingredient is small and even in size. At the end of this step, the ingredients should look neatly prepped and clearly separated. The onion and parsley add fresh color, the garlic is finely minced, and all of the measured ingredients are ready for mixing with no visible cooking or heat applied.
Tip: Cut the onion very small so it blends into the meatloaf mixture evenly.
Step 2: Whisk together the glaze
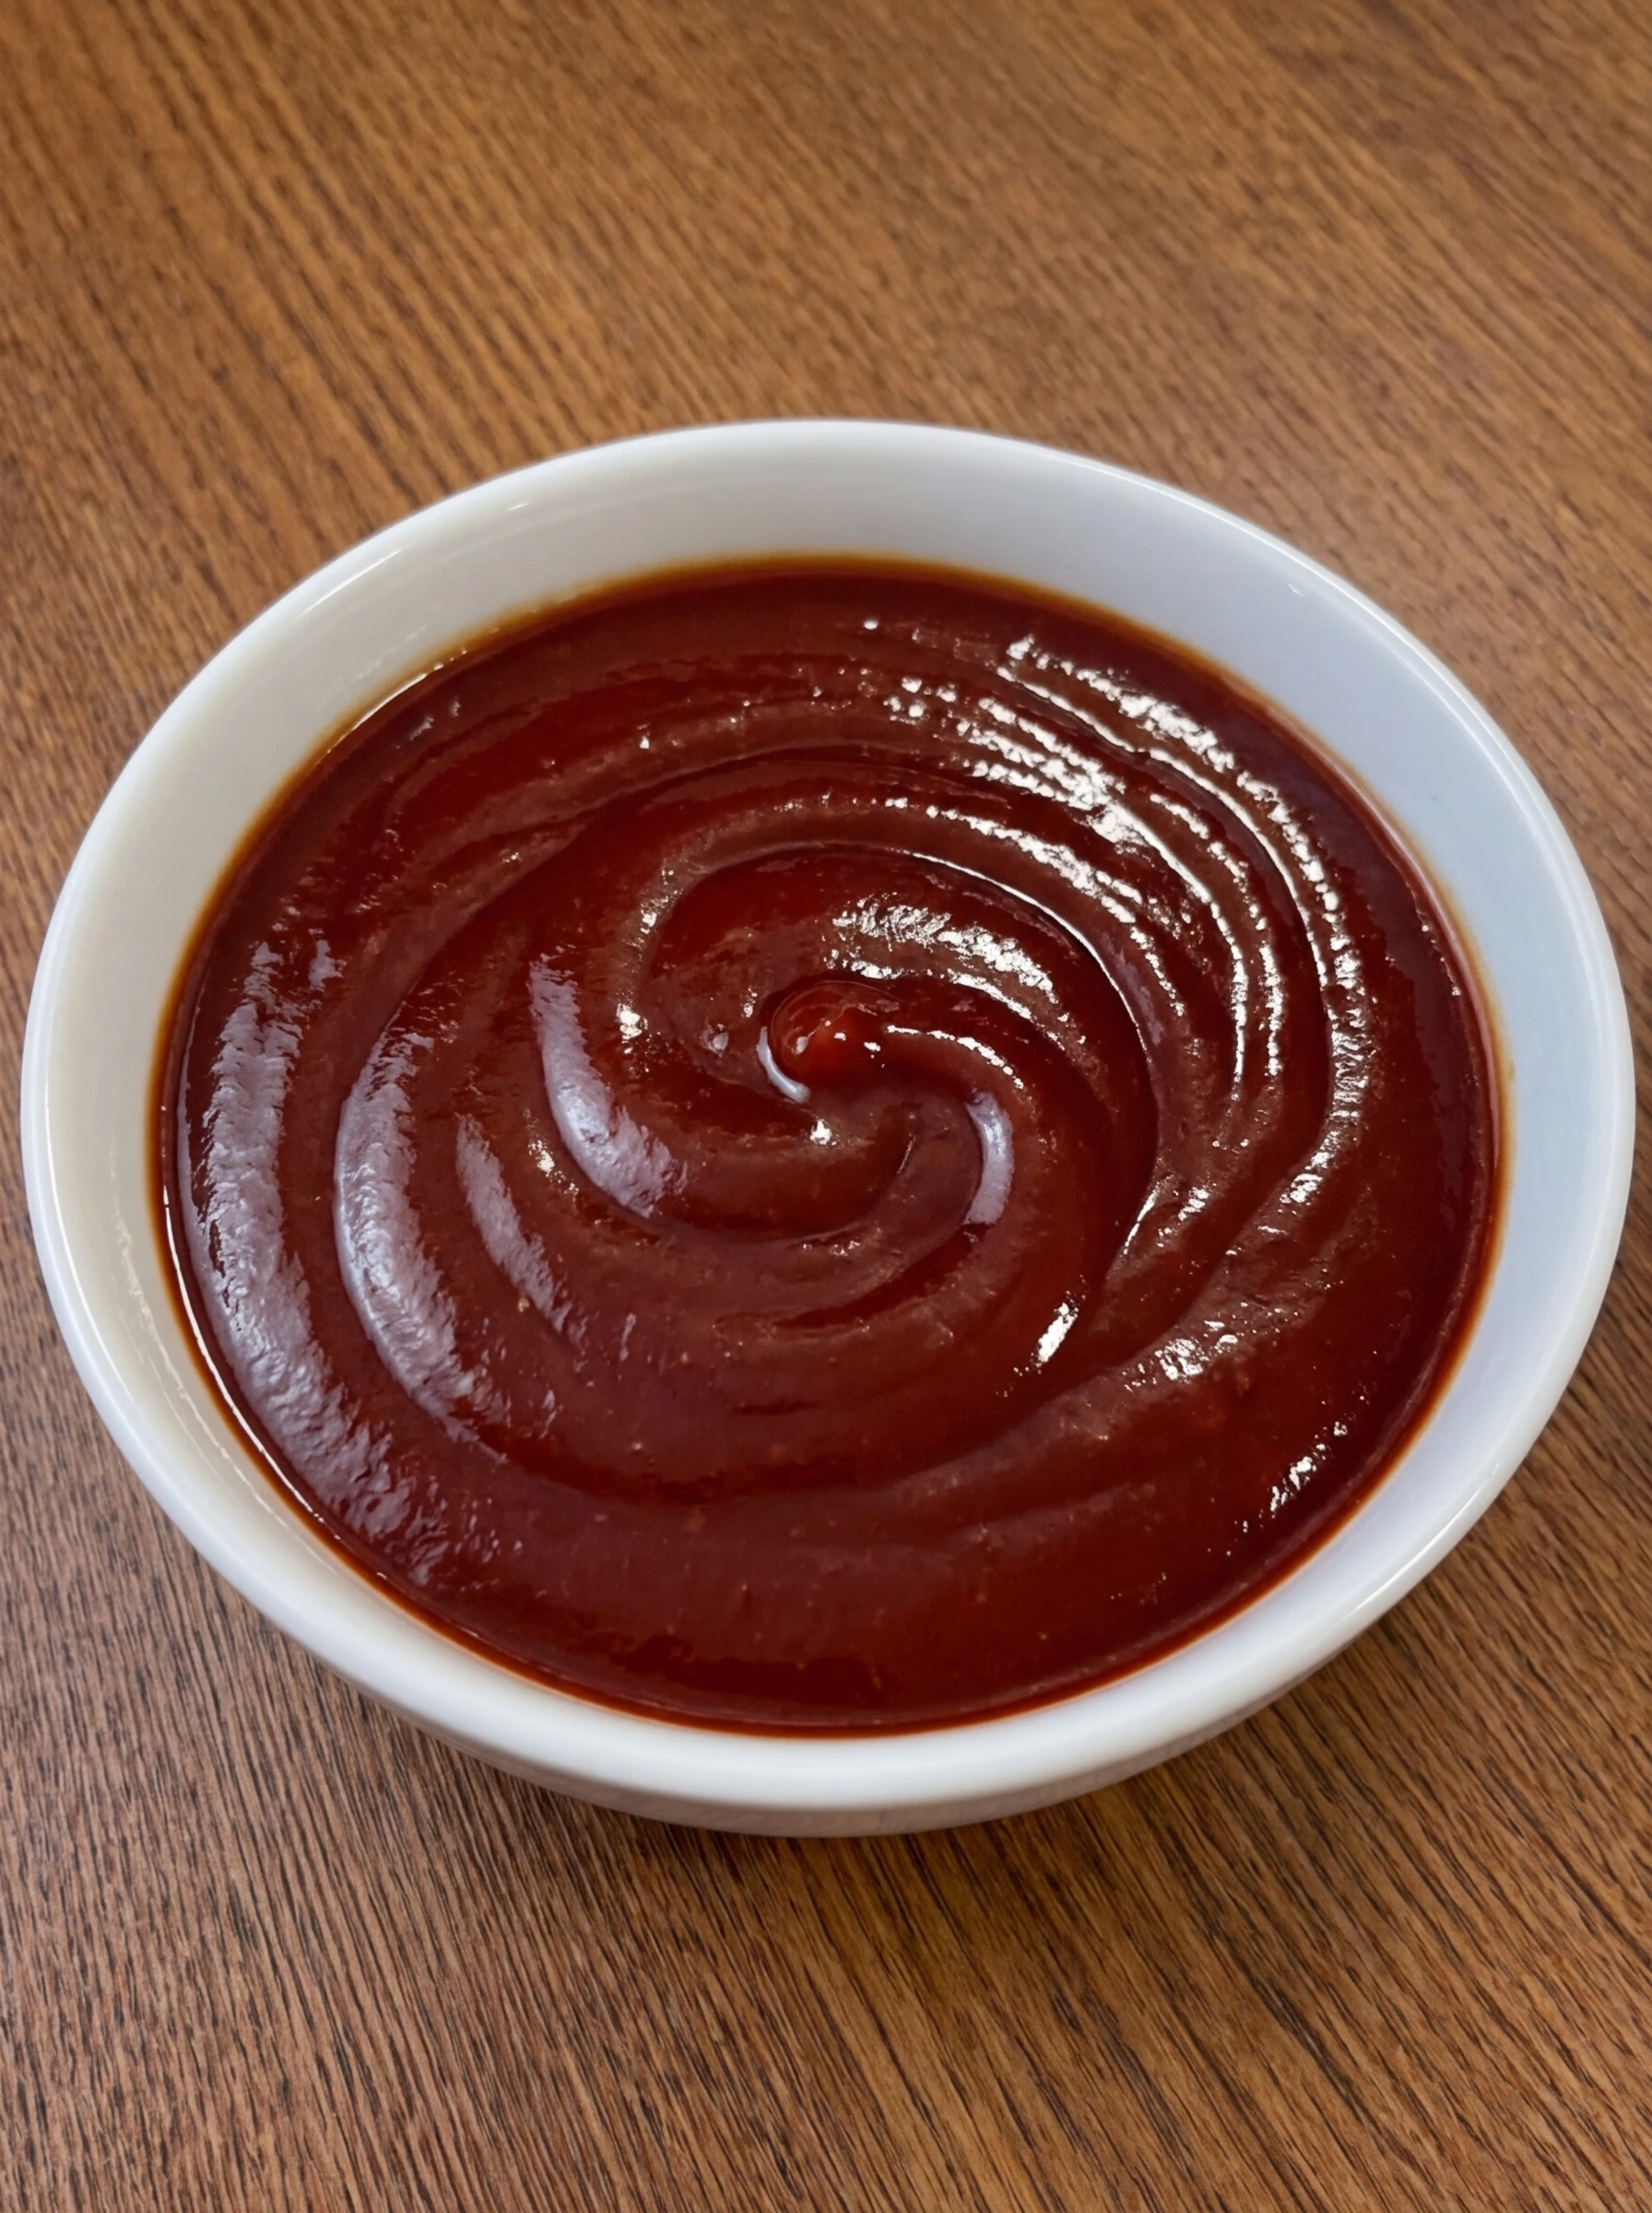
In a small bowl, combine ketchup, brown sugar, and yellow mustard until smooth and evenly blended. The mixture should change from separate streaks of red, golden brown, and yellow into one glossy glaze with a thick, spreadable texture. Once mixed, the glaze should look shiny and uniform with no pockets of sugar left behind. This step creates the sweet and tangy topping that gives the finished meatloaf its classic look and rich surface color.
Tip: Whisk until the sugar is dissolved so the glaze spreads smoothly later.
Step 3: Mix the meatloaf base
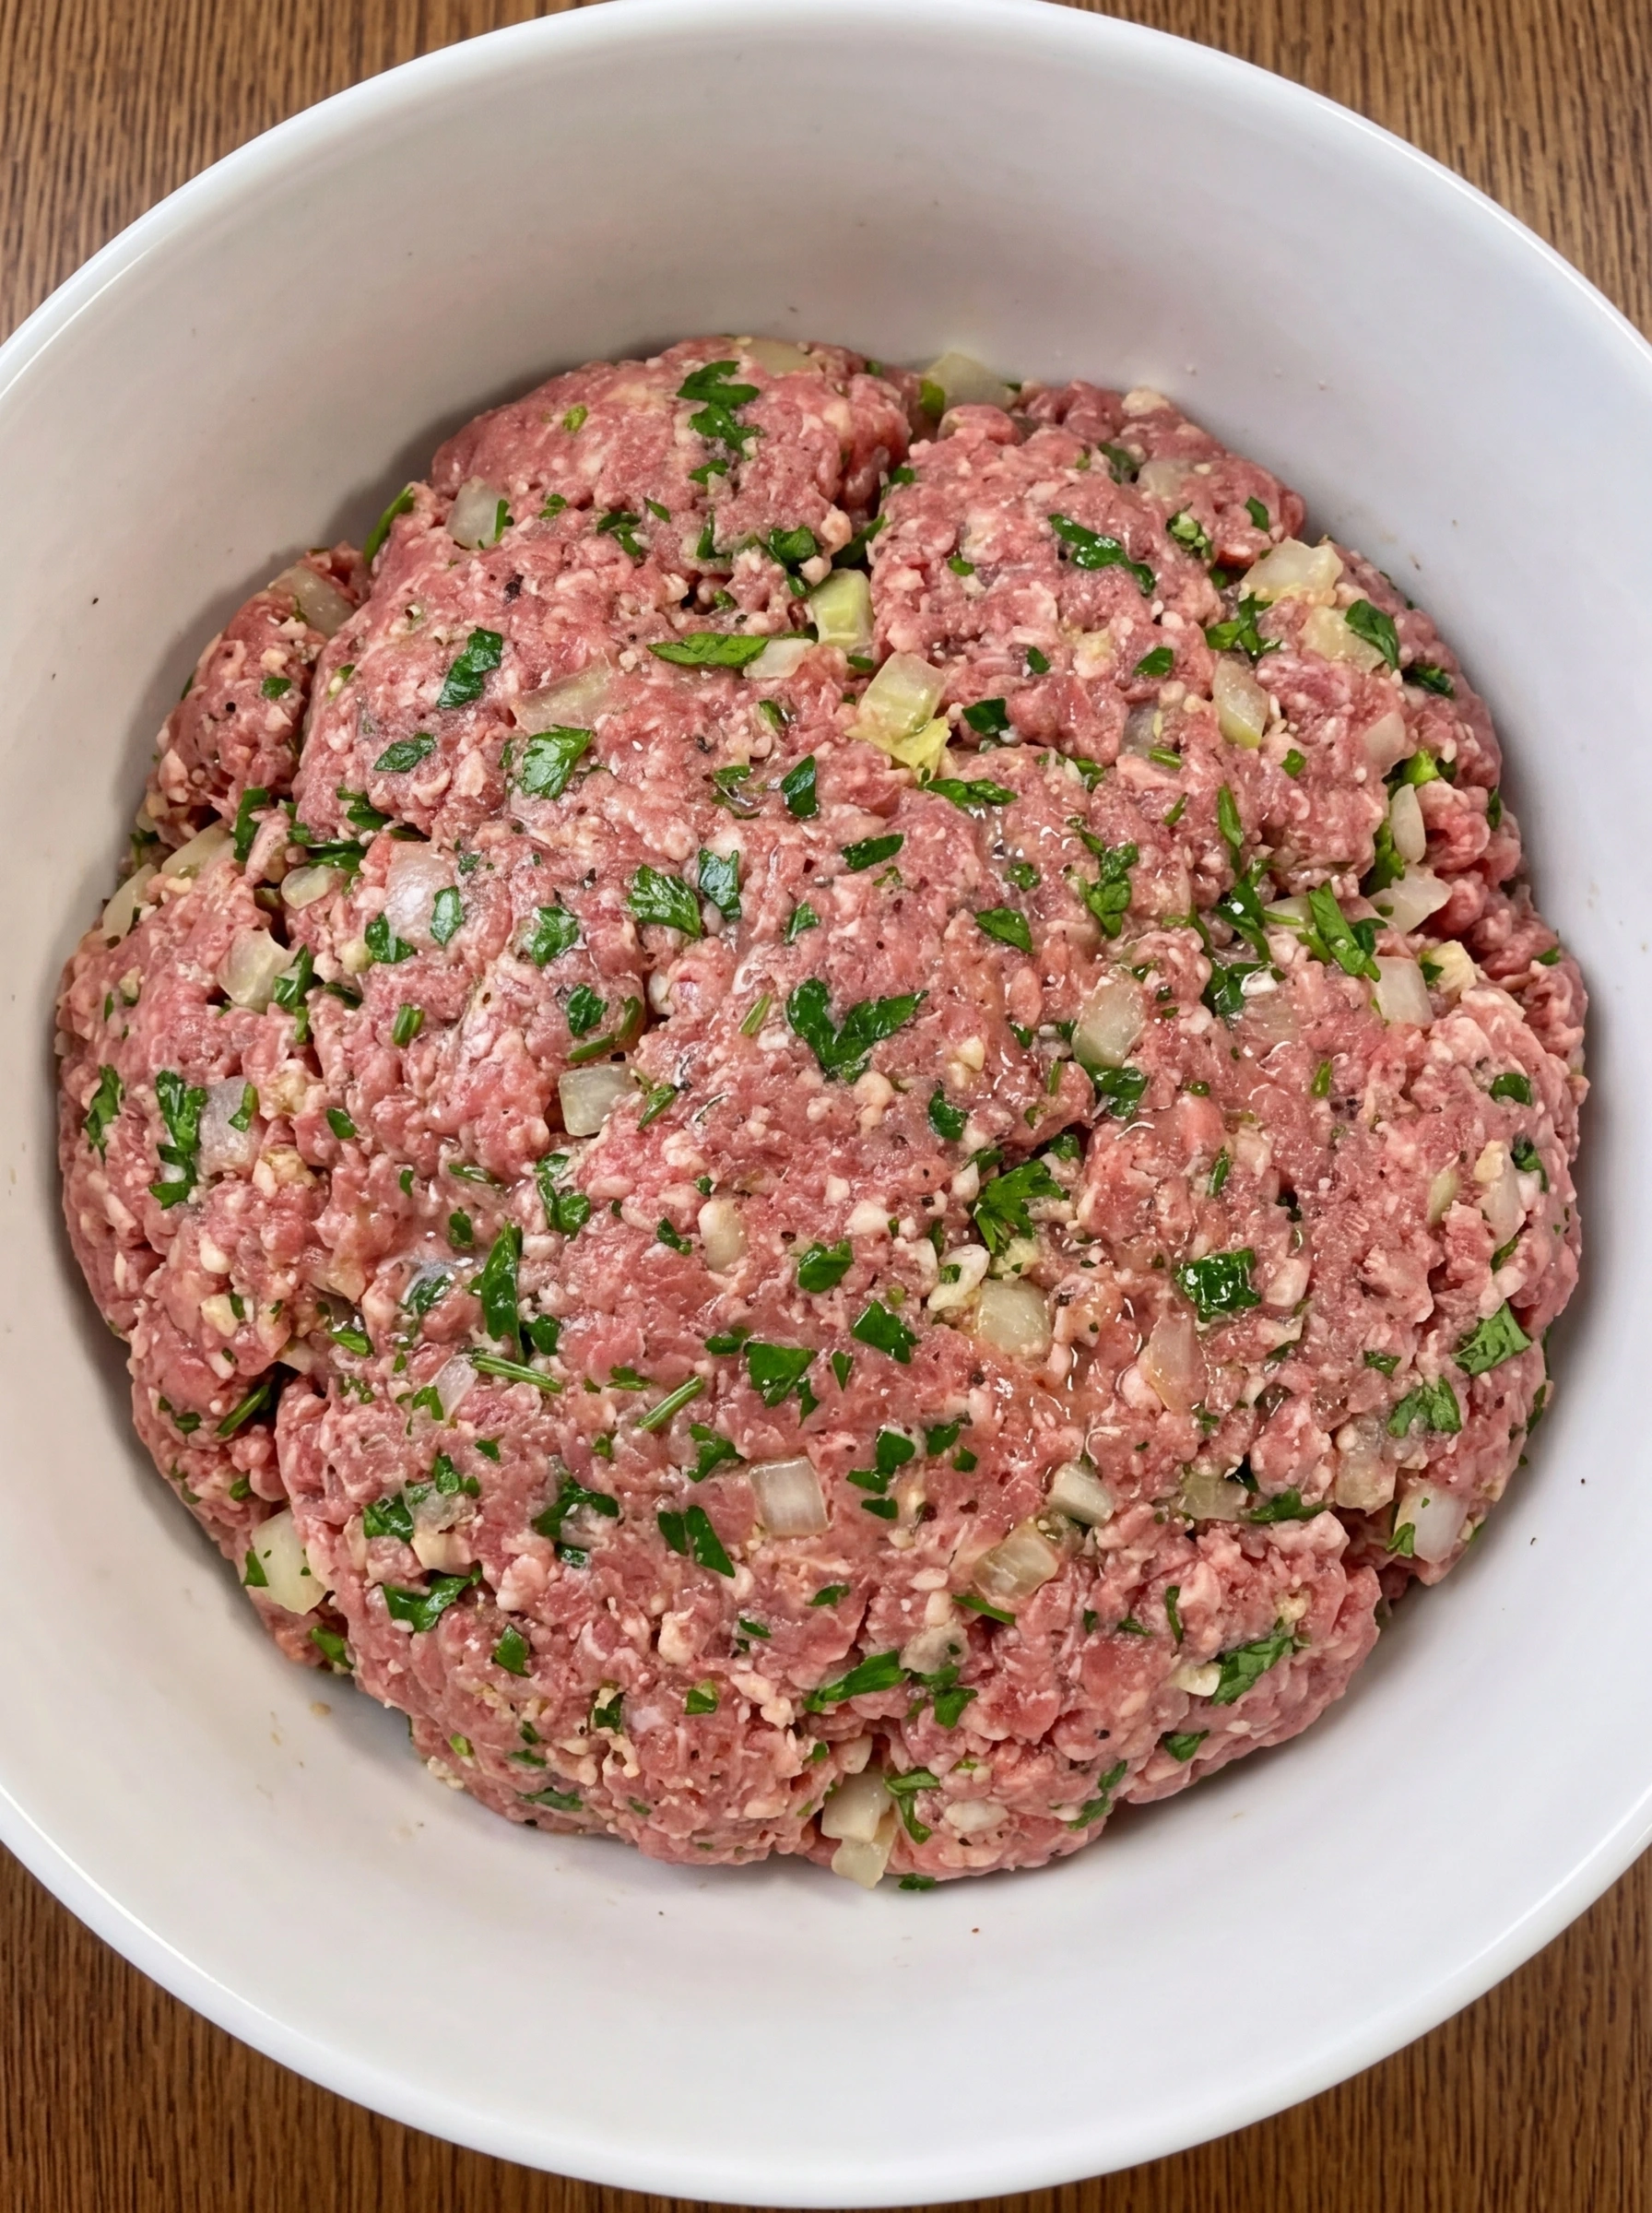
Add the ground beef, diced onion, minced garlic, breadcrumbs, milk, eggs, Worcestershire sauce, ketchup, parsley, salt, pepper, and paprika to a large bowl. Gently mix until everything is evenly combined and the seasonings, breadcrumbs, and aromatics are distributed throughout the meat. The mixture should look moist, cohesive, and well blended, with bits of onion and parsley visible in the raw beef. It should hold together when pressed but still look soft rather than tightly packed.
Tip: Mix just until combined so the loaf stays tender instead of compact.
Step 4: Shape the loaf

Transfer the meat mixture to a tray and shape it into a compact loaf with rounded edges and an even thickness from end to end. Press lightly so the loaf holds its form while keeping the surface smooth and the shape uniform. At this stage, the loaf should look sturdy and neatly formed, with a slightly textured surface from the ground beef. The raw mixture is now arranged in its final shape and ready for the glaze to be added on top.
Tip: Keep the loaf even in thickness so it cooks and slices more evenly.
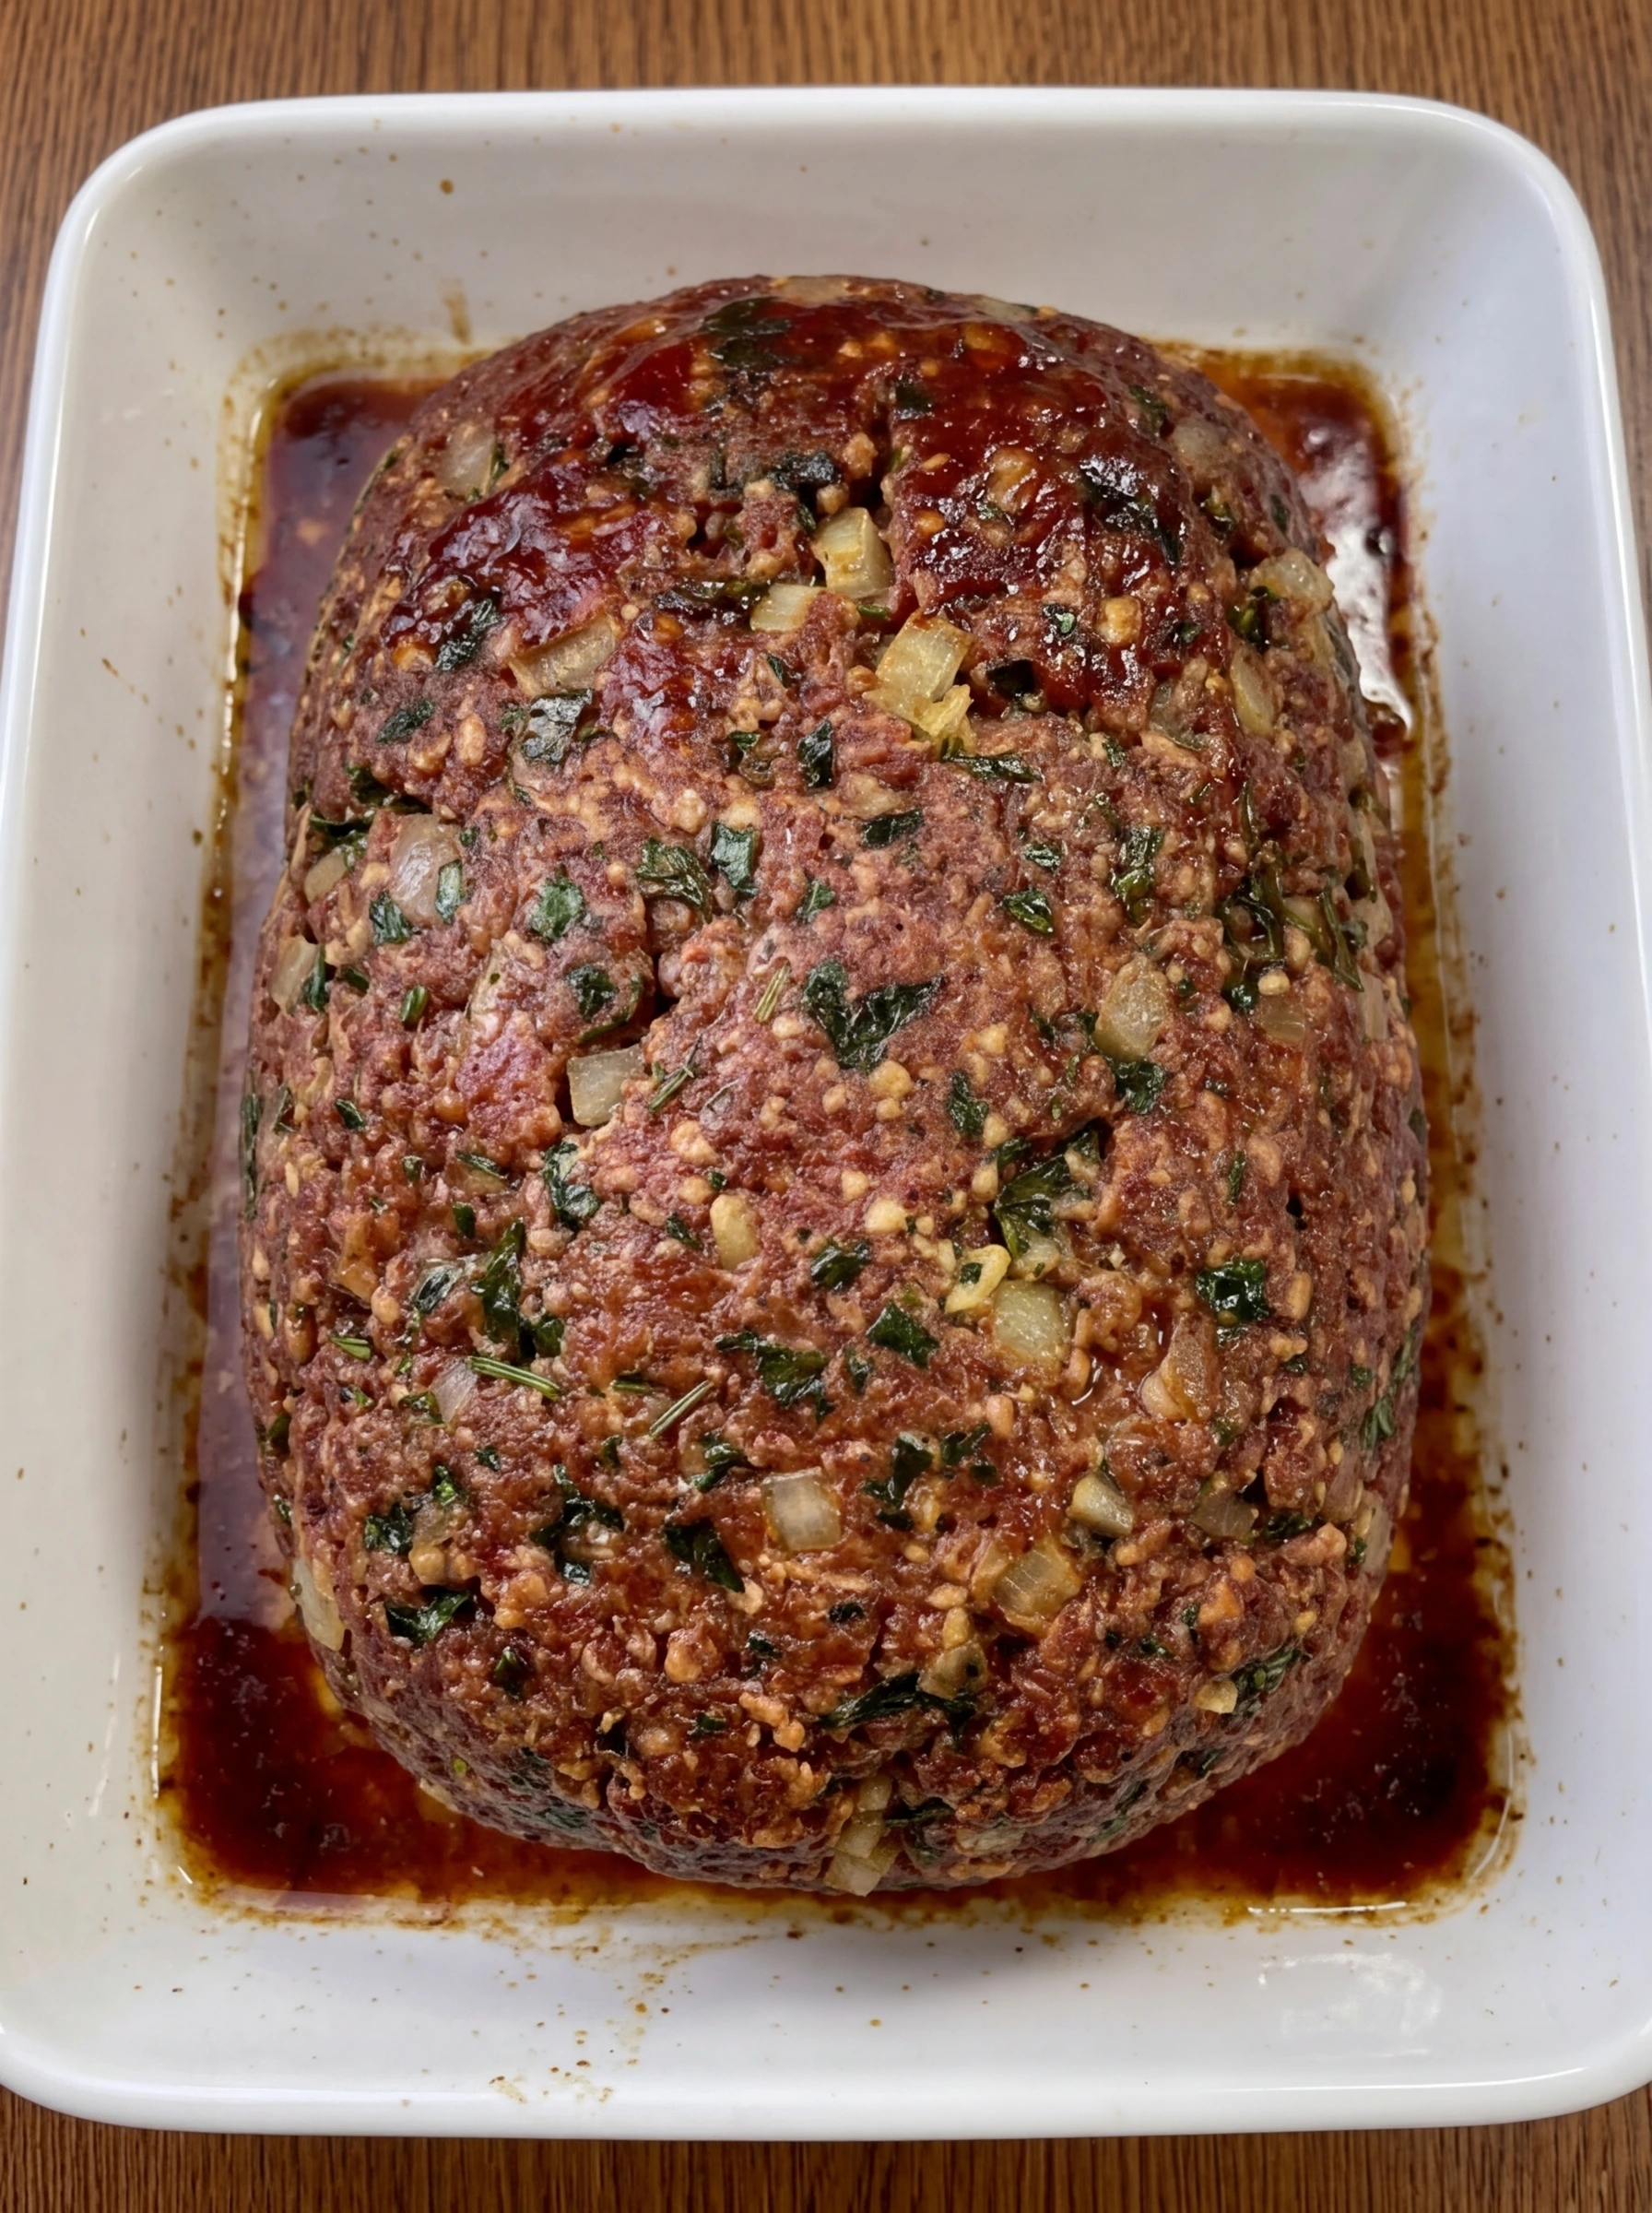
Step 5: Spread the glaze over the loaf

Spoon the prepared glaze over the top and sides of the shaped loaf, then smooth it into an even layer. The red coating should cover the surface neatly, with a little thickness on top so it stays visible after the loaf is finished. The loaf now looks more polished and defined, with a glossy red layer over the raw meat mixture. This step gives the loaf its signature appearance before it becomes fully set and sliceable.
Tip: Leave a slightly thicker layer of glaze on top for the classic finish.
Step 6: Rest the finished meatloaf
Once the meatloaf is fully finished, set it aside to rest before slicing. The loaf will look firm and settled, and the glaze on top will appear darker, thicker, and more set than before. Resting helps the juices stay inside the loaf so the slices hold together cleanly. Visually, the surface should look glossy and slightly sticky, while the loaf keeps a compact shape with no crumbling edges.
Tip: Let it rest before slicing so the pieces stay neat and juicy.
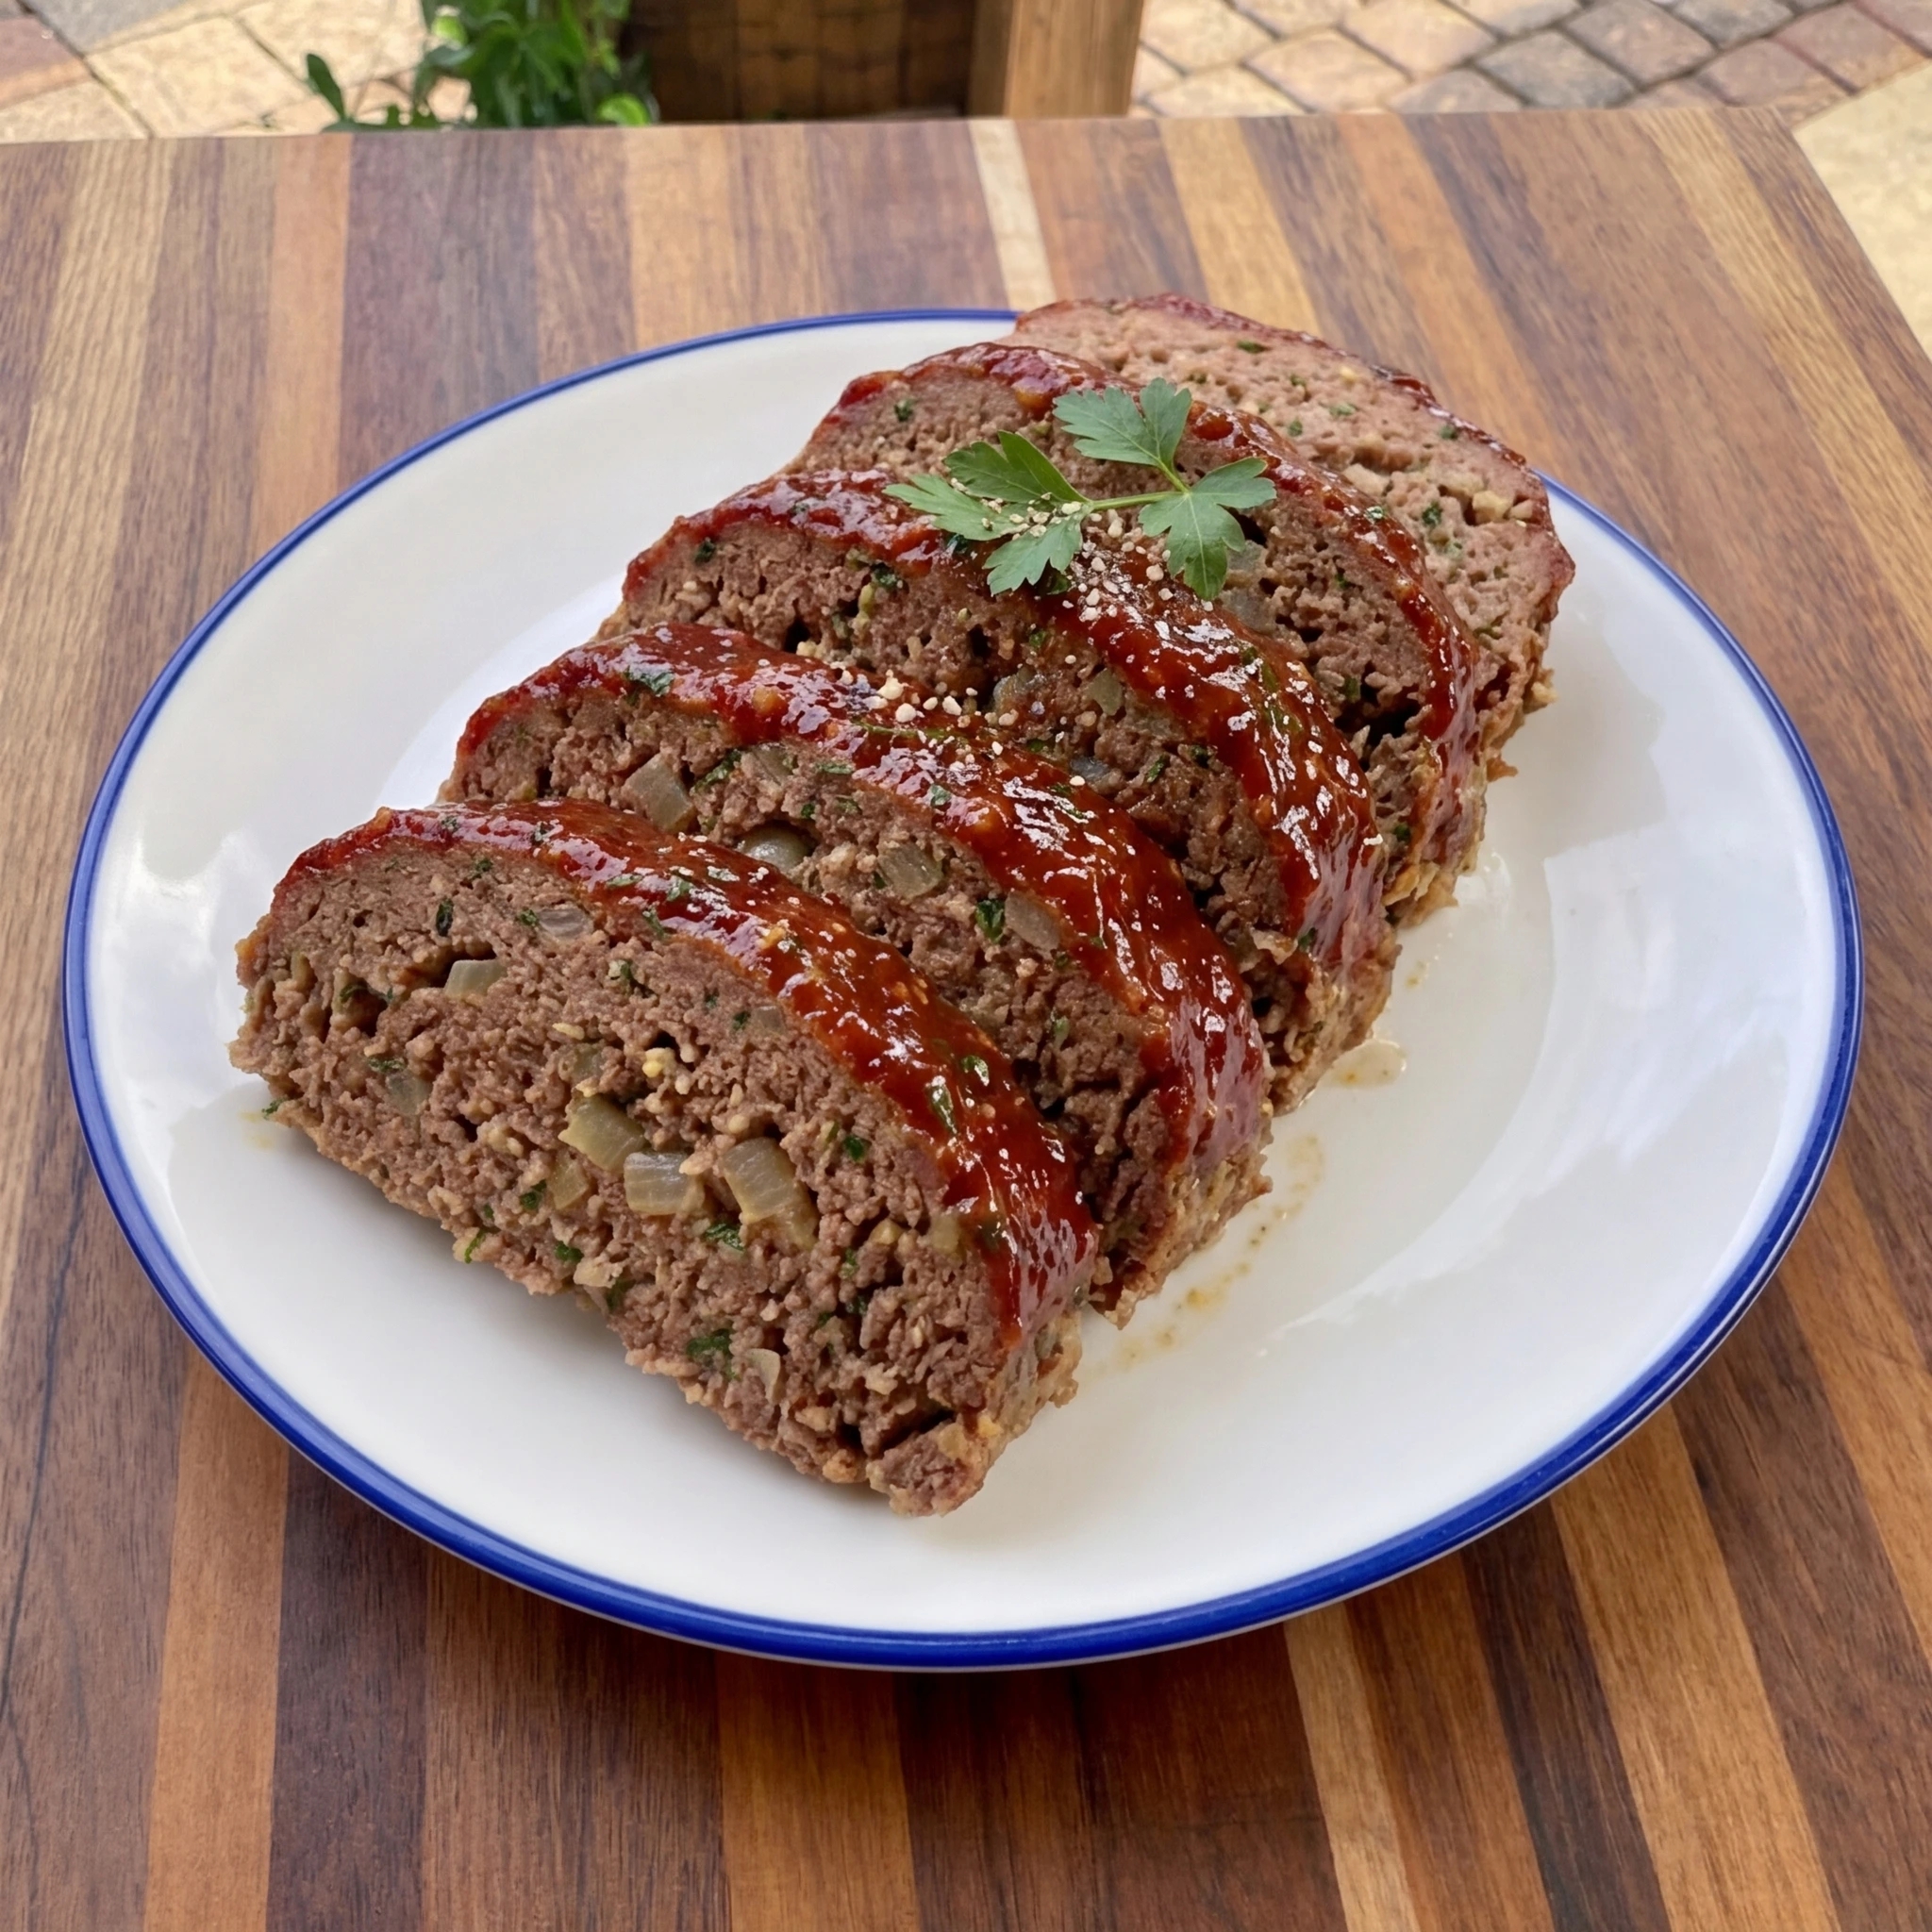
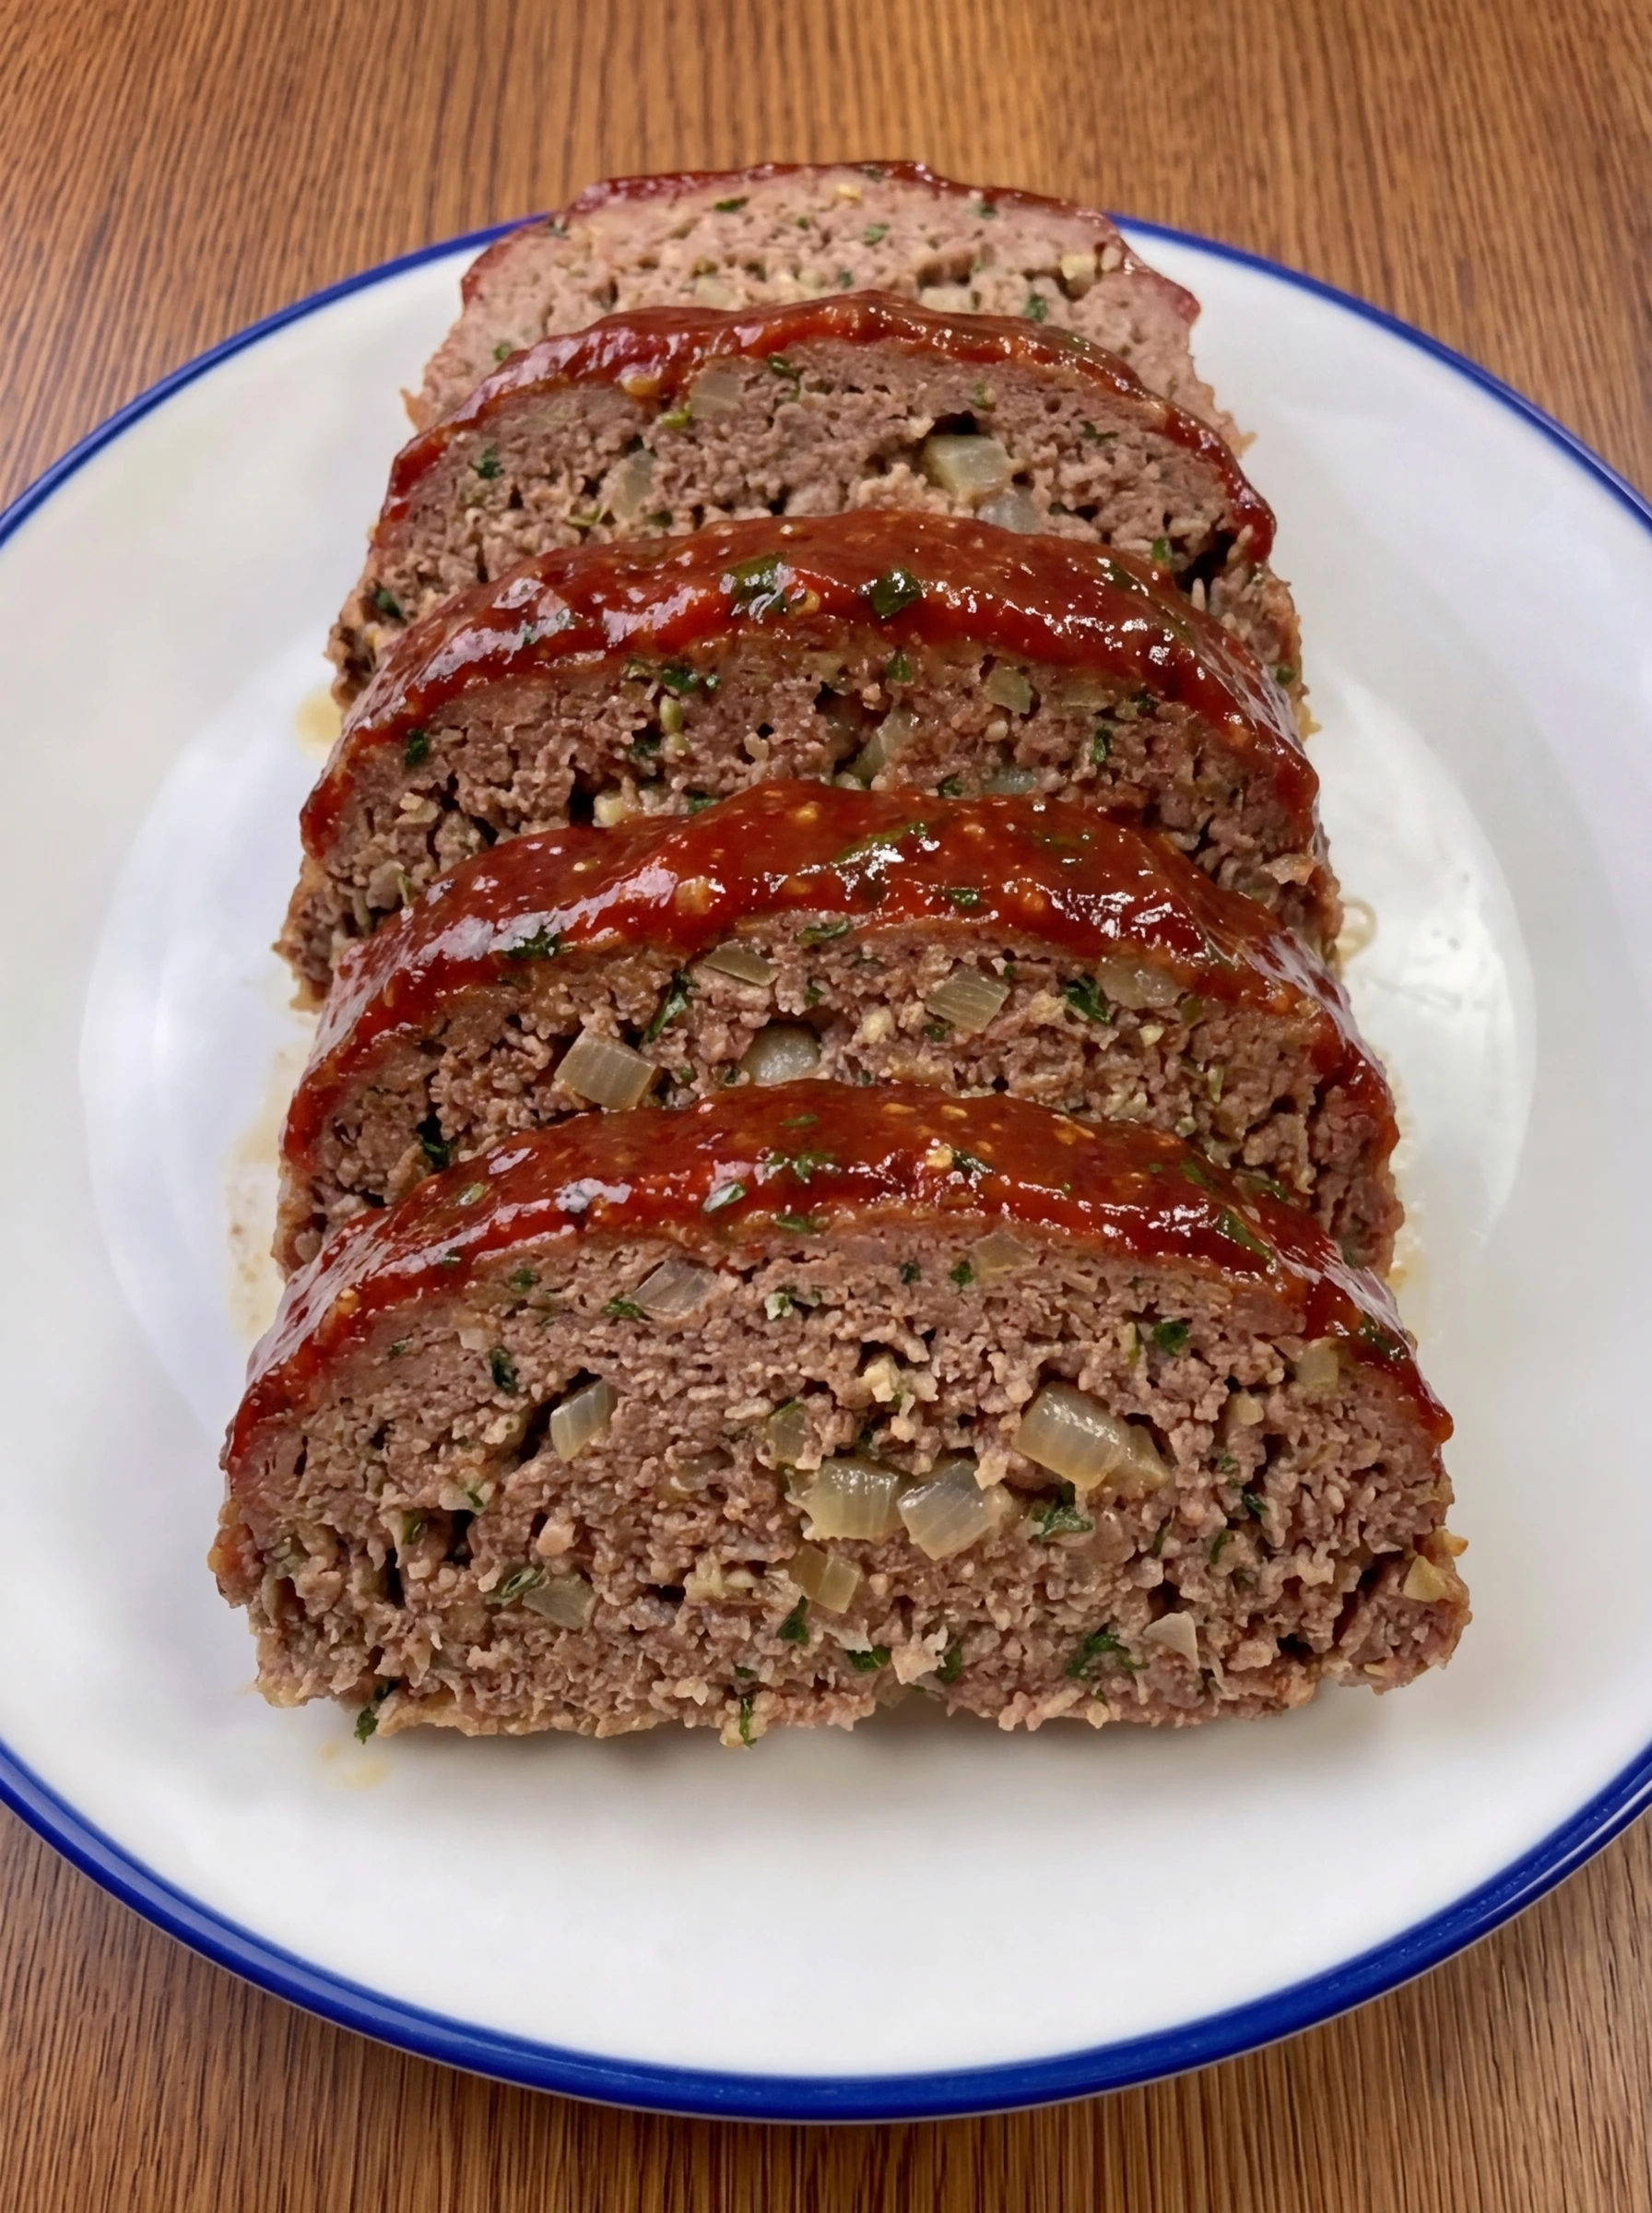
Step 7: Slice and arrange the meatloaf
Cut the rested meatloaf into thick even slices and arrange them neatly on a serving plate. Each slice should show a moist, tender interior with visible onion and parsley, while the glaze stays glossy across the top. At the end of this step, the slices should hold their shape without falling apart. The contrast between the rich red glaze and the savory beef center makes the meatloaf look ready to serve.
Tip: Use a sharp knife and wipe it between cuts for cleaner slices.
Step 8: Plate and serve the finished dish
Transfer the sliced meatloaf to the serving plate and brush a little extra glaze over the top for a fresh glossy finish. Arrange the slices so the interior is visible and the plate looks full, neat, and ready for the table. The final dish should look tender, rich, and inviting, with clean slices, a moist center, and a bright glazed top. This is the completed meatloaf plated and ready to serve.
Tip: A final brush of glaze makes the finished plate look extra fresh and flavorful.
Pro Tips
- Soak the breadcrumbs with the milk in the mixture so the meatloaf stays tender.
- Finely chop the onion so it blends into the loaf and does not leave large chunks.
- Do not overmix the beef or the texture can become tight and dense.
- Rest the meatloaf before slicing so the juices stay in the loaf instead of running out.
Storage Instructions
Store leftover meatloaf in an airtight container in the fridge for up to 4 days. For longer storage, wrap individual slices tightly and freeze them for up to 3 months. The glaze helps protect the surface, but for best freshness keep the slices well sealed so they do not dry out. Reheat gently until warmed through, and add a spoonful of extra ketchup or glaze on top if you want to refresh the moisture and flavor.
Frequently Asked Questions
How do I keep meatloaf from falling apart?
Use enough binder so the mixture holds together well. The breadcrumbs and eggs are important because they give the loaf structure and help the slices stay neat. Letting the meatloaf rest before slicing also makes a big difference because it firms up as it settles.
Can I make classic homemade meatloaf ahead of time?
Yes, this recipe is great for making ahead. You can prep and shape the loaf earlier, then keep it covered until you are ready to finish it. You can also slice the finished meatloaf and store it for easy weeknight dinners or meal prep lunches.
What is the best meat to use for meatloaf?
Ground beef is the classic choice for a traditional meatloaf flavor. A blend with a little fat works especially well because it keeps the loaf moist and flavorful. Very lean beef can work too, but the final texture may be a little less juicy.
Why should I rest meatloaf before slicing?
Resting helps the juices settle back into the loaf. If you slice it too soon, the inside can look looser and more moisture may run out onto the plate. A short rest gives you cleaner slices and a better texture.
Final Thoughts
If you try this recipe, I really hope you love it as much as my family does. It has become one of those dinners we just keep coming back to, no matter the season.
Drop a comment below and let me know how yours turned out. And if you are looking for more easy dinner ideas, make sure to bookmark this page.
I am always adding new recipes that are simple, satisfying, and perfect for busy weeknights.
Print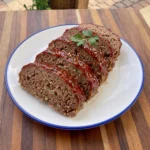
Classic Homemade Meatloaf
- Total Time: 1 hour 15 minutes
- Yield: 6 servings
Description
Looking for the best classic homemade meatloaf? This one is quick, easy, and wonderfully comforting with tender slices and a rich tomato glaze. Whether you are after a healthy dinner idea or a simple family favorite, this delivers every time. Great for weeknight dinner, meal prep, holiday tables, potluck spreads, brunch buffets, and any party. Save this easy meatloaf for your next dinner!
Ingredients
- 2 pounds ground beef
- 1 small, finely diced yellow onion
- 3 cloves, minced garlic
- 1 cup breadcrumbs
- 1/2 cup whole milk
- 2 large eggs
- 1 tablespoon Worcestershire sauce
- 1/2 cup ketchup
- 2 tablespoons, chopped fresh parsley
- 1 1/2 teaspoons salt
- 1/2 teaspoon black pepper
- 1 teaspoon paprika
- 2 tablespoons brown sugar
- 1 tablespoon yellow mustard
Instructions
- Place the ground beef, breadcrumbs, milk, eggs, ketchup, Worcestershire sauce, and seasonings into separate containers so everything is ready to use. Finely dice the onion, mince the garlic, and chop the parsley until each ingredient is small and even in size. At the end of this step, the ingredients should look neatly prepped and clearly separated. The onion and parsley add fresh color, the garlic is finely minced, and all of the measured ingredients are ready for mixing with no visible cooking or heat applied.
- In a small bowl, combine ketchup, brown sugar, and yellow mustard until smooth and evenly blended. The mixture should change from separate streaks of red, golden brown, and yellow into one glossy glaze with a thick, spreadable texture. Once mixed, the glaze should look shiny and uniform with no pockets of sugar left behind. This step creates the sweet and tangy topping that gives the finished meatloaf its classic look and rich surface color.
- Add the ground beef, diced onion, minced garlic, breadcrumbs, milk, eggs, Worcestershire sauce, ketchup, parsley, salt, pepper, and paprika to a large bowl. Gently mix until everything is evenly combined and the seasonings, breadcrumbs, and aromatics are distributed throughout the meat. The mixture should look moist, cohesive, and well blended, with bits of onion and parsley visible in the raw beef. It should hold together when pressed but still look soft rather than tightly packed.
- Transfer the meat mixture to a tray and shape it into a compact loaf with rounded edges and an even thickness from end to end. Press lightly so the loaf holds its form while keeping the surface smooth and the shape uniform. At this stage, the loaf should look sturdy and neatly formed, with a slightly textured surface from the ground beef. The raw mixture is now arranged in its final shape and ready for the glaze to be added on top.
- Spoon the prepared glaze over the top and sides of the shaped loaf, then smooth it into an even layer. The red coating should cover the surface neatly, with a little thickness on top so it stays visible after the loaf is finished. The loaf now looks more polished and defined, with a glossy red layer over the raw meat mixture. This step gives the loaf its signature appearance before it becomes fully set and sliceable.
- Once the meatloaf is fully finished, set it aside to rest before slicing. The loaf will look firm and settled, and the glaze on top will appear darker, thicker, and more set than before. Resting helps the juices stay inside the loaf so the slices hold together cleanly. Visually, the surface should look glossy and slightly sticky, while the loaf keeps a compact shape with no crumbling edges.
- Cut the rested meatloaf into thick even slices and arrange them neatly on a serving plate. Each slice should show a moist, tender interior with visible onion and parsley, while the glaze stays glossy across the top. At the end of this step, the slices should hold their shape without falling apart. The contrast between the rich red glaze and the savory beef center makes the meatloaf look ready to serve.
- Transfer the sliced meatloaf to the serving plate and brush a little extra glaze over the top for a fresh glossy finish. Arrange the slices so the interior is visible and the plate looks full, neat, and ready for the table. The final dish should look tender, rich, and inviting, with clean slices, a moist center, and a bright glazed top. This is the completed meatloaf plated and ready to serve.
Notes
Pro Tips:
- Soak the breadcrumbs with the milk in the mixture so the meatloaf stays tender.
- Finely chop the onion so it blends into the loaf and does not leave large chunks.
- Do not overmix the beef or the texture can become tight and dense.
- Rest the meatloaf before slicing so the juices stay in the loaf instead of running out.
Storage: Store leftover meatloaf in an airtight container in the fridge for up to 4 days. For longer storage, wrap individual slices tightly and freeze them for up to 3 months. The glaze helps protect the surface, but for best freshness keep the slices well sealed so they do not dry out. Reheat gently until warmed through, and add a spoonful of extra ketchup or glaze on top if you want to refresh the moisture and flavor.
- Prep Time: 20 minutes
- Cook Time: 55 minutes
- Category: Dinner
- Cuisine: American