This Classic Spaghetti Bolognese recipe is packed with flavor and so easy to make. It is a budget friendly recipe that you can make in 45 minutes or less! Make this rich and hearty pasta recipe for dinner tonight.
If you love saucy pasta recipes then you are going to love this Classic Spaghetti Bolognese recipe. It is a comforting dinner that is hearty and flavorful and completely satisfying. With a rich sauce like this you are going to want something to soak up every single last bit.
If you are looking for other cozy dinner recipes like my Classic Spaghetti Bolognese then why not also try a creamy chicken pasta or a simple baked meatball dish. Both of those recipes come together fast which makes them perfect for a quick weeknight meal.
Ingredients
Here’s what I use for this recipe and you can always make substitutions if you prefer.
- spaghetti: the main pasta that holds the sauce well
- ground beef: adds rich savory body to the sauce
- yellow onion: brings sweetness and depth
- carrot: adds gentle sweetness and texture
- celery stalk: builds classic aromatic flavor
- garlic: adds sharp savory aroma
- tomato paste: intensifies tomato richness
- crushed tomatoes: forms the base of the sauce
- beef broth: loosens and enriches the sauce
- dry red wine: adds depth and balance
- whole milk: softens acidity and adds a silky finish
- olive oil: helps the vegetables soften and the meat brown
- dried oregano: adds earthy herb flavor
- dried basil: adds sweet herb flavor
- kosher salt: seasons the pasta and sauce
- black pepper: adds gentle heat
- granulated sugar: balances the tomatoes if needed
- Parmesan cheese: adds salty nutty finish
- fresh parsley: bright garnish for the final dish
Tools You’ll Need
- chef knife: for finely dicing the vegetables and chopping parsley
- mixing bowls: for holding prepped ingredients and seasoning the beef
- large deep pan: for building and simmering the sauce
- large pot: for boiling the spaghetti
- wooden spoon: for breaking up the beef and mixing the sauce
- colander: for draining the cooked spaghetti
Instructions
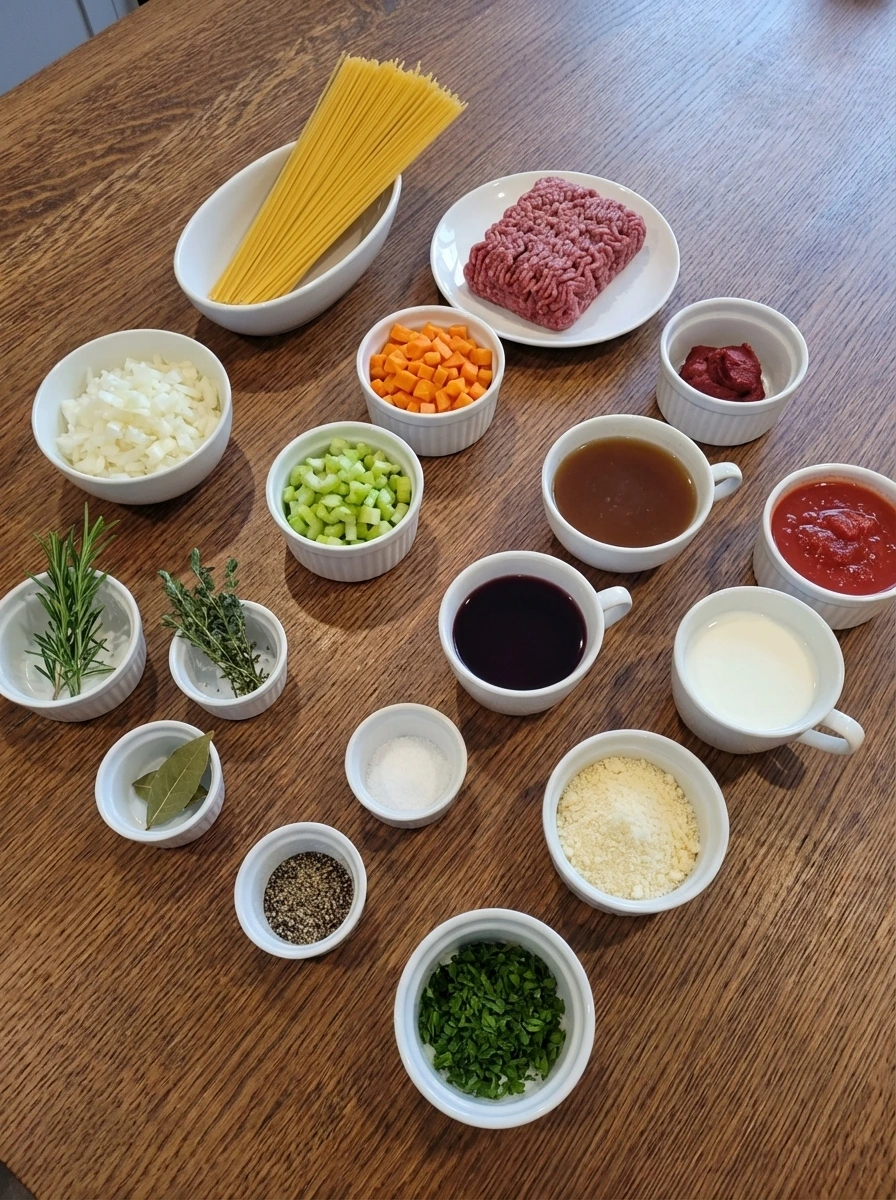
Step 1: Measure And Prep The Ingredients
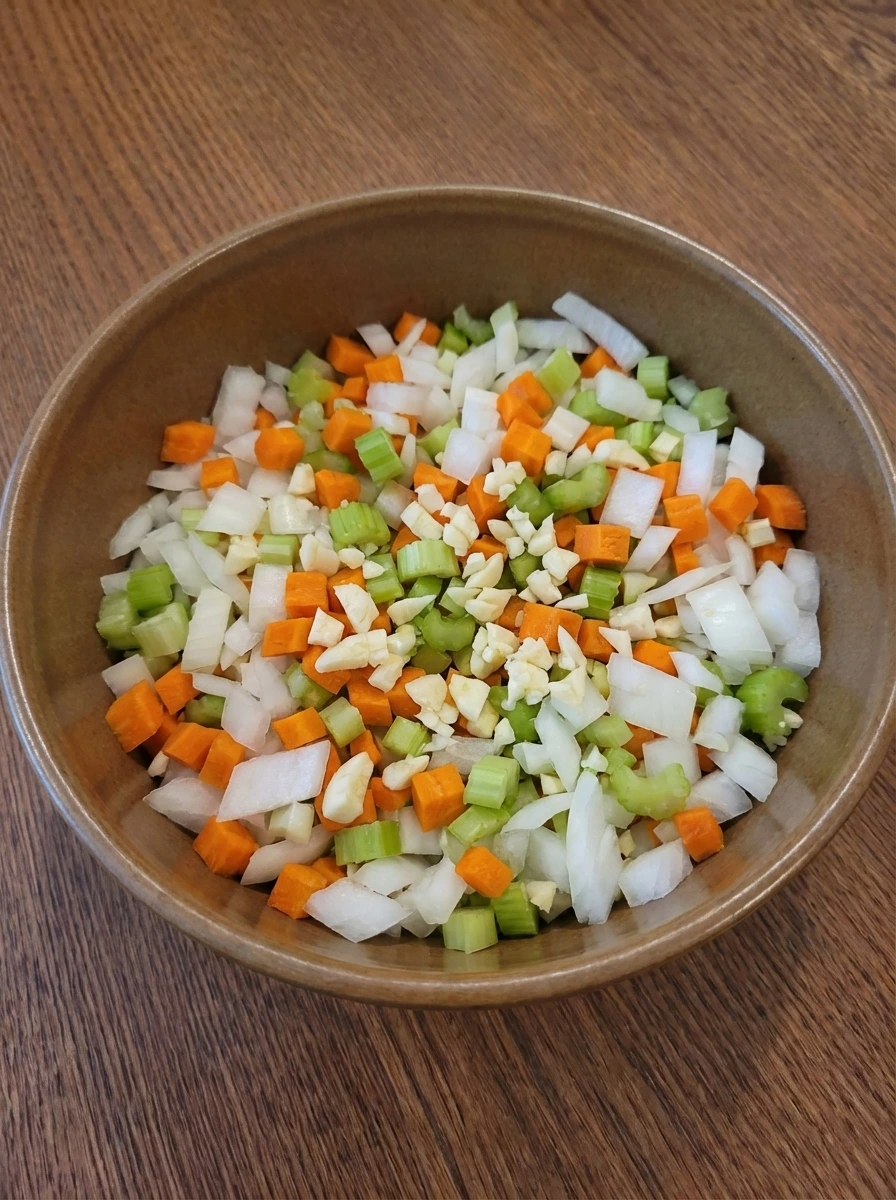
Add the diced onion diced carrot diced celery and minced garlic to one large bowl so the colors look fresh and distinct with small uneven pieces throughout. Place the ground beef in a separate bowl then measure the tomato paste crushed tomatoes broth wine milk herbs salt pepper and Parmesan into their own portions so everything is ready to go. At this stage the food is completely raw and separate. The vegetables look crisp and dry while the beef is soft and loose and the seasonings are still unmixed.
Tip: Finely diced vegetables melt into the sauce more easily and give the finished Bolognese a smoother texture.
Step 2: Season The Beef
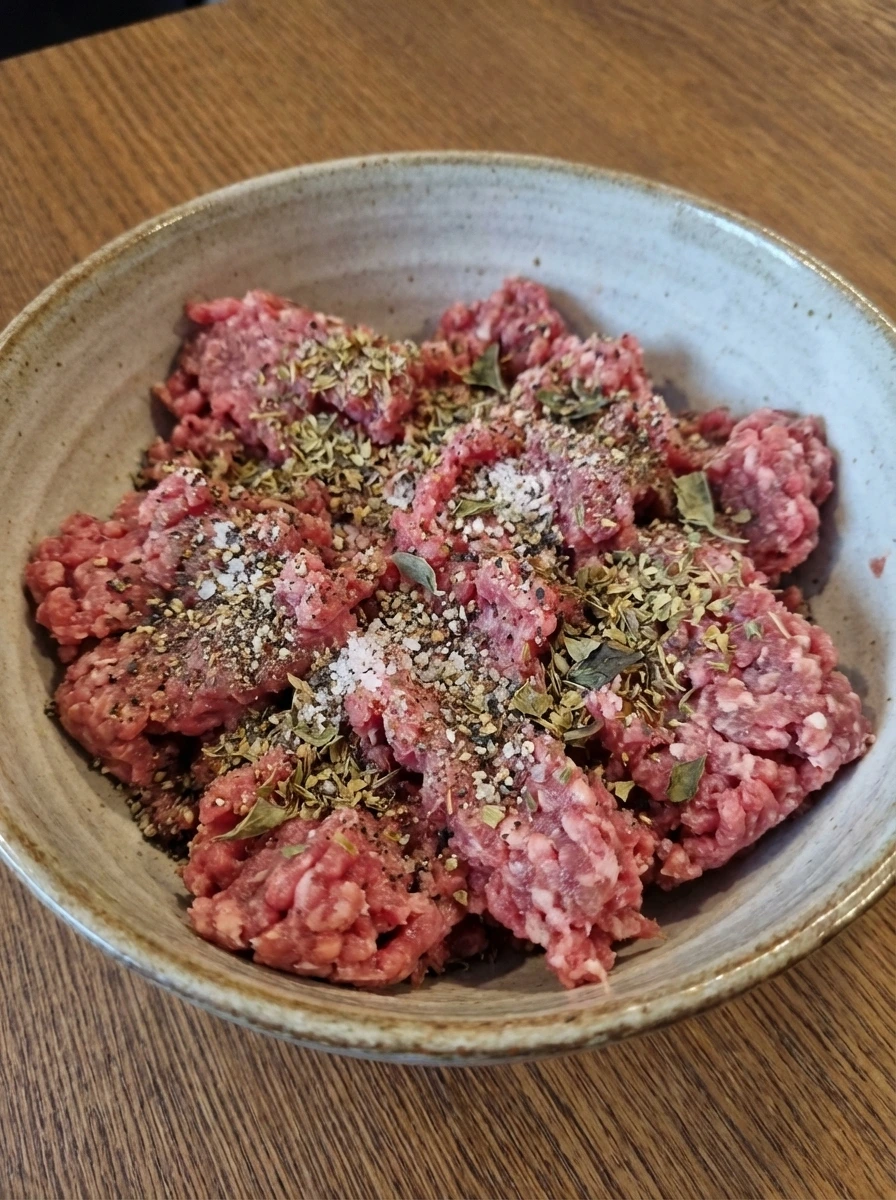
Sprinkle the ground beef with salt pepper oregano and basil then gently break it up and mix just until the seasoning is spread through the meat. The surface changes from plain pink meat to a lightly speckled mixture with herbs and seasoning scattered all through it. The beef should still look raw and loose though now it is visibly seasoned and ready for the next stage.
Tip: Mix lightly so the beef stays tender rather than compact and dense.
Step 3: Start The Aromatics
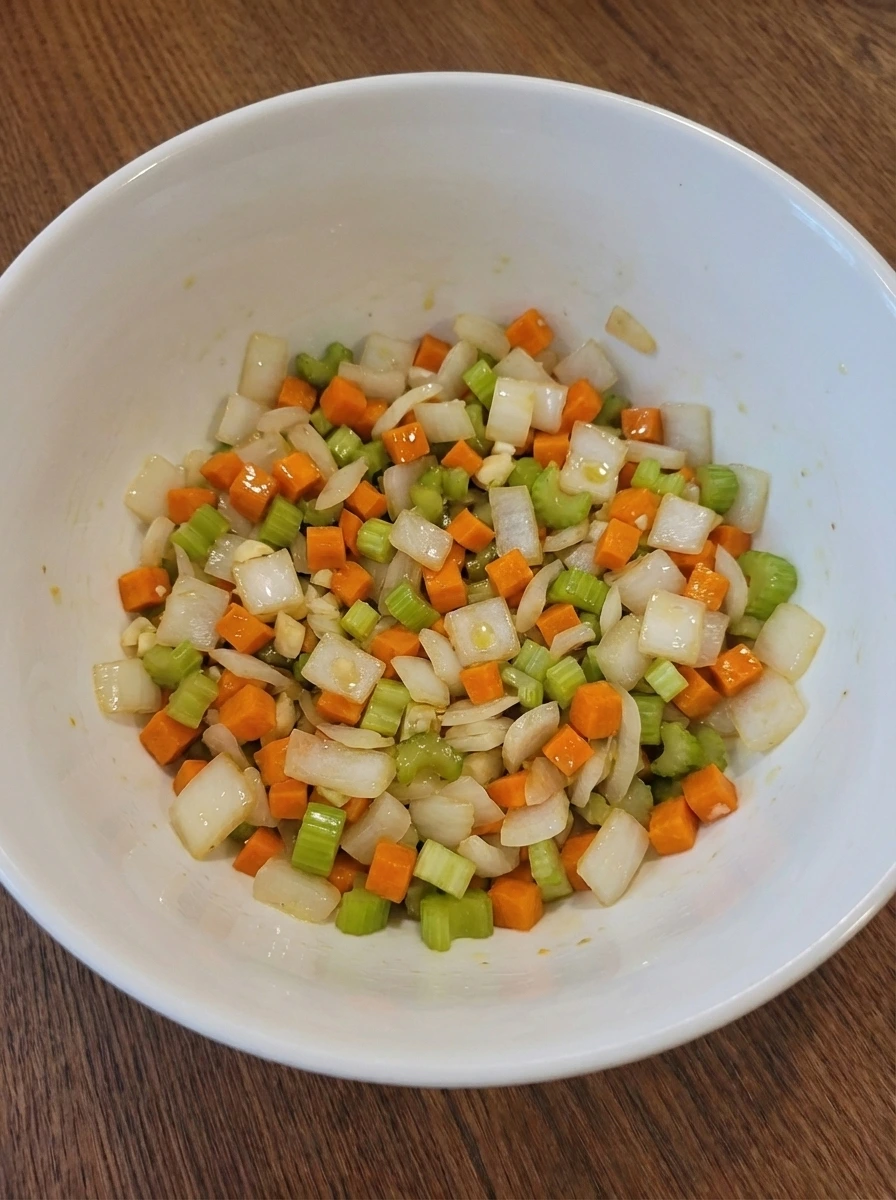
Pour the olive oil over the diced onion carrot and celery and mix them so the vegetables look lightly coated instead of dry. As they begin to cook they shift from sharp raw edges to a slightly glossy and softer look while the colors mellow a little. The bowl of vegetables now looks lightly slick and partially softened rather than crisp and dry.
Tip: Give the vegetables enough time to soften well because this builds sweetness into the sauce.
Step 4: Soften The Garlic With The Vegetables
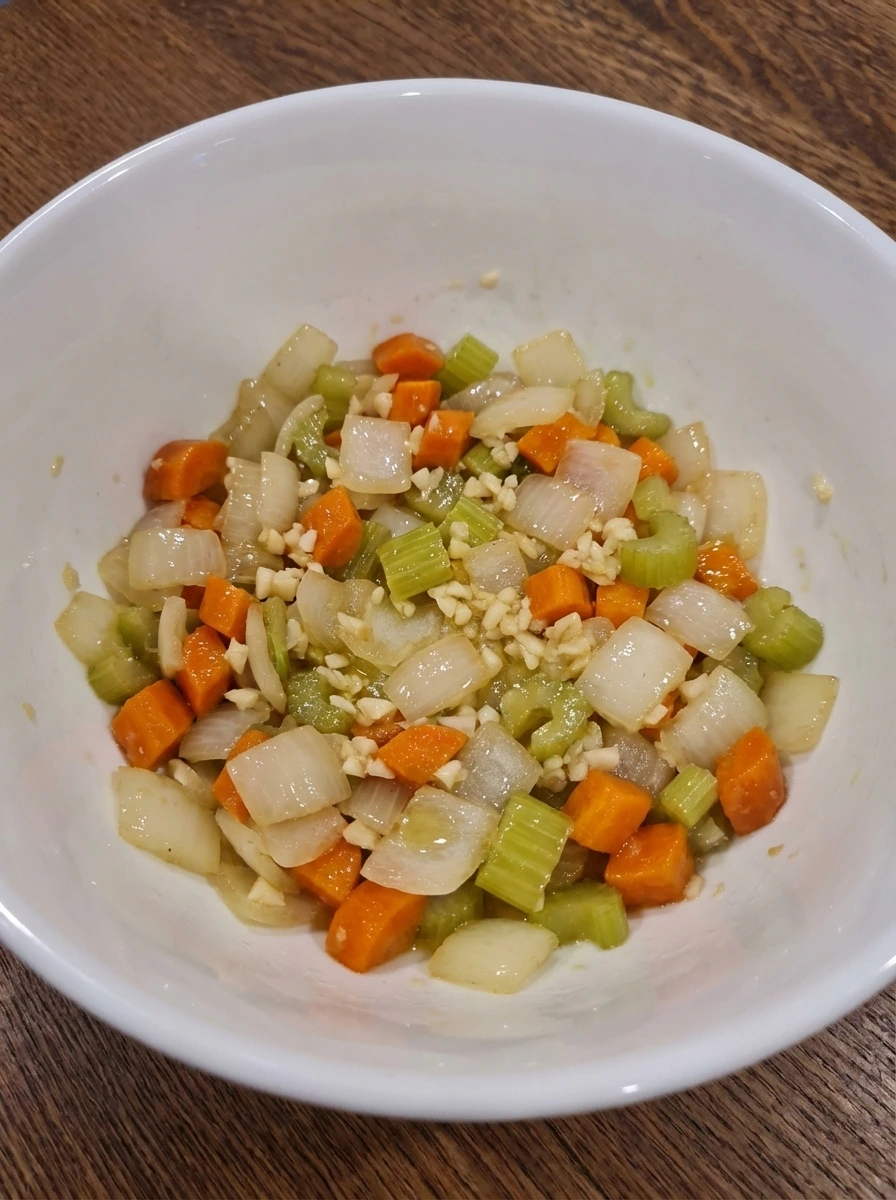
Scatter the minced garlic over the softened vegetables and fold it through so the mixture becomes more fragrant and cohesive. The tiny pieces of garlic disappear into the vegetables and the whole mixture looks softer and a little more relaxed in texture. The food has moved from simply coated to visibly softened and more unified with no sharp raw look left on the aromatics.
Tip: Add garlic after the vegetables have softened a bit so it blends in without turning harsh.
Step 5: Brown The Beef
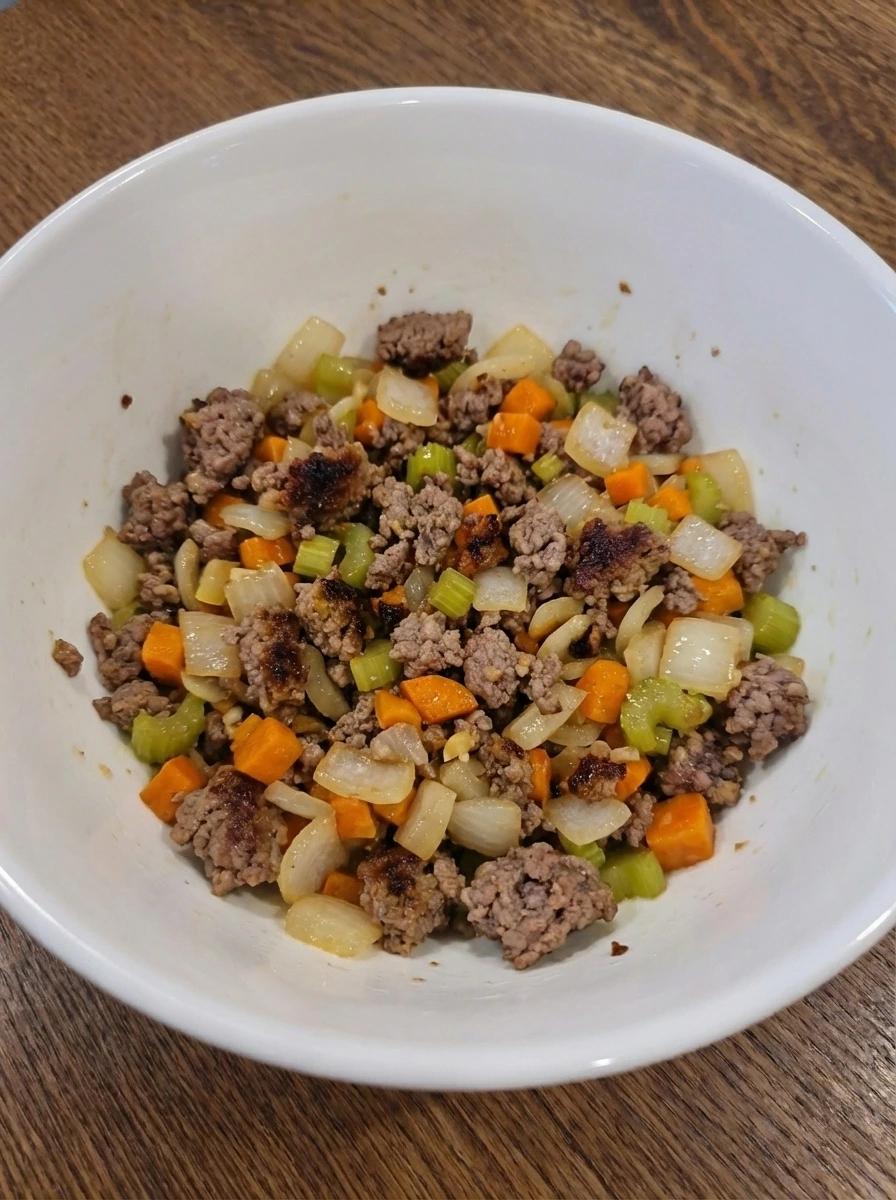
Add the seasoned beef over the softened vegetables and break it up as it cooks so the pink color slowly changes to brown in uneven crumbles. Some pieces darken a bit more than others and the vegetables tuck in around the meat creating a rough hearty mixture. This is the first major visual transformation from raw meat to slightly browned meat and softened vegetables all mixed together.
Tip: Leave a few larger crumbles for a more rustic homemade texture.
Step 6: Mix In Tomato Paste
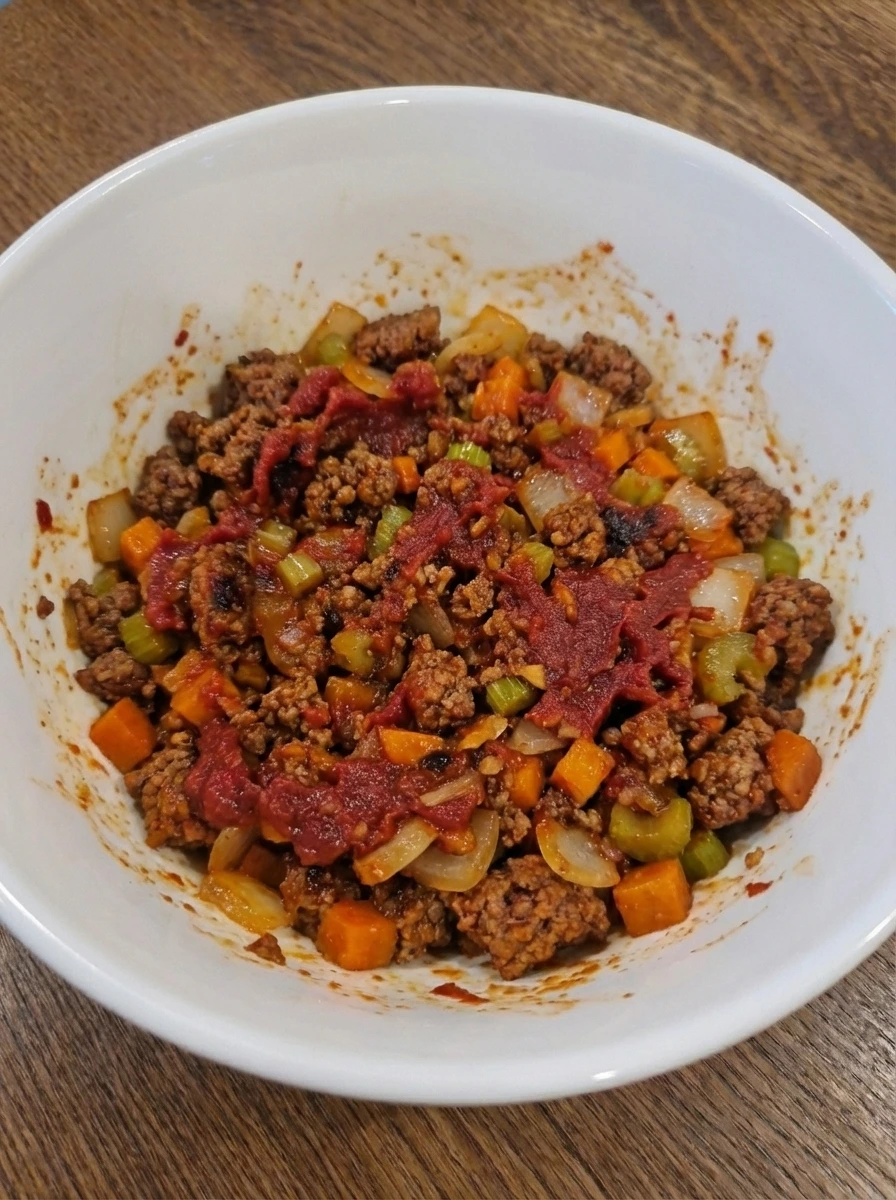
Spoon the tomato paste over the browned beef mixture and stir until the meat and vegetables are coated in a deeper brick red layer. The mixture looks thicker and slightly sticky with concentrated tomato color clinging unevenly to the crumbles. This stage gives the food a coated look and the sauce base starts to feel richer and more developed.
Tip: Cook the tomato paste until it darkens slightly for a sweeter deeper flavor.
Step 7: Build The Sauce
Pour in the red wine then the crushed tomatoes and broth and stir until everything loosens into a chunky red sauce. The thick coated meat mixture changes into a wetter more fluid sauce with visible beef crumbles and softened vegetables suspended all through it. As it cooks the sauce begins to settle and the surface turns glossy with deeper red brown tones appearing in uneven patches.
Tip: Stir well so the sauce looks fully combined yet still rustic with visible texture.
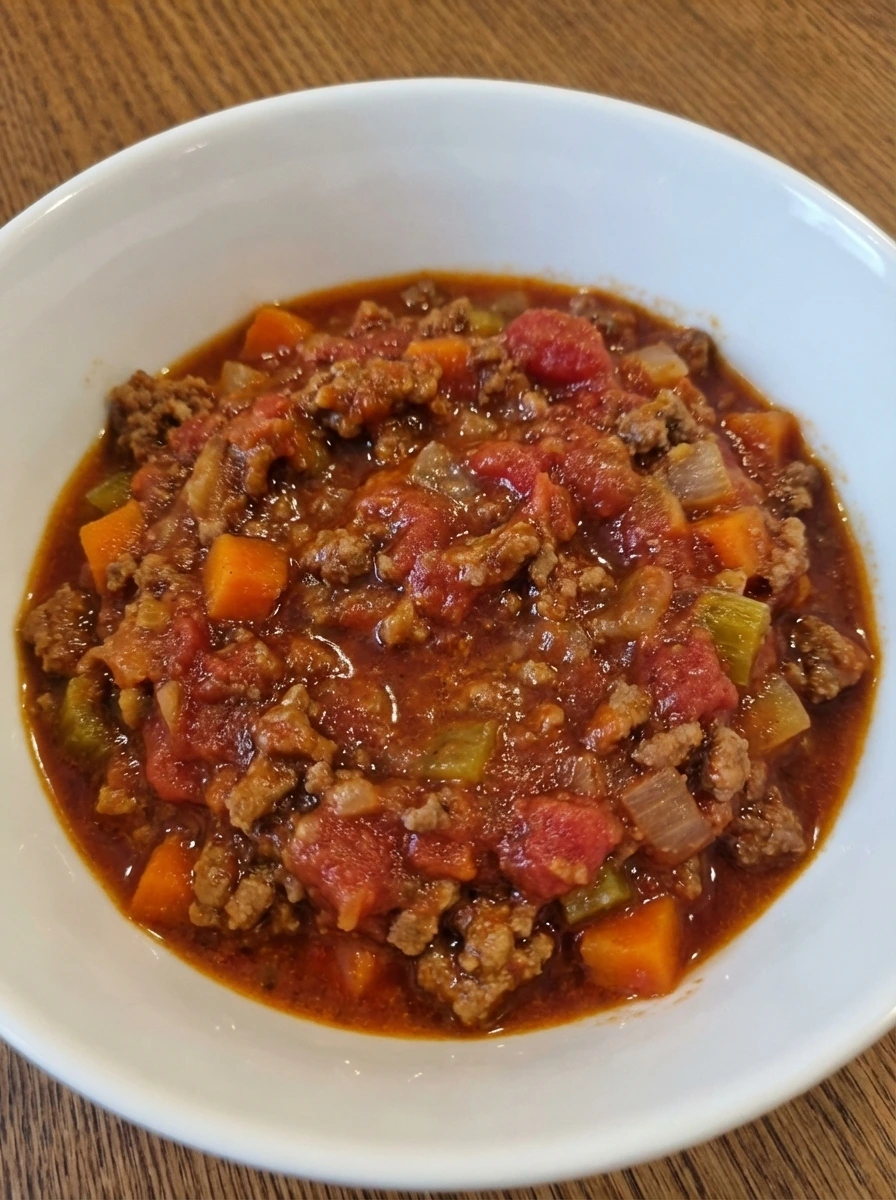
Step 8: Simmer Until Thick And Rich
Stir in the milk and let the sauce cook down until it thickens and turns a deeper red brown color with a soft velvety look. The vegetables become even more tender and the sauce clings more closely to the meat instead of looking loose. By the end of this stage the sauce should look rich and finished with gentle texture variation and a slightly reduced surface rather than a thin raw tomato look.
Tip: If the tomatoes taste too sharp stir in the optional sugar to round out the sauce.
Step 9: Cook The Spaghetti
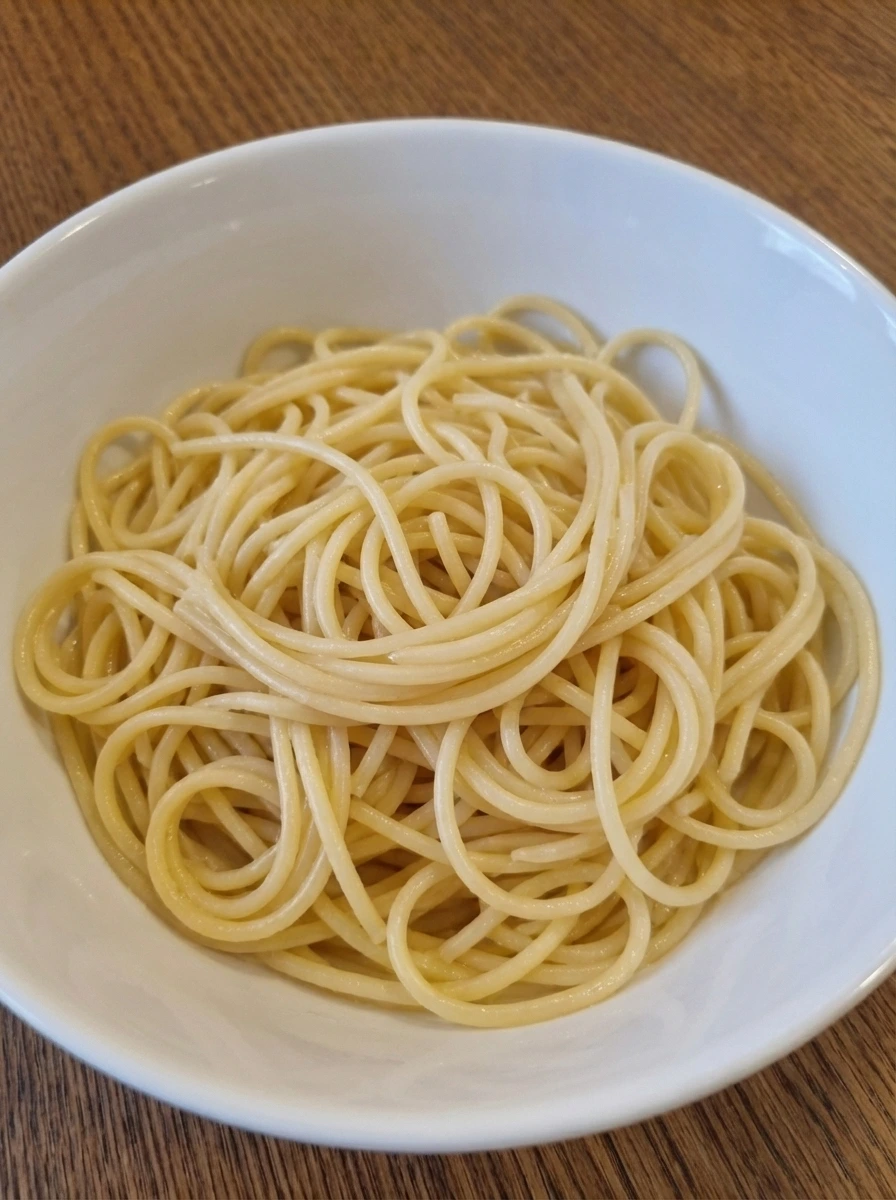
Add the spaghetti to salted water and cook until tender so the strands go from stiff and pale to flexible and lightly swollen. Once drained the pasta looks glossy and loose with a gentle curve instead of a dry brittle shape. The strands should remain separate enough to mix easily with the sauce while still looking soft and fully cooked.
Tip: Save a splash of pasta water in case you want to loosen the sauce later.
Step 10: Combine Pasta And Sauce
Spoon the thick Bolognese over the cooked spaghetti and toss until the strands are coated though not perfectly covered. Some areas hold more sauce while a few pale strands still peek through and the meat settles naturally between the pasta twists. Scatter in the grated Parmesan and fold again so tiny melted bits cling unevenly to the warm sauce and noodles. The dish now looks glossy hearty and fully combined with real homemade variation.
Tip: Do not overmix because the best texture comes from sauce clinging unevenly to the pasta.
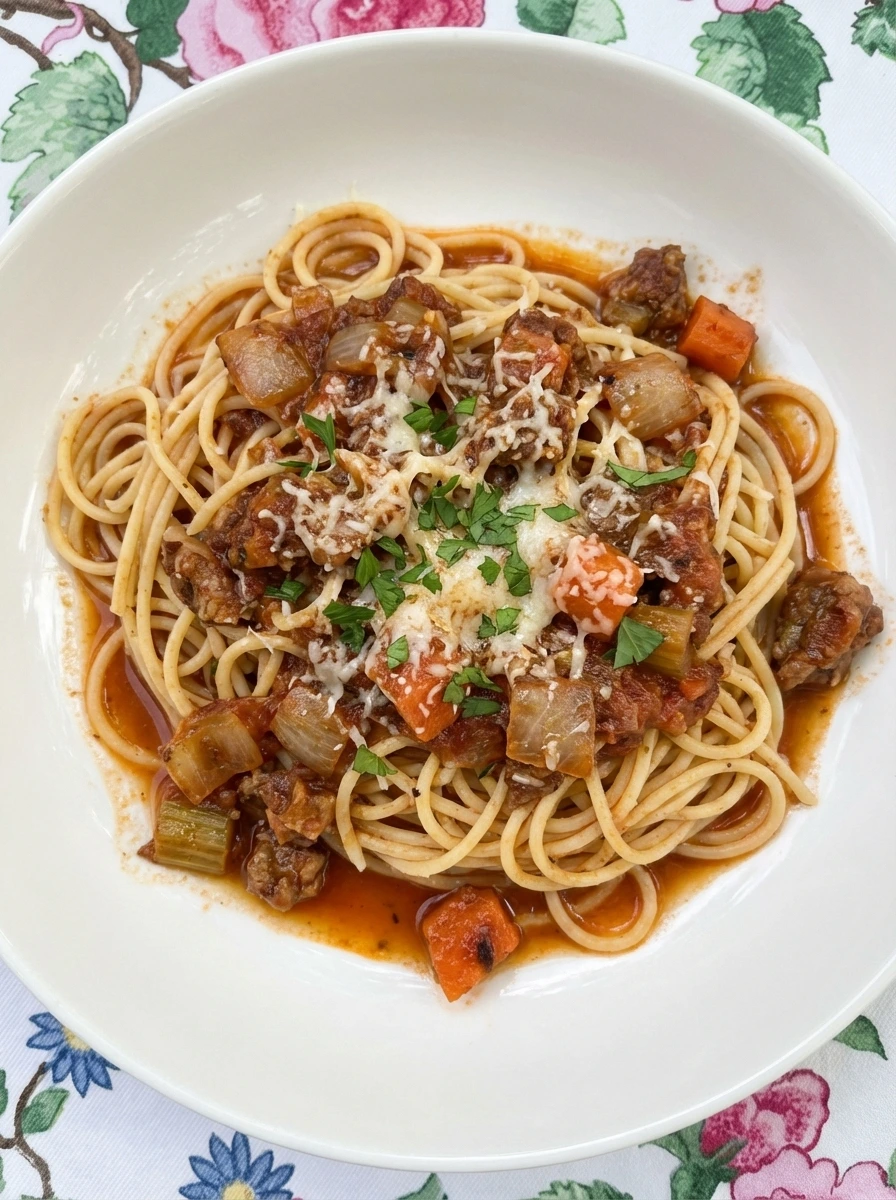
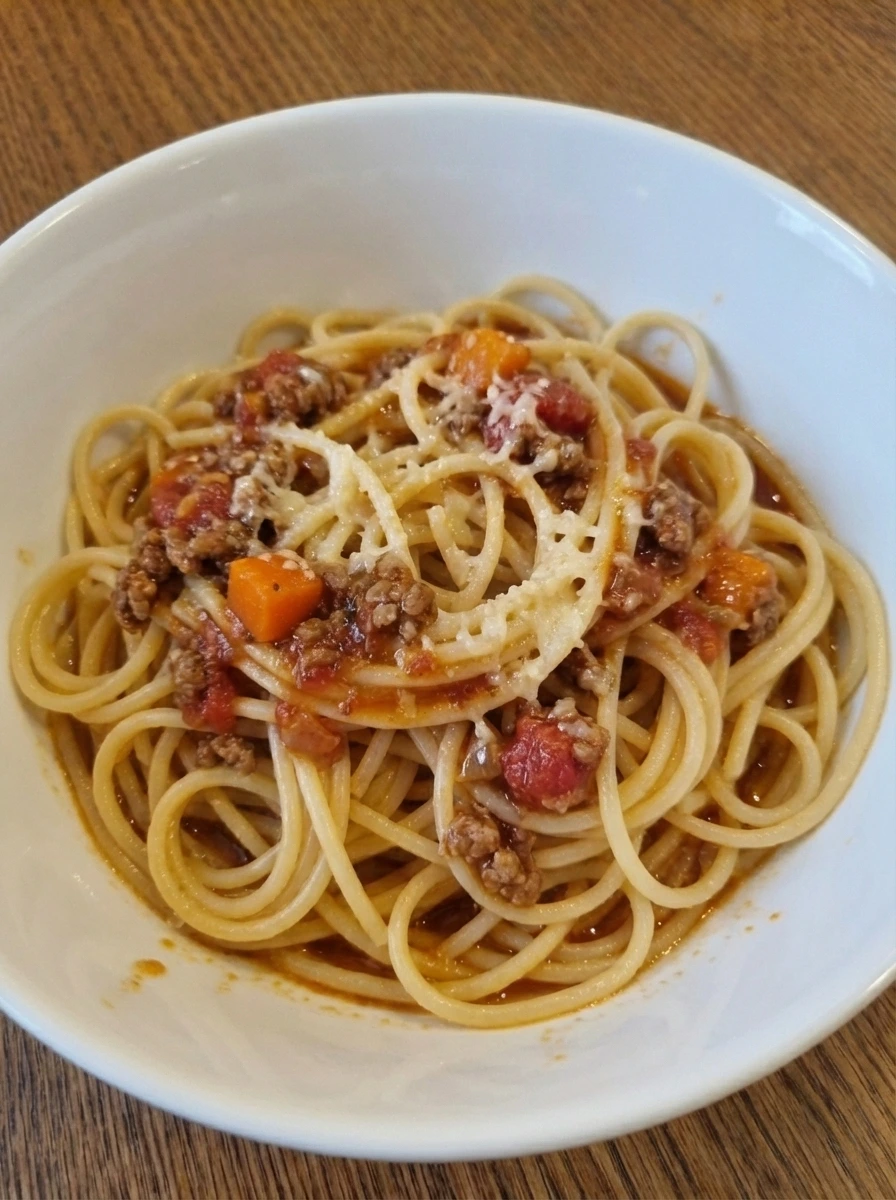
Step 11: Plate And Garnish
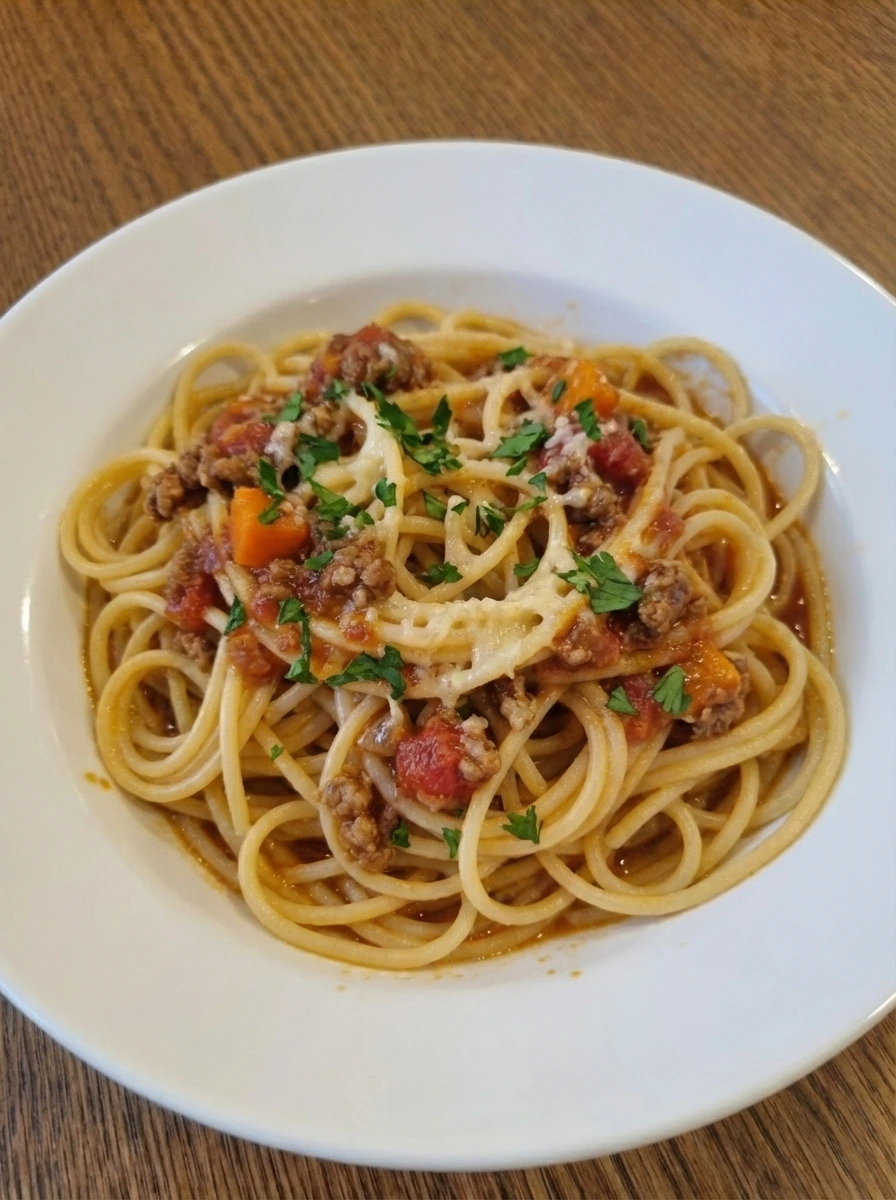
Pile the spaghetti Bolognese onto a shallow white ceramic pasta plate and spoon any extra sauce loosely over the top so some parts look more saucy than others. Finish with a casual scattering of extra Parmesan and chopped parsley for contrast and a little fresh color. The final dish looks fully cooked and ready to serve with rich red brown sauce tender noodles irregular melted cheese and natural variation in texture and coverage across the plate.
Tip: A final spoonful of sauce over the top keeps the plated pasta looking juicy and generous.
Pro Tips
- Dice the onion carrot and celery small so they soften quickly and blend into the sauce.
- Let the tomato paste darken slightly before adding liquids for deeper flavor.
- Simmer the sauce until it looks thick and glossy so it clings to the pasta well.
- Toss the pasta with sauce just before serving so the noodles stay tender and coated.
Storage Instructions
Store leftover spaghetti Bolognese in an airtight container in the refrigerator for up to 4 days. Reheat gently until hot and add a small splash of water or broth if the sauce has thickened too much. For longer storage freeze the sauce separately for up to 3 months for the best texture.
Frequently Asked Questions
Can I make Classic Spaghetti Bolognese ahead of time?
Yes and the sauce often tastes even better the next day because the flavors have more time to settle together.
Can I use another pasta shape?
Yes although spaghetti is classic and you can also use fettuccine tagliatelle or rigatoni for a slightly different texture.
Can I freeze the Bolognese sauce?
Yes and let it cool fully first then store it in a sealed container and freeze for up to 3 months.
What can I serve with spaghetti Bolognese?
A simple green salad and warm garlic bread work really well with the rich hearty sauce.
Final Thoughts
If you try this recipe I really hope you love it as much as my family does. It has become one of those dinners we just keep coming back to no matter the season.
Drop a comment below and let me know how yours turned out. And if you are looking for more easy dinner ideas make sure to bookmark this page.
I am always adding new recipes that are simple satisfying and perfect for busy weeknights.
Print
Classic Spaghetti Bolognese
- Total Time: 45 minutes
- Yield: 4 servings 1x
Description
This easy Classic Spaghetti Bolognese is one of the best dinner ideas for a quick and simple meal that still feels special. The rich sauce and tender pasta make it healthy enough for meal prep and cozy enough for a weeknight dinner. It also works well for a holiday table and a casual potluck and party spread when you want something hearty and crowd pleasing.
Ingredients
- 12 ounces spaghetti
- 1 pound ground beef
- 1 medium finely diced yellow onion
- 1 medium finely diced carrot
- 1 finely diced celery stalk
- 3 cloves minced garlic
- 2 tablespoons tomato paste
- 1 can 28 ounces crushed tomatoes
- 1 cup beef broth
- 1/2 cup dry red wine
- 1/2 cup whole milk
- 2 tablespoons olive oil
- 1 teaspoon dried oregano
- 1 teaspoon dried basil
- 1 1/2 teaspoons plus more to taste kosher salt
- 1/2 teaspoon plus more to taste black pepper
- 1/2 teaspoon optional granulated sugar
- 1/3 cup finely grated plus more for garnish Parmesan cheese
- 2 tablespoons chopped fresh parsley
Instructions
- Add the diced onion diced carrot diced celery and minced garlic to one large bowl so the colors look fresh and distinct with small uneven pieces throughout. Place the ground beef in a separate bowl then measure the tomato paste crushed tomatoes broth wine milk herbs salt pepper and Parmesan into their own portions so everything is ready to go. At this stage the food is completely raw and separate. The vegetables look crisp and dry while the beef is soft and loose and the seasonings are still unmixed.
- Sprinkle the ground beef with salt pepper oregano and basil then gently break it up and mix just until the seasoning is spread through the meat. The surface changes from plain pink meat to a lightly speckled mixture with herbs and seasoning scattered all through it. The beef should still look raw and loose though now it is visibly seasoned and ready for the next stage.
- Pour the olive oil over the diced onion carrot and celery and mix them so the vegetables look lightly coated instead of dry. As they begin to cook they shift from sharp raw edges to a slightly glossy and softer look while the colors mellow a little. The bowl of vegetables now looks lightly slick and partially softened rather than crisp and dry.
- Scatter the minced garlic over the softened vegetables and fold it through so the mixture becomes more fragrant and cohesive. The tiny pieces of garlic disappear into the vegetables and the whole mixture looks softer and a little more relaxed in texture. The food has moved from simply coated to visibly softened and more unified with no sharp raw look left on the aromatics.
- Add the seasoned beef over the softened vegetables and break it up as it cooks so the pink color slowly changes to brown in uneven crumbles. Some pieces darken a bit more than others and the vegetables tuck in around the meat creating a rough hearty mixture. This is the first major visual transformation from raw meat to slightly browned meat and softened vegetables all mixed together.
- Spoon the tomato paste over the browned beef mixture and stir until the meat and vegetables are coated in a deeper brick red layer. The mixture looks thicker and slightly sticky with concentrated tomato color clinging unevenly to the crumbles. This stage gives the food a coated look and the sauce base starts to feel richer and more developed.
- Pour in the red wine then the crushed tomatoes and broth and stir until everything loosens into a chunky red sauce. The thick coated meat mixture changes into a wetter more fluid sauce with visible beef crumbles and softened vegetables suspended all through it. As it cooks the sauce begins to settle and the surface turns glossy with deeper red brown tones appearing in uneven patches.
- Stir in the milk and let the sauce cook down until it thickens and turns a deeper red brown color with a soft velvety look. The vegetables become even more tender and the sauce clings more closely to the meat instead of looking loose. By the end of this stage the sauce should look rich and finished with gentle texture variation and a slightly reduced surface rather than a thin raw tomato look.
- Add the spaghetti to salted water and cook until tender so the strands go from stiff and pale to flexible and lightly swollen. Once drained the pasta looks glossy and loose with a gentle curve instead of a dry brittle shape. The strands should remain separate enough to mix easily with the sauce while still looking soft and fully cooked.
- Spoon the thick Bolognese over the cooked spaghetti and toss until the strands are coated though not perfectly covered. Some areas hold more sauce while a few pale strands still peek through and the meat settles naturally between the pasta twists. Scatter in the grated Parmesan and fold again so tiny melted bits cling unevenly to the warm sauce and noodles. The dish now looks glossy hearty and fully combined with real homemade variation.
- Pile the spaghetti Bolognese onto a shallow white ceramic pasta plate and spoon any extra sauce loosely over the top so some parts look more saucy than others. Finish with a casual scattering of extra Parmesan and chopped parsley for contrast and a little fresh color. The final dish looks fully cooked and ready to serve with rich red brown sauce tender noodles irregular melted cheese and natural variation in texture and coverage across the plate.
Notes
Pro Tips:
- Dice the onion carrot and celery small so they soften quickly and blend into the sauce.
- Let the tomato paste darken slightly before adding liquids for deeper flavor.
- Simmer the sauce until it looks thick and glossy so it clings to the pasta well.
- Toss the pasta with sauce just before serving so the noodles stay tender and coated.
Storage: Store leftover spaghetti Bolognese in an airtight container in the refrigerator for up to 4 days. Reheat gently until hot and add a small splash of water or broth if the sauce has thickened too much. For longer storage freeze the sauce separately for up to 3 months for the best texture.
- Prep Time: 15 minutes
- Cook Time: 30 minutes
- Category: Dinner
- Cuisine: Italian
Nutrition
- Serving Size: 1 serving