This Classic Cobb Salad is a great meal to make when you are in the mood for something fresh and tasty.
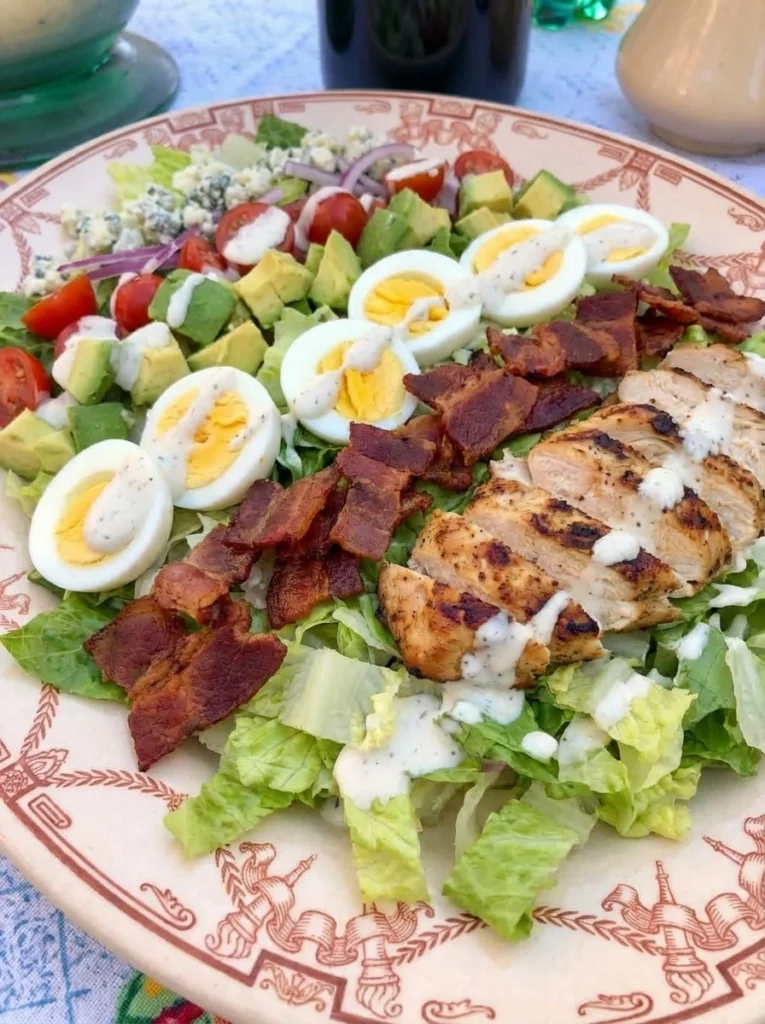
This yummy meal is great for any occasion and it can be made for lunch and dinner and even a filling after gym snack In this post we will show you how to make this recipe right at home with simple steps.
Ingredients
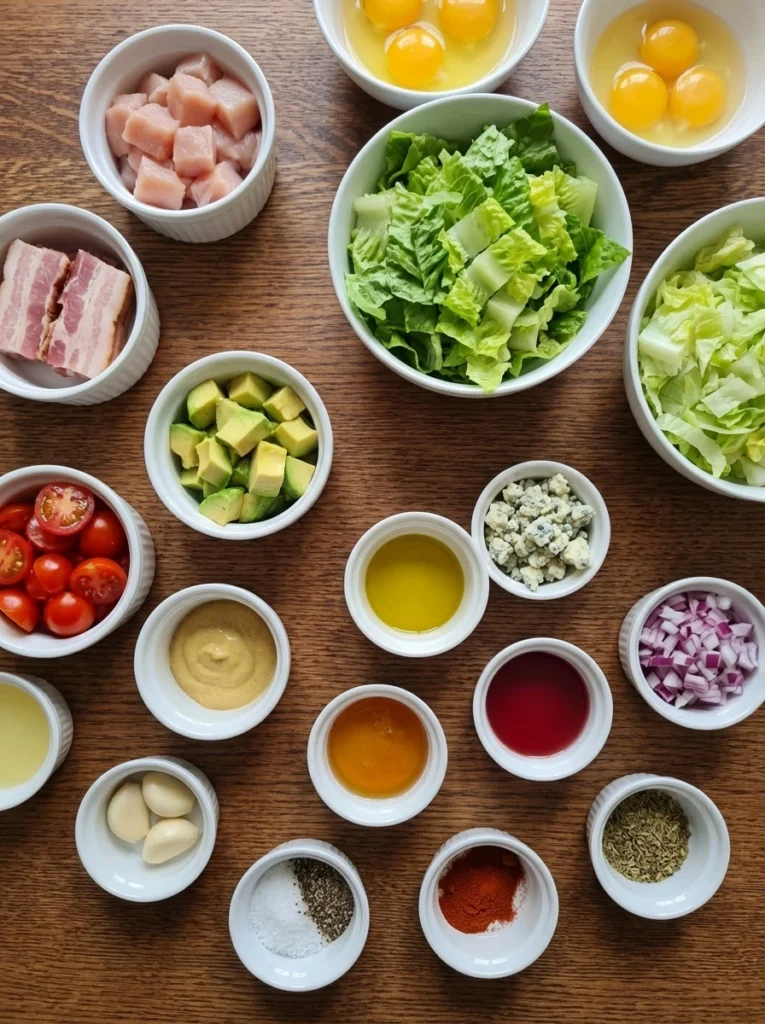
Here’s what I use for this recipe and you can always make substitutions if you prefer.
- boneless skinless chicken breasts: main protein that turns juicy and lightly browned
- thick cut bacon: adds smoky crisp bites and savory richness
- large eggs: gives creamy firm texture and classic Cobb flavor
- romaine lettuce: adds crisp fresh body
- iceberg lettuce: brings extra crunch and lightness
- ripe avocado: adds buttery soft texture
- cherry tomatoes: adds juicy sweet bright contrast
- blue cheese: adds sharp creamy salty finish
- red onion: adds a crisp bite and color
- olive oil: helps coat chicken and enrich dressing
- lemon juice: brightens the dressing and chicken
- red wine vinegar: adds tangy salad balance
- Dijon mustard: helps the dressing emulsify
- honey: softens the sharp edges of the dressing
- garlic: adds savory depth
- kosher salt: seasons chicken eggs and dressing
- black pepper: adds warmth and mild heat
- paprika: gives the chicken color and gentle smoky flavor
- dried oregano: adds herb flavor to the chicken
- water: gently cooks the eggs
Tools You’ll Need
- mixing bowl: for tossing the greens with dressing
- small bowl: for mixing the dressing
- large pot: for cooking the eggs
- large skillet: for browning the bacon and chicken
- knife: for chopping and slicing the toppings
- serving platter: for loose natural final plating
Instructions
Step 1: Season the chicken
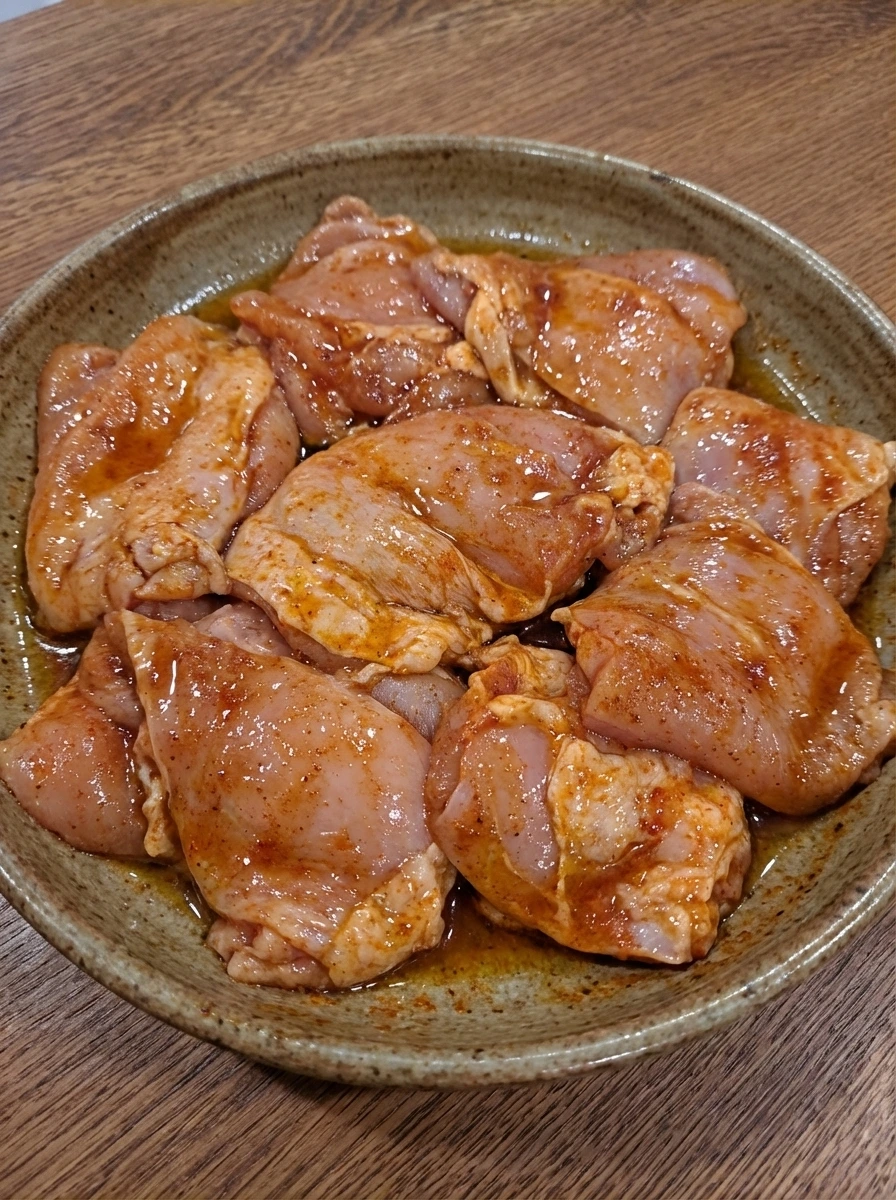
Place the chicken pieces in a shallow dish and drizzle over 1 tablespoon olive oil and 1 tablespoon lemon juice and then sprinkle with 1 teaspoon salt and 1 half teaspoon pepper and paprika and oregano. Rub the seasoning over every surface so the chicken changes from pale and plain to glossy and warmly colored with a light red coating. Let the chicken sit for 10 minutes so the surface looks slightly moistened and more deeply seasoned rather than dry. The coating should cling unevenly in a natural way with a few thicker patches of seasoning across the chicken.
Tip: Do not overcoat the chicken because a thin uneven layer helps it brown better.
Step 2: Cook the eggs until firm
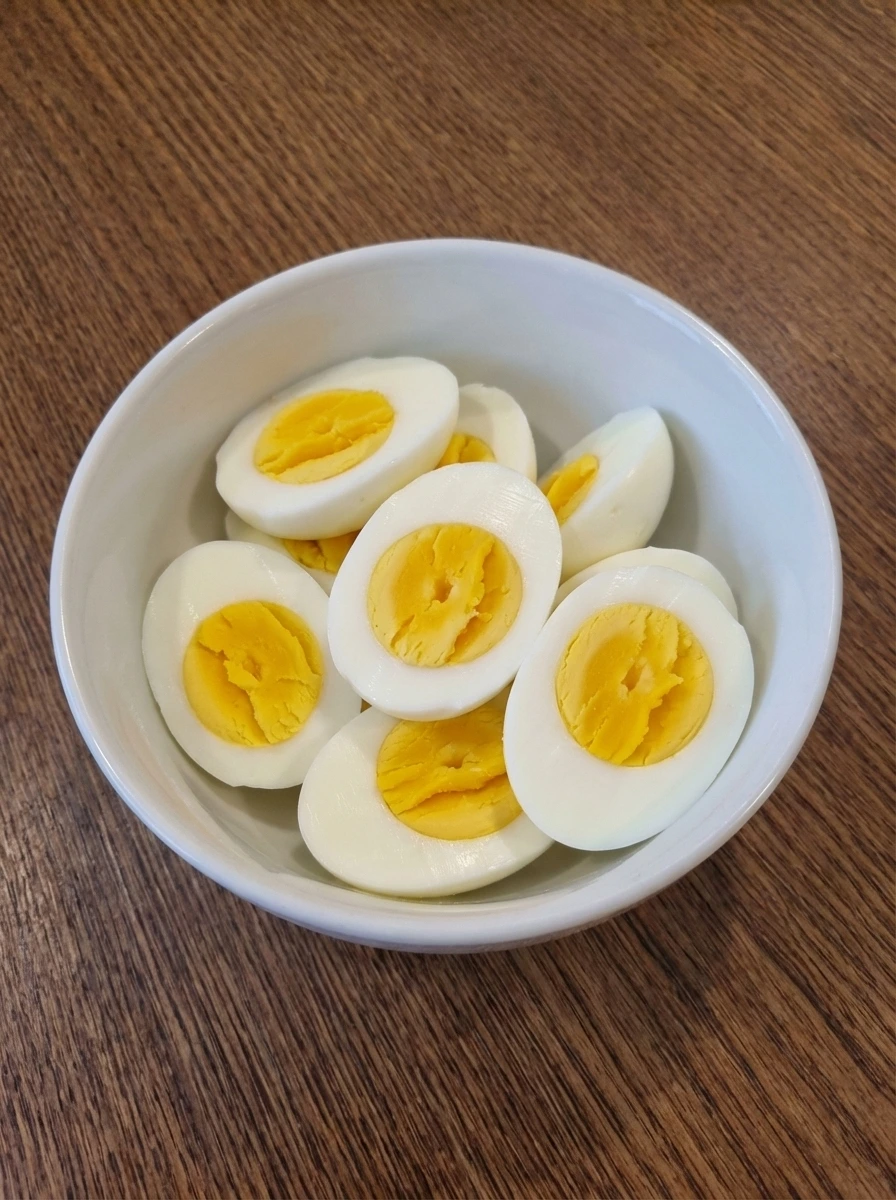
Cover the eggs with water and cook until the whites turn fully set and the yolks become rich and firm. Once cooled and peeled slice them in half so the centers show a soft yellow color that is fully cooked and creamy looking rather than chalky. The eggs should visibly change from smooth shells to neat halves with tender whites and bright yolks. Set them aside so they stay clean and intact for the final salad.
Tip: Cool the eggs before slicing so the yolks stay neat and do not crumble too much.
Step 3: Brown the bacon
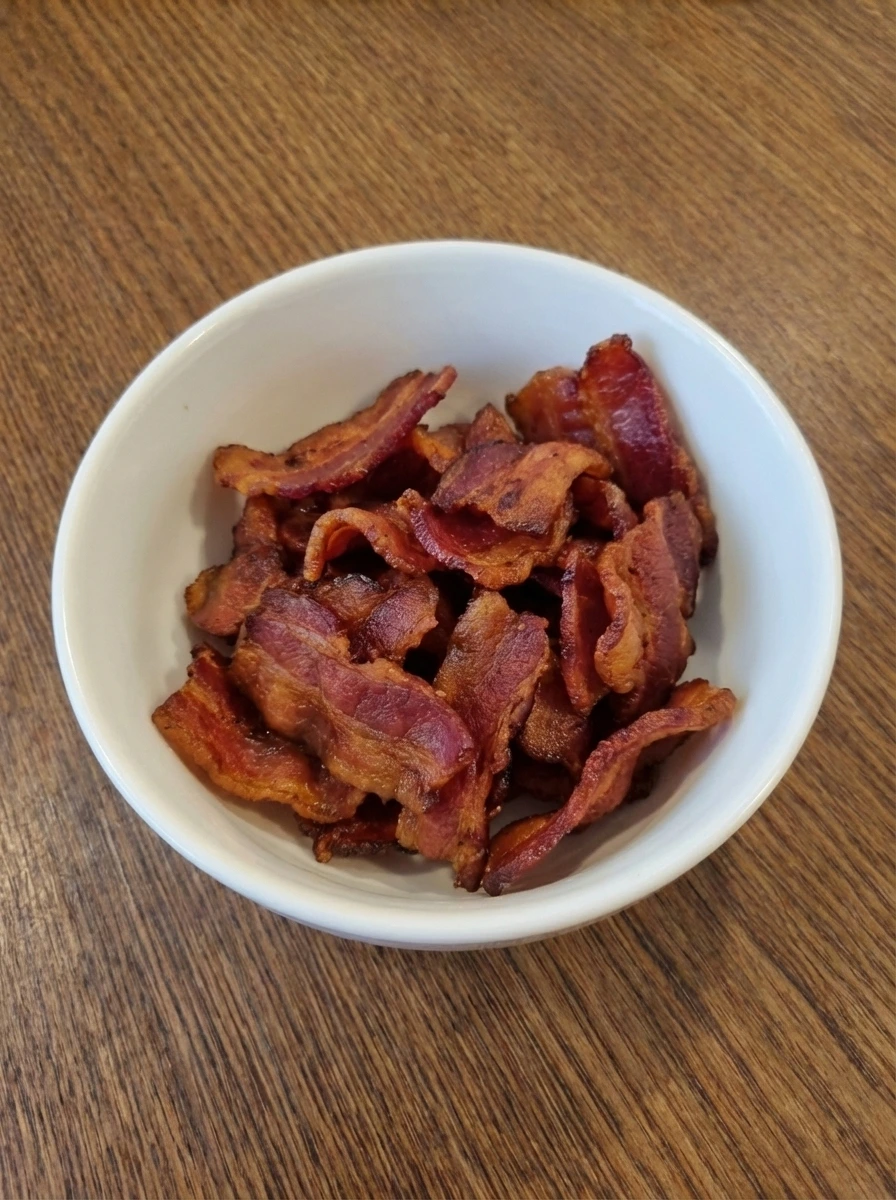
Cook the bacon until the fat turns translucent and then slowly renders down and the slices soften before becoming crisp at the edges. Keep cooking until the strips show a deep reddish brown color with slightly darker spots and a natural waviness. Once cooled break or chop the bacon into rough pieces. The finished bacon should look crisp and irregular with some larger pieces and some smaller shards for a homemade feel.
Tip: Let the bacon reach a deep color but stop before it turns too dark and bitter.
Step 4: Cook the chicken until lightly browned
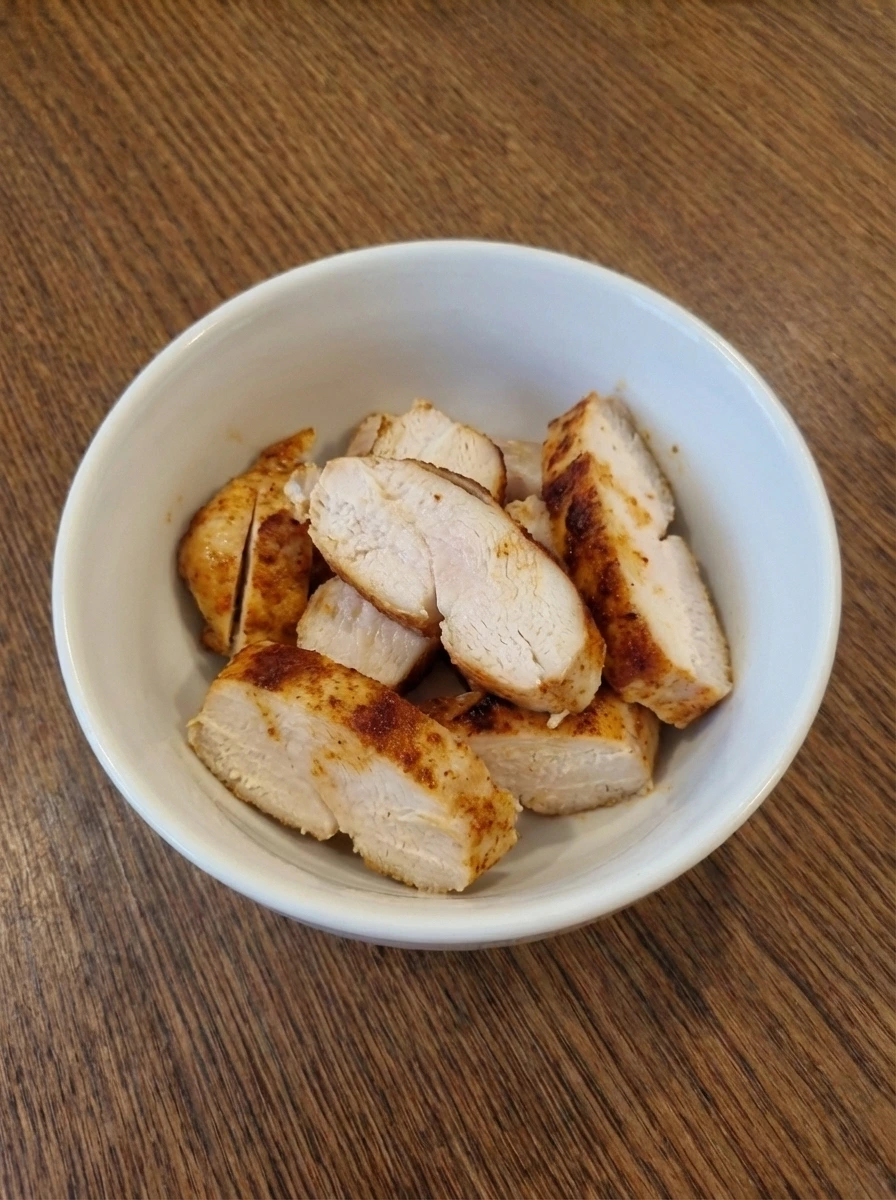
Cook the seasoned chicken until the surface changes from glossy raw seasoning to a firmer cooked exterior with light golden brown patches. As it finishes the meat turns juicy and opaque while the coating deepens in color and forms a slightly browned crust in uneven areas. Rest the chicken briefly and then slice it into strips or bite size pieces. The inside should look moist and fully cooked while the outside shows warm browned edges and seasoning that has settled into the meat.
Tip: Resting the chicken keeps the slices juicy and helps the surface stay nicely colored.
Step 5: Cut the fresh toppings
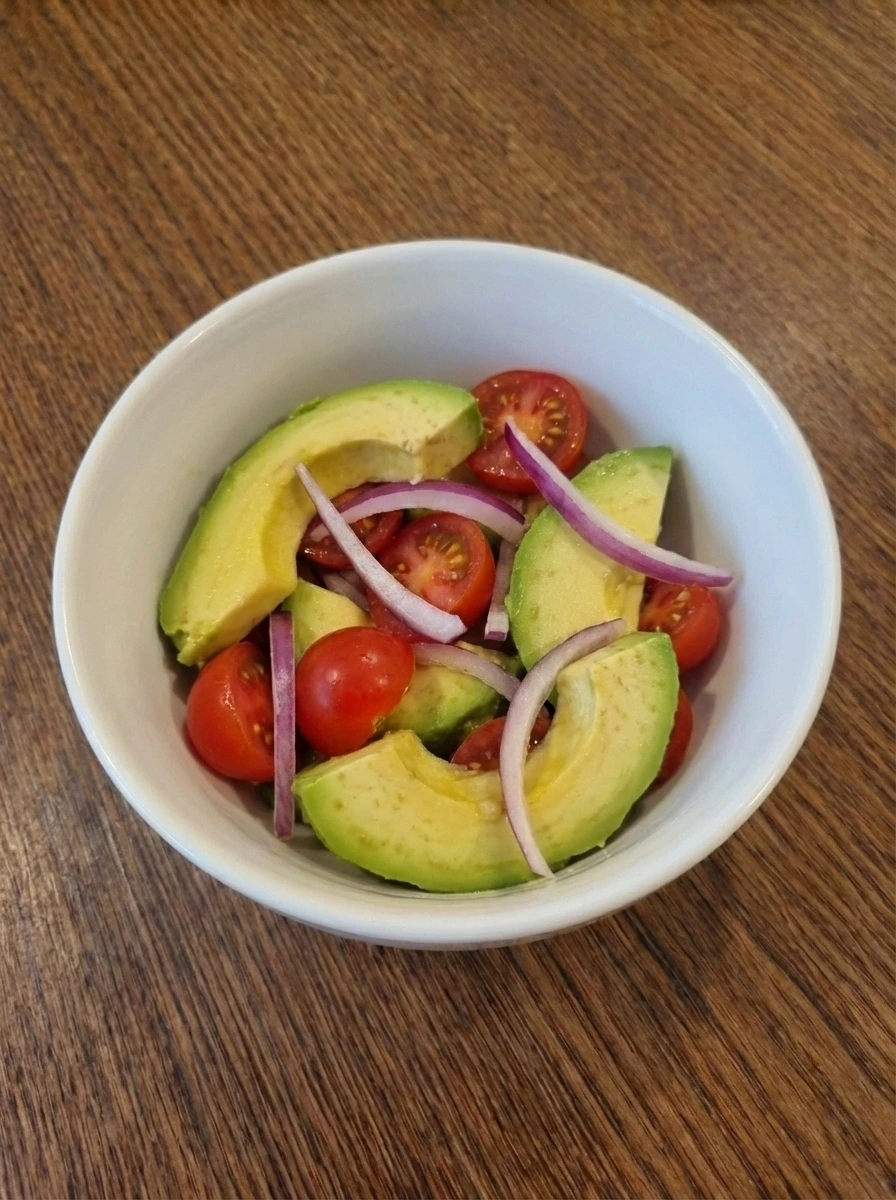
Slice the avocado and halve the tomatoes and thinly slice the red onion so each topping has its own distinct texture and shape. The avocado should look soft and buttery while the tomatoes look juicy and bright and the onion should appear crisp and sharp. Keep the pieces slightly varied in size so the salad looks natural later on. This stage brings the raw fresh color into the recipe and balances the cooked elements with clean bright contrast.
Tip: Slice the avocado near the end so it stays fresh and green.
Step 6: Mix the dressing

Whisk together the remaining olive oil and red wine vinegar and Dijon mustard and honey and garlic and the rest of the salt and pepper until the mixture changes from separated streaks into a lightly thickened dressing. The color should turn pale golden with tiny flecks of garlic and pepper suspended throughout. The finished dressing should look glossy and slightly creamy with a natural looseness so it can coat the greens without drowning them. A little uneven texture is perfect and keeps it looking homemade.
Tip: Taste the dressing and add a touch more lemon if you want a brighter finish.
Step 7: Toss the greens
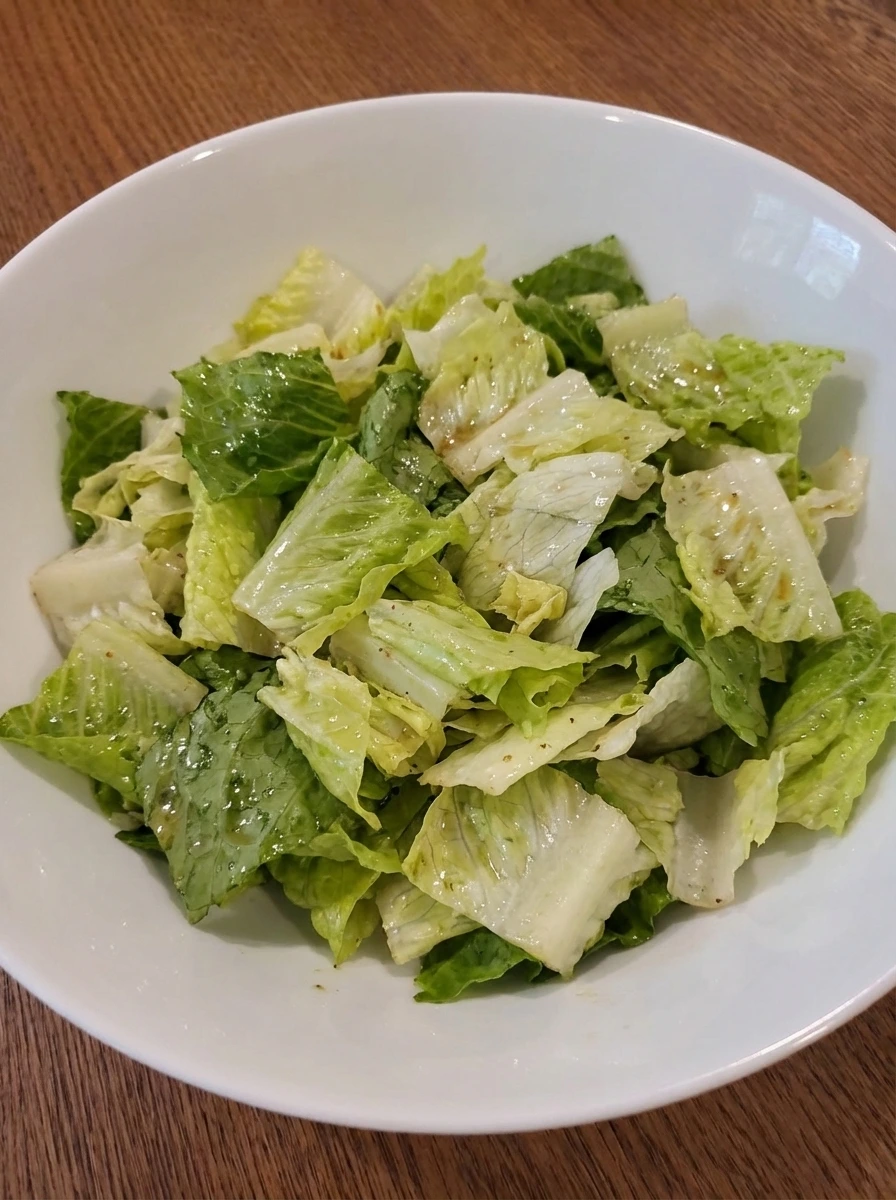
Combine the chopped romaine and iceberg with part of the dressing so the leaves change from dry and fluffy to lightly coated and glossy. Toss just enough to spread the dressing unevenly across the greens while still leaving some lighter areas and some more dressed patches. The lettuce should stay crisp and lifted rather than heavily packed down. This creates the fresh base and gives the salad an early mixed stage before the toppings go on.
Tip: Start with less dressing because you can always drizzle more at the end.
Step 8: Arrange the salad layers
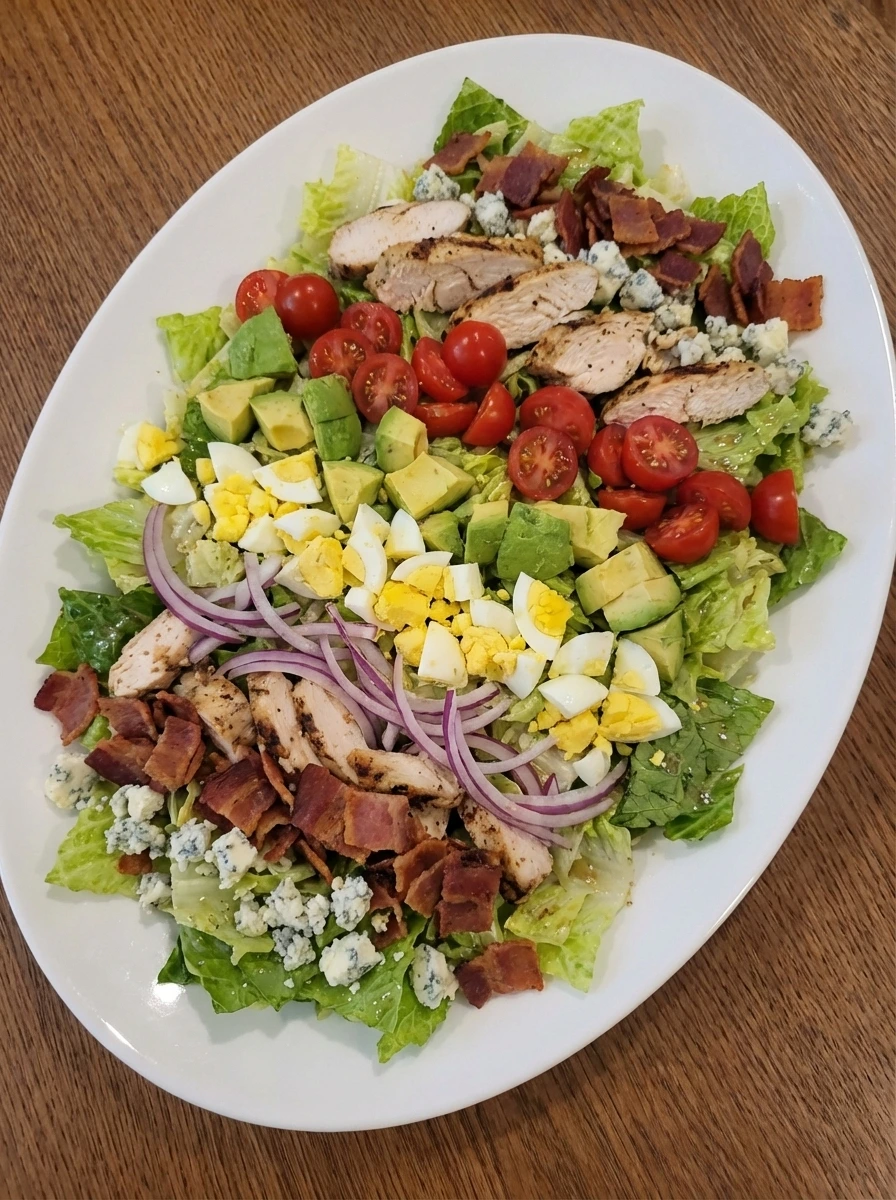
Spread the dressed greens onto the serving platter and then layer on the sliced chicken and chopped bacon and egg halves and avocado and tomatoes and red onion and blue cheese. Keep the placement loose and slightly irregular so some toppings overlap while others sit in little clusters rather than perfect rows. At this stage the salad looks hearty and colorful with warm browned chicken and bacon against crisp greens and creamy avocado and sharp blue cheese. The dish should feel abundant and homemade rather than formal or perfectly lined up.
Tip: Leave a few bits of lettuce visible between the toppings so the salad looks layered and fresh.
Step 9: Finish and plate the salad
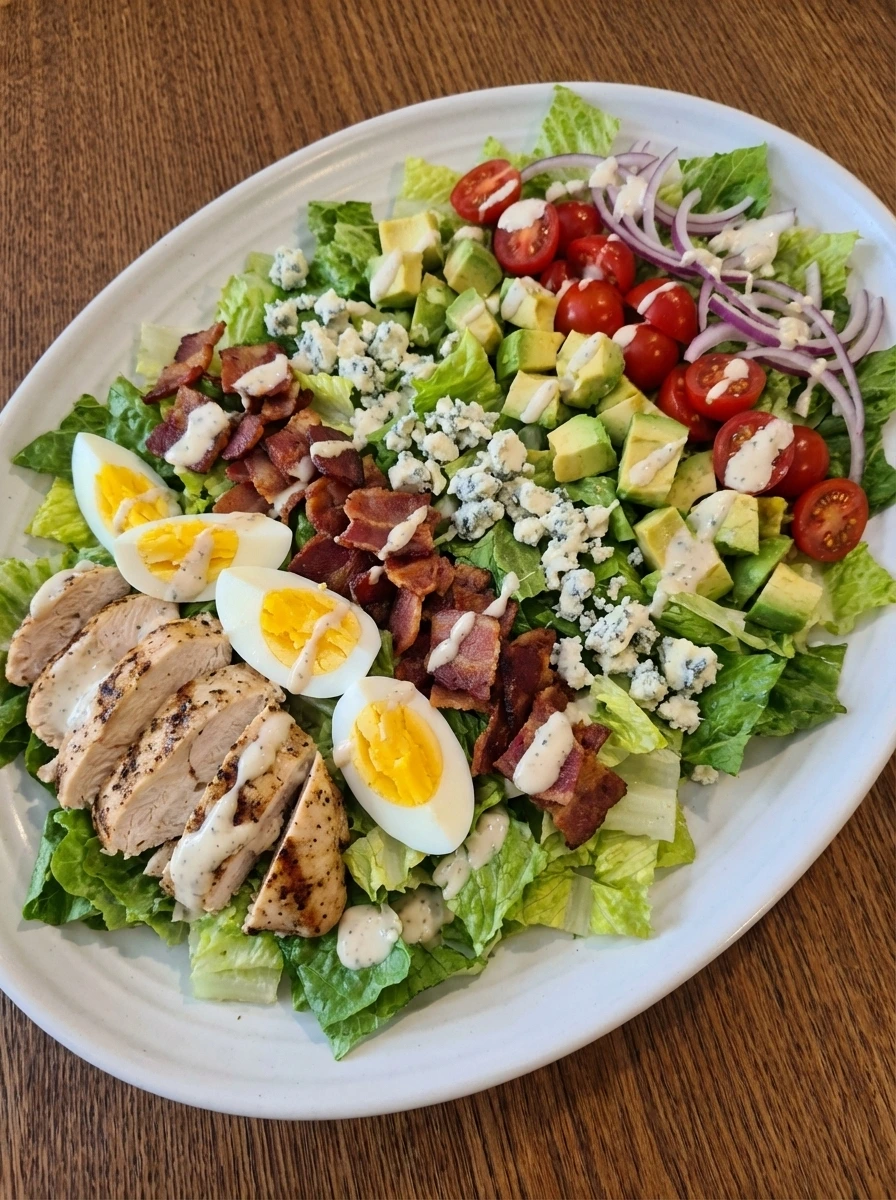
Drizzle the remaining dressing over the top in irregular streaks and add a final pinch of blue cheese and black pepper where needed. The finished salad should show juicy slices of golden browned chicken and crisp bacon with creamy egg yolks and avocado tucked into the greens while the dressing catches in some spots more than others. Serve the fully finished Classic Cobb Salad right away on the platter so the final dish looks fresh and complete with rich color and clear contrast between crisp greens and warm cooked toppings. The natural variation in the topping placement and the slightly uneven dressing makes it look inviting and real.
Tip: A light final drizzle keeps the salad bright without making the greens heavy.
Pro Tips
- Season the chicken first so it has time to take on more flavor before it cooks
- Use a mix of romaine and iceberg for a salad that stays crisp and hearty
- Add the avocado near the end so it stays soft and green
- Drizzle the last bit of dressing loosely so the salad keeps a homemade look
Storage Instructions
Store the greens and cooked toppings in separate containers in the refrigerator for up to 3 days and keep the dressing separate until serving so the lettuce stays crisp
Frequently Asked Questions
Can I make Classic Cobb Salad ahead of time
Yes and keep the greens and toppings separate and then toss and arrange everything just before serving for the freshest texture
What can I use instead of blue cheese
Feta or shredded cheddar both work well though the flavor will be a little milder and less sharp
Is this salad good for meal prep
Yes and it holds well when the dressing is stored separately and added right before eating
Can I use turkey instead of chicken
Yes and sliced cooked turkey works nicely when you want a quick shortcut
Final Thoughts
So there you go A recipe that is simple enough for a Tuesday night and good enough to serve at a gathering I have made this Classic Cobb Salad more times than I can count and it never disappoints Save this one and share it with a friend and let me know in the comments if you made any fun changes I am always curious to see how people put their own spin on things
Print
Classic Cobb Salad
- Total Time: 45 minutes
- Yield: 4 servings 1x
Description
This easy Classic Cobb Salad is packed with healthy layers and simple flavors that feel like the best kind of comfort food while still staying fresh and quick to make at home and it is full of ideas for weeknight dinner meal prep holiday brunch potluck or party plates with crisp greens warm chicken smoky bacon creamy dressing and a colorful homemade finish everyone loves
Ingredients
- 2 medium about 1 pound boneless skinless chicken breasts
- 6 slices thick cut bacon
- 4 large eggs
- 1 large head chopped romaine lettuce
- 1 half head chopped iceberg lettuce
- 1 large sliced ripe avocado
- 1 cup halved cherry tomatoes
- 1 third cup crumbled blue cheese
- 1 quarter cup thinly sliced red onion
- 3 tablespoons olive oil
- 2 tablespoons lemon juice
- 2 tablespoons red wine vinegar
- 1 teaspoon Dijon mustard
- 1 teaspoon honey
- 1 clove finely grated garlic
- 1 and a half teaspoons divided kosher salt
- 1 teaspoon divided black pepper
- 1 teaspoon paprika
- 1 half teaspoon dried oregano
- enough to cover eggs water
Instructions
- Place the chicken pieces in a shallow dish and drizzle over 1 tablespoon olive oil and 1 tablespoon lemon juice and then sprinkle with 1 teaspoon salt and 1 half teaspoon pepper and paprika and oregano. Rub the seasoning over every surface so the chicken changes from pale and plain to glossy and warmly colored with a light red coating. Let the chicken sit for 10 minutes so the surface looks slightly moistened and more deeply seasoned rather than dry. The coating should cling unevenly in a natural way with a few thicker patches of seasoning across the chicken.
- Cover the eggs with water and cook until the whites turn fully set and the yolks become rich and firm. Once cooled and peeled slice them in half so the centers show a soft yellow color that is fully cooked and creamy looking rather than chalky. The eggs should visibly change from smooth shells to neat halves with tender whites and bright yolks. Set them aside so they stay clean and intact for the final salad.
- Cook the bacon until the fat turns translucent and then slowly renders down and the slices soften before becoming crisp at the edges. Keep cooking until the strips show a deep reddish brown color with slightly darker spots and a natural waviness. Once cooled break or chop the bacon into rough pieces. The finished bacon should look crisp and irregular with some larger pieces and some smaller shards for a homemade feel.
- Cook the seasoned chicken until the surface changes from glossy raw seasoning to a firmer cooked exterior with light golden brown patches. As it finishes the meat turns juicy and opaque while the coating deepens in color and forms a slightly browned crust in uneven areas. Rest the chicken briefly and then slice it into strips or bite size pieces. The inside should look moist and fully cooked while the outside shows warm browned edges and seasoning that has settled into the meat.
- Slice the avocado and halve the tomatoes and thinly slice the red onion so each topping has its own distinct texture and shape. The avocado should look soft and buttery while the tomatoes look juicy and bright and the onion should appear crisp and sharp. Keep the pieces slightly varied in size so the salad looks natural later on. This stage brings the raw fresh color into the recipe and balances the cooked elements with clean bright contrast.
- Whisk together the remaining olive oil and red wine vinegar and Dijon mustard and honey and garlic and the rest of the salt and pepper until the mixture changes from separated streaks into a lightly thickened dressing. The color should turn pale golden with tiny flecks of garlic and pepper suspended throughout. The finished dressing should look glossy and slightly creamy with a natural looseness so it can coat the greens without drowning them. A little uneven texture is perfect and keeps it looking homemade.
- Combine the chopped romaine and iceberg with part of the dressing so the leaves change from dry and fluffy to lightly coated and glossy. Toss just enough to spread the dressing unevenly across the greens while still leaving some lighter areas and some more dressed patches. The lettuce should stay crisp and lifted rather than heavily packed down. This creates the fresh base and gives the salad an early mixed stage before the toppings go on.
- Spread the dressed greens onto the serving platter and then layer on the sliced chicken and chopped bacon and egg halves and avocado and tomatoes and red onion and blue cheese. Keep the placement loose and slightly irregular so some toppings overlap while others sit in little clusters rather than perfect rows. At this stage the salad looks hearty and colorful with warm browned chicken and bacon against crisp greens and creamy avocado and sharp blue cheese. The dish should feel abundant and homemade rather than formal or perfectly lined up.
- Drizzle the remaining dressing over the top in irregular streaks and add a final pinch of blue cheese and black pepper where needed. The finished salad should show juicy slices of golden browned chicken and crisp bacon with creamy egg yolks and avocado tucked into the greens while the dressing catches in some spots more than others. Serve the fully finished Classic Cobb Salad right away on the platter so the final dish looks fresh and complete with rich color and clear contrast between crisp greens and warm cooked toppings. The natural variation in the topping placement and the slightly uneven dressing makes it look inviting and real.
Notes
Pro Tips:
- Season the chicken first so it has time to take on more flavor before it cooks
- Use a mix of romaine and iceberg for a salad that stays crisp and hearty
- Add the avocado near the end so it stays soft and green
- Drizzle the last bit of dressing loosely so the salad keeps a homemade look
Storage: Store the greens and cooked toppings in separate containers in the refrigerator for up to 3 days and keep the dressing separate until serving so the lettuce stays crisp
- Prep Time: 15 minutes
- Cook Time: 30 minutes
- Category: Lunch
- Cuisine: American
Nutrition
- Serving Size: 1 serving