Description
Looking for the best Soft Chocolate Chip Cookies? This one is quick, easy, and perfectly soft every time. Whether you are after a healthy dessert idea or a simple sweet treat, this delivers every time. Great for weeknight dinner, meal prep, holiday baking, potluck sharing, brunch tables, or any party. Save this easy cookie recipe for your next special occasion or everyday craving!
Ingredients
- 2 1/4 cups all purpose flour
- 1 teaspoon baking soda
- 1 teaspoon fine salt
- 1 cup unsalted butter, softened
- 3/4 cup packed light brown sugar
- 3/4 cup granulated sugar
- 2 large eggs
- 2 teaspoons vanilla extract
- 2 cups semi sweet chocolate chips
- 1/2 teaspoon optional flaky sea salt
Instructions
- Add the flour, baking soda, and fine salt to a white ceramic mixing bowl. The dry ingredients sit in soft layered mounds, with the powdery flour surrounding the smaller portions of baking soda and salt. After a quick whisk, the mixture looks evenly blended and pale white with a smooth, airy texture. There are no streaks or pockets, and everything remains completely uncooked with no signs of heat.
- Place the softened butter, brown sugar, and granulated sugar into a white ceramic mixing bowl. At first, the butter looks thick and smooth while the sugars sit visibly separate, with the brown sugar darker and slightly damp looking beside the white sugar. Once mixed, the texture changes into a pale tan, fluffy mixture that looks creamy and light. The surface becomes soft and spreadable, and the sugars are no longer distinct, leaving a whipped base that is still completely uncooked.
- Add the eggs and vanilla extract to the creamed butter and sugar mixture. Before mixing, the yolks and vanilla are clearly visible on top, creating glossy yellow streaks over the pale tan base. After mixing, the dough base becomes smoother, silkier, and slightly glossier. The color turns a bit warmer and more uniform, with a thick creamy consistency that still looks fully raw and uncooked.
- Gradually add the dry ingredient mixture into the bowl with the wet base. At first, the flour mixture sits in pale layers over the glossy dough, creating a contrast between the powdery top and the creamy mixture underneath. Once combined, the mixture thickens into a soft cookie dough with a light golden beige color. The dough looks dense, smooth, and scoopable, with no dry flour visible and no signs of heat or cooking.
- Add the semi sweet chocolate chips to the dough and fold them through gently. At the start, the chips sit in a loose pile over the dough, creating a dark contrast against the pale cookie base. After folding, the dough is evenly studded with chocolate chips throughout. The mixture remains thick and uncooked, and the chocolate pieces are clearly visible from edge to edge, promising plenty of chocolate in every cookie.
- Scoop the dough into even portions and arrange them with space between each piece. Each portion looks rounded and thick, with rough tops and visible chocolate chips peeking through the surface. A few extra chocolate chips can be pressed onto the tops, and a tiny pinch of flaky sea salt can be added if using. The dough portions remain fully raw and uncooked, sitting neatly arranged and ready for the next stage.
- Let the shaped dough rest so the portions hold their shape and the surface firms slightly. Visually, the dough mounds look a little more settled, with smoother edges and a more defined rounded shape. The chocolate chips remain visible on top and throughout each mound, and everything still looks completely raw with no signs of heat. This brief resting stage helps the dough look more structured and ready for the final transformation.
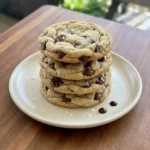
- The dough portions are now finished as soft chocolate chip cookies with lightly golden brown tops and tender centers. The cookies look gently puffed with soft crinkled surfaces, and the chocolate chips appear glossy and slightly melted across the tops. Arrange the finished cookies on a serving plate and let the stacked layers show off their soft texture and rich chocolate pockets. The final dish looks warm, inviting, and ready to serve, with each cookie appearing thick, soft, and full of chocolate.
Notes
Pro Tips:
- Use softened butter, not melted butter, for the best soft texture.
- Chill the shaped dough briefly if your kitchen is warm.
- Press a few extra chocolate chips on top before finishing for bakery style cookies.
- Do not overmix once the flour is added or the cookies can become tough.
Storage: Store the cookies in an airtight container at room temperature for up to 4 days for the best texture and flavor. If you want to keep them longer, refrigerate them for up to 1 week, though they are best after coming back to room temperature. For longer storage, freeze the baked cookies or unbaked dough portions for up to 3 months in a freezer safe container. To enjoy again, let the cookies thaw and warm them briefly until soft, or bake the frozen dough portions straight from frozen with a few extra minutes added.
- Prep Time: 15 minutes
- Cook Time: 30 minutes
- Category: Dessert
- Cuisine: American