Description
Looking for the best moist chocolate cake? This one is quick, easy, and wonderfully rich with a soft crumb and creamy frosting. Whether you are after a healthy dessert idea or a simple sweet treat, this delivers every time. Great for weeknight dinner, meal prep, holiday gatherings, potluck tables, brunch spreads, and any party. Save this easy moist chocolate cake for your next celebration!
Ingredients
- 2 cups all purpose flour
- 2 cups granulated sugar
- 3/4 cup unsweetened cocoa powder
- 2 teaspoons baking powder
- 1 1/2 teaspoons baking soda
- 1 teaspoon salt
- 2 large eggs
- 1 cup buttermilk
- 1/2 cup vegetable oil
- 2 teaspoons vanilla extract
- 1 cup hot coffee
- 1 cup unsalted butter, softened
- 3 1/2 cups powdered sugar
- 3/4 cup unsweetened cocoa powder for frosting
- 1/4 cup heavy cream
- 1/4 cup chocolate shavings
Instructions
- Add the flour, granulated sugar, cocoa powder, baking powder, baking soda, and salt into a large white ceramic mixing bowl. At this stage the ingredients are clearly separate in color and texture, with pale flour, dark cocoa, and a sandy layer of sugar visible across the bowl. Once everything is added, the bowl looks full and evenly portioned but still completely dry. Nothing is blended yet, so the powders remain loose, light, and clearly defined.
- Whisk the dry ingredients together until the color turns into one even cocoa brown. The mixture looks lighter, fluffier, and more uniform, with no white streaks of flour or pockets of cocoa left behind. The surface becomes smooth and powdery with a fine, airy texture. This step sets up the batter so every bite of cake has even chocolate flavor.
- In a second large white ceramic mixing bowl, whisk together the eggs, buttermilk, vegetable oil, and vanilla extract. The mixture turns glossy and pale brown, with the eggs fully broken up and the liquids blended into one smooth base. Visually, the texture becomes fluid and silky with no visible yolk streaks left behind. It should look creamy and well mixed before it meets the dry ingredients.
- Pour the wet mixture into the bowl of dry ingredients, then add the hot coffee and whisk until the batter is fully blended. The mixture changes from loose powder and liquid into a deep brown batter that looks glossy, smooth, and pourable. By the end of this step, there should be no dry patches around the edges of the bowl. The batter will look thinner than some cake batters, but that is exactly what helps create a moist, tender crumb.
- Pour the batter evenly into two round cake pans and gently level the tops. The batter settles into smooth, dark pools with a glossy surface and an even thickness from edge to edge. Once divided, the pans look neat and ready, with the batter spread evenly so the layers bake up level. This is the last fully raw stage before the batter transforms into cake layers.
- After baking and cooling, turn the cake layers out and place them in round white ceramic dishes. The layers are now fully cooked, soft, and springy, with a rich dark brown color and a tender crumb visible along the sides. If the tops have domed slightly, trim them so the layers stack evenly. At this point the cakes look neat, even, and completely cooled, which makes frosting much easier.
- In a large white ceramic mixing bowl, beat the softened butter, powdered sugar, cocoa powder, and heavy cream until smooth. The mixture changes from separate pale and dark ingredients into a thick, fluffy frosting with a deep chocolate color. Visually, the frosting should look creamy and spreadable with soft swirls that hold their shape. It becomes lighter in texture as air is worked into it.
- Set the first cake layer in a round white ceramic cake stand and spread a generous layer of frosting across the top. Place the second layer over it, then spread a thin coat of frosting over the top and sides to catch the loose crumbs. At this stage the cake looks assembled but not finished. The frosting layer is thin and smooth, and a few darker crumbs may still show through the surface.
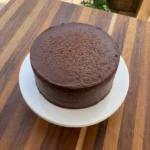
- Spread the remaining frosting over the top and sides until the whole cake is covered in a smooth, thick layer. Add the chocolate shavings over the top so the surface looks finished and rich without feeling overdone. The cake now looks polished and ready to serve, with even frosting, clean edges, and a soft chocolate finish. The shavings add a simple final touch and make the top feel complete.
- Slice the finished cake and place a piece onto a white ceramic dessert plate. The inside shows tender, moist chocolate layers with a thick ribbon of frosting between them and a smooth finish over the top. This final step is all about the completed dessert. The slice looks soft, rich, and ready to serve, with the layers clearly defined and the frosting holding neatly in place.
Notes
Pro Tips:
- Use coffee instead of water to deepen the chocolate flavor without making the cake taste like coffee.
- Do not overmix the batter once the dry ingredients are fully incorporated.
- Let the cake layers cool completely before frosting so the frosting stays thick and tidy.
- A thin crumb coat first makes the final layer of frosting much smoother.
Storage: Store the cake covered in the fridge if you want the frosting to stay firm and fresh. It also keeps well at room temperature for about a day if your kitchen is cool. For longer storage, wrap individual slices or whole unfrosted layers well and freeze them for up to 2 months. To serve, let chilled slices sit at room temperature for a bit, or warm a slice very briefly in the microwave for a softer texture.
- Prep Time: 15 minutes
- Cook Time: 30 minutes
- Category: Dessert
- Cuisine: American