

The first batch of Christmas Crinkle Cookies always makes my kitchen feel like the holidays have started. These soft little cookies are packed with buttery vanilla flavor and they’re so easy to make. With bright red and green centers and snowy white tops, they’re a fun treat to bake for Christmas parties or a quiet afternoon at home. If you love christmas cookies that look festive without much work then you’re going to love this recipe.
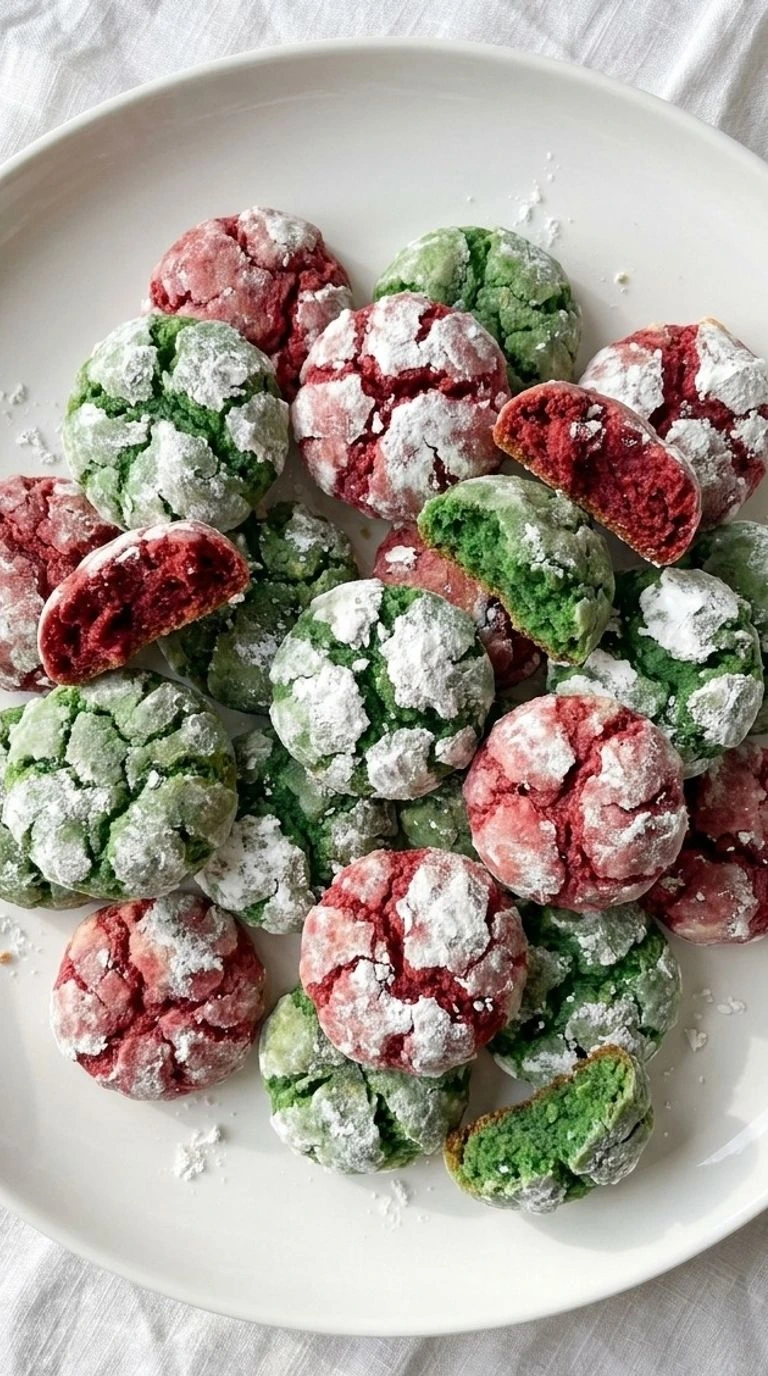
It’s one of those christmas crinkle cookies easy ideas that makes a big impression with simple pantry ingredients. The centers stay soft while the powdered sugar forms pretty cracks as the cookies spread in the oven. And you don’t need fancy decorating skills to get that sweet holiday look. If you’re looking for more holiday baking ideas then why not try my Vintage Christmas Cookies too?
They’re a lovely addition to a homemade cookie box and give you another sweet treat to share with family. I like making a few different kinds because everyone always reaches for something different. Plus there’s something really nice about filling the kitchen with the smell of fresh cookies.
Ingredients
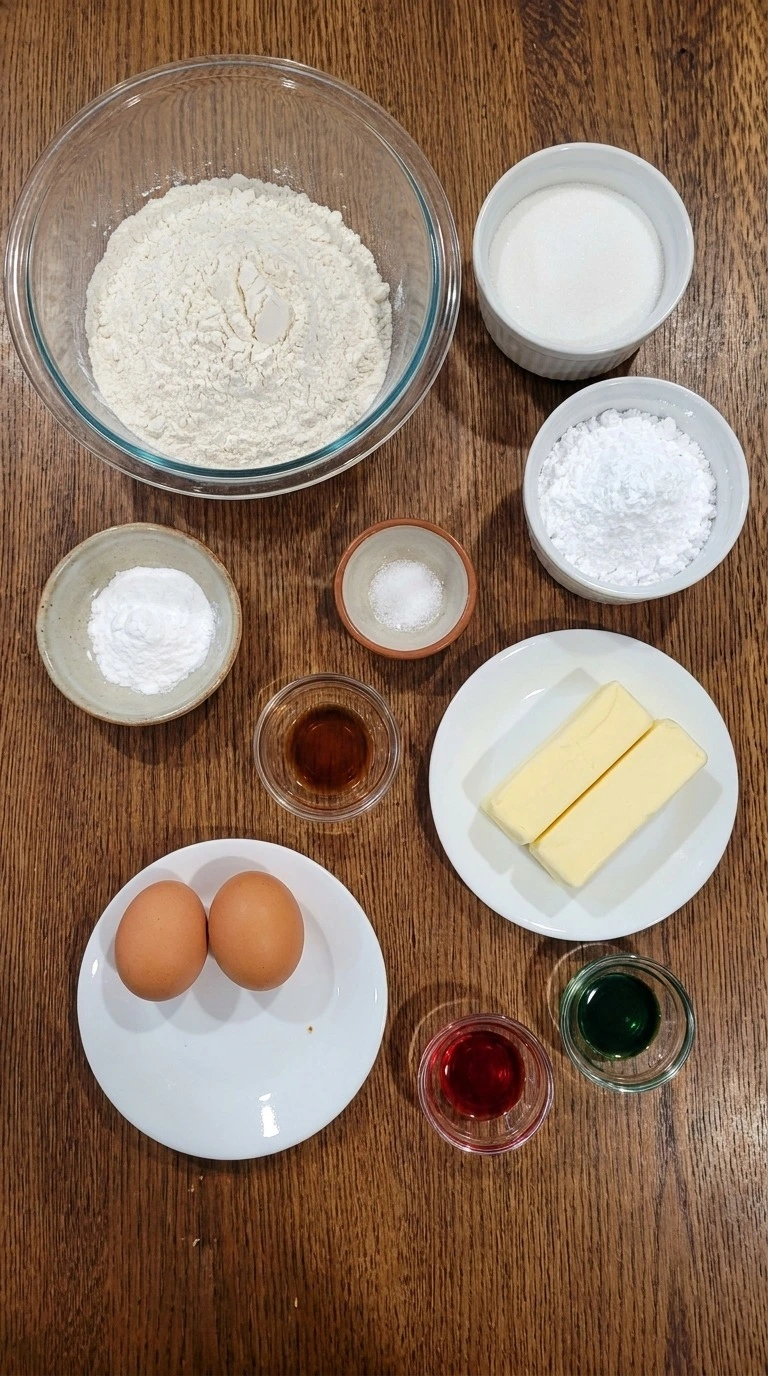
- unsalted butter: Softened to about 68°F to 70°F so it creams smoothly with the sugar and gives the cookies a tender buttery texture.
- granulated white sugar: Beaten with the butter to add sweetness and help the dough hold tiny air bubbles.
- large eggs: Added one at a time to bind the dough and help the cookies rise without crumbling.
- pure vanilla extract: Mixed into the butter base for a warm vanilla flavor that suits the festive cookies.
- all-purpose flour: Measured by spooning into the cup and leveling off to provide enough structure without making the cookies dense.
- baking powder: Whisked into the flour to help the dough rise and form cracks during baking.
- fine sea salt: Mixed into the dry ingredients to balance the sweetness and bring out the vanilla flavor.
- red gel food coloring: Folded into half the dough to give 12 cookies a bright cranberry red color without adding much extra liquid.
- green gel food coloring: Folded into the remaining dough to create 12 evergreen green cookies with a festive holiday appearance.
- powdered sugar: Sifted and used to coat the chilled dough balls generously so the white crust splits into snowy cracks during baking.
Tools You’ll Need
- Large mixing bowl: A bowl with at least a 3-quart capacity holds the dough while you mix and color it. Choose a sturdy bowl with enough room for folding without spills.
- Electric hand mixer: A hand mixer with two beaters creams the butter and sugar evenly. Choose one with adjustable speed because a fixed high speed can scatter sugar.
- Rubber spatula: A flexible rubber spatula folds the flour and gel colors into the dough. Choose one with a firm core so thick chilled dough won’t bend it out of shape.
- Measuring cups and spoons: A standard set measures the flour and sugar while 1/4-teaspoon and 1-teaspoon measures keep the coloring and leavening accurate. Flat-edged measures help prevent excess flour.
- Two baking trays: Two 13-by-18-inch rimmed baking trays give the 24 cookies space to spread. Choose light-colored aluminum trays because very dark pans can brown the bottoms too fast.
- Parchment paper: Two sheets of oven-safe parchment prevent sticking and protect the cookie bottoms. Choose parchment rated for at least 350°F rather than wax paper.
- Cooling rack: A wire cooling rack at least 12 inches wide lets air reach the cookie bottoms. Choose a stable rack with closely spaced wires so soft cookies don’t sag.
- Small cookie scoop: A scoop holding about 1 tablespoon portions the dough evenly. Choose a spring-release scoop because uneven portions may finish baking at different times.
Instructions
Step 1: Beat the butter and sugar into a fluffy base
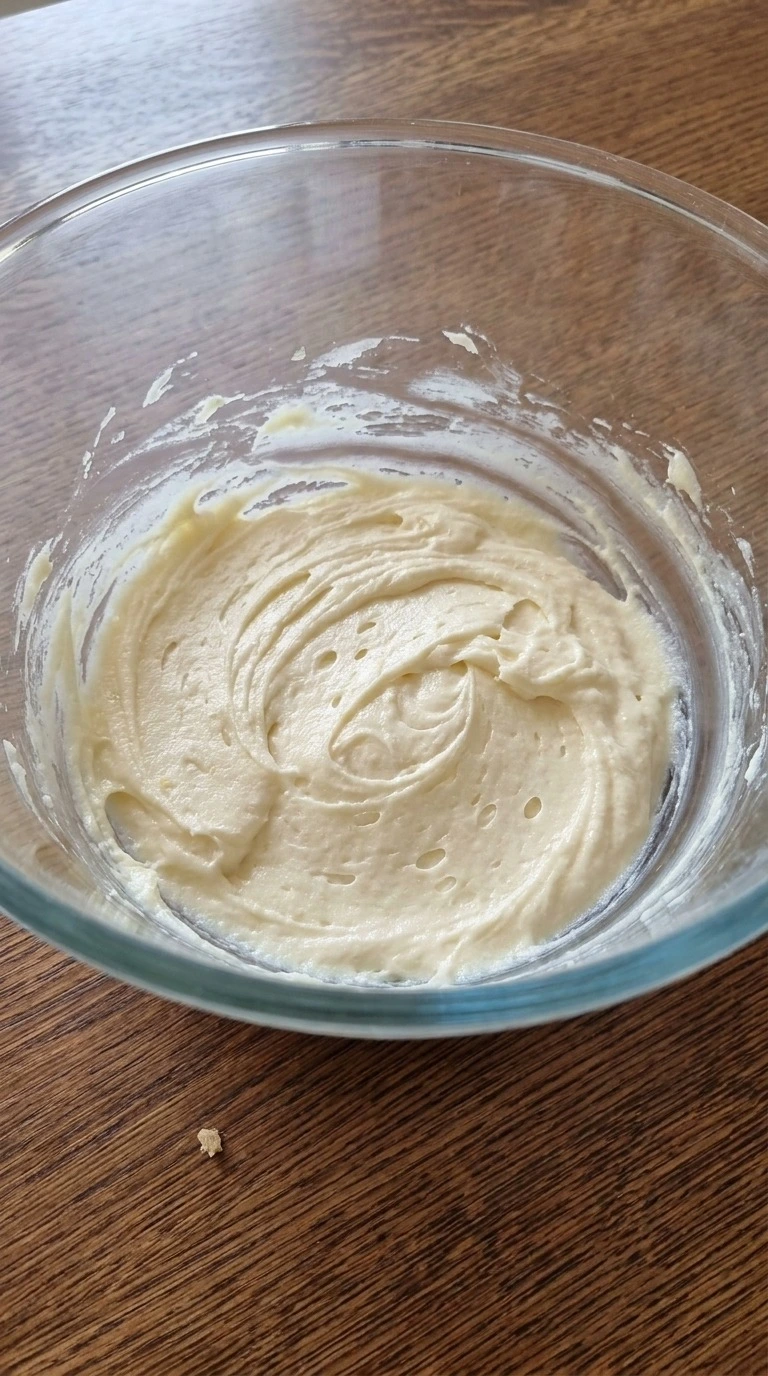
Place 1/2 cup softened unsalted butter and 1 cup granulated white sugar in a large mixing bowl. Beat them together for 2 to 3 minutes until the mixture looks pale and fluffy. The butter should be soft at about 68°F to 70°F but shouldn’t look melted. Next add 2 large eggs one at a time and beat for about 30 seconds after each addition.
Pour in 1 teaspoon pure vanilla extract and mix for another 15 seconds. Scrape the sides of the bowl so all the butter blends into the eggs and sugar. Don’t rush this part. The mixture should look creamy and slightly thick with tiny air bubbles across the surface.
You’ll notice a light vanilla smell as everything blends. If the butter gets too warm then the dough may spread too far during baking. Keep the butter cool enough to hold air because those tiny pockets help the cookies stay tender.
Tip: Use a large bowl with at least a 3-quart capacity so the mixture has room to expand without spilling over the edges.
Step 2: Fold in the flour and make red and green dough
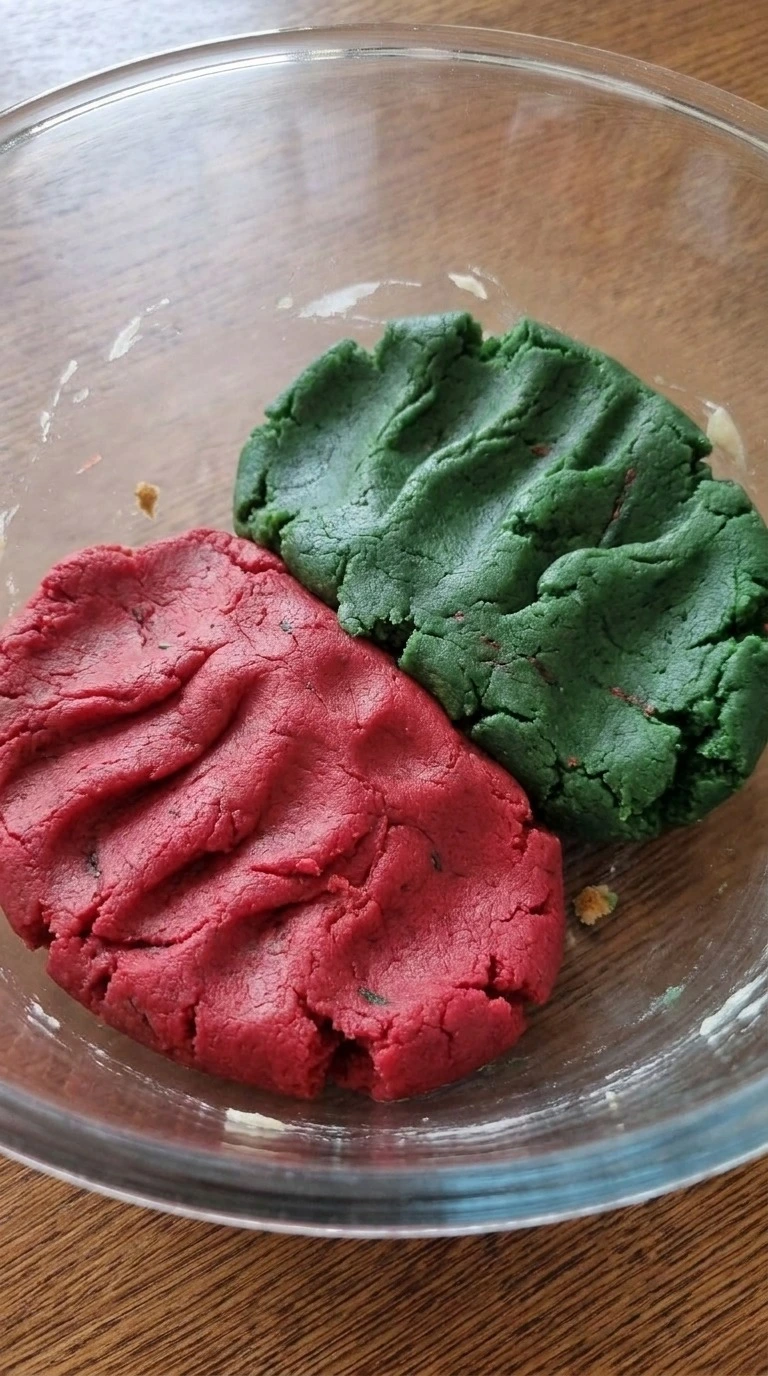
In a separate bowl whisk 2 1/4 cups all-purpose flour with 2 teaspoons baking powder and 1/4 teaspoon fine sea salt for 30 seconds. Then add the dry blend to the butter mixture in two batches. Fold with a rubber spatula until you can’t see loose flour. This takes about 1 to 2 minutes. Divide the dough into two equal portions.
Mix 1/4 teaspoon red gel food coloring into one portion and 1/4 teaspoon green gel food coloring into the other. Fold each just until the color looks mostly even. Don’t knead the dough for too long. Both portions should feel soft and slightly tacky but hold their shape. Small color streaks are fine.
Cover and chill at about 38°F for 60 minutes. If you skip this rest then the cookies can spread into thin discs. Cold dough holds its shape because the butter firms up before baking.
Tip: Use concentrated gel coloring instead of liquid coloring because 1/4 teaspoon gives a stronger shade without adding much extra moisture.
Step 3: Roll the chilled dough into sugar-coated balls
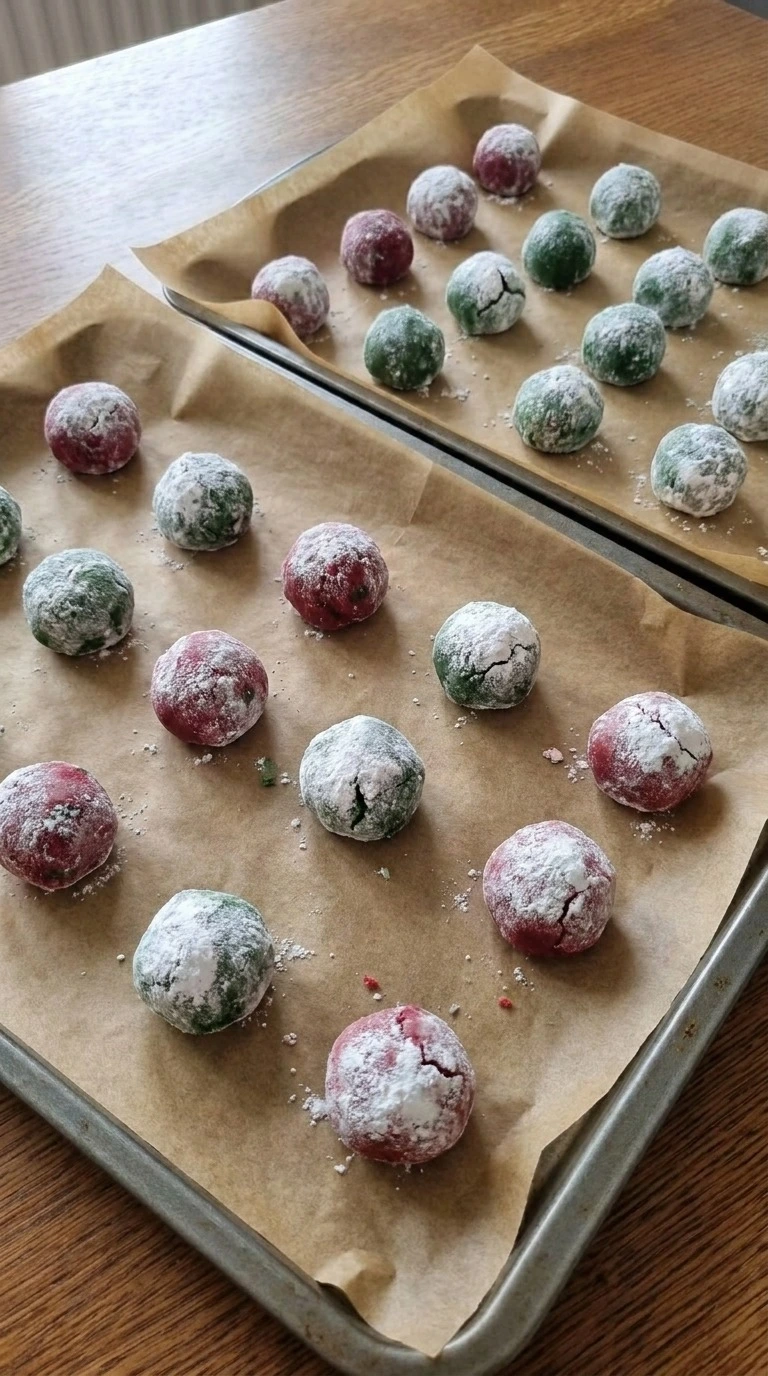
Take both dough portions from the refrigerator after their 60-minute chill. The dough should feel firm enough to scoop without sticking badly. Divide each color into 12 pieces and roll each piece between your palms into a ball about 1 inch wide. You’ll have 24 balls in total.
Pour 1/2 cup powdered sugar into a shallow bowl and coat each ball generously. Roll each one through the sugar and press gently so the white layer clings to the dough. Keep the balls round instead of flattening them. Then arrange them on two baking trays lined with parchment paper and leave about 2 inches between each ball.
You’ll see a thick snowy coating with little patches of red and green peeking through. The dough should still feel cool. If shaping takes longer than 15 minutes and the balls turn soft then chill them for another 10 minutes. A firm center and thick sugar shell help the cracks stand out.
Tip: Sift the 1/2 cup powdered sugar before coating so lumps don’t leave bare patches on the colorful dough balls.
Step 4: Bake until the tops crack and the edges set
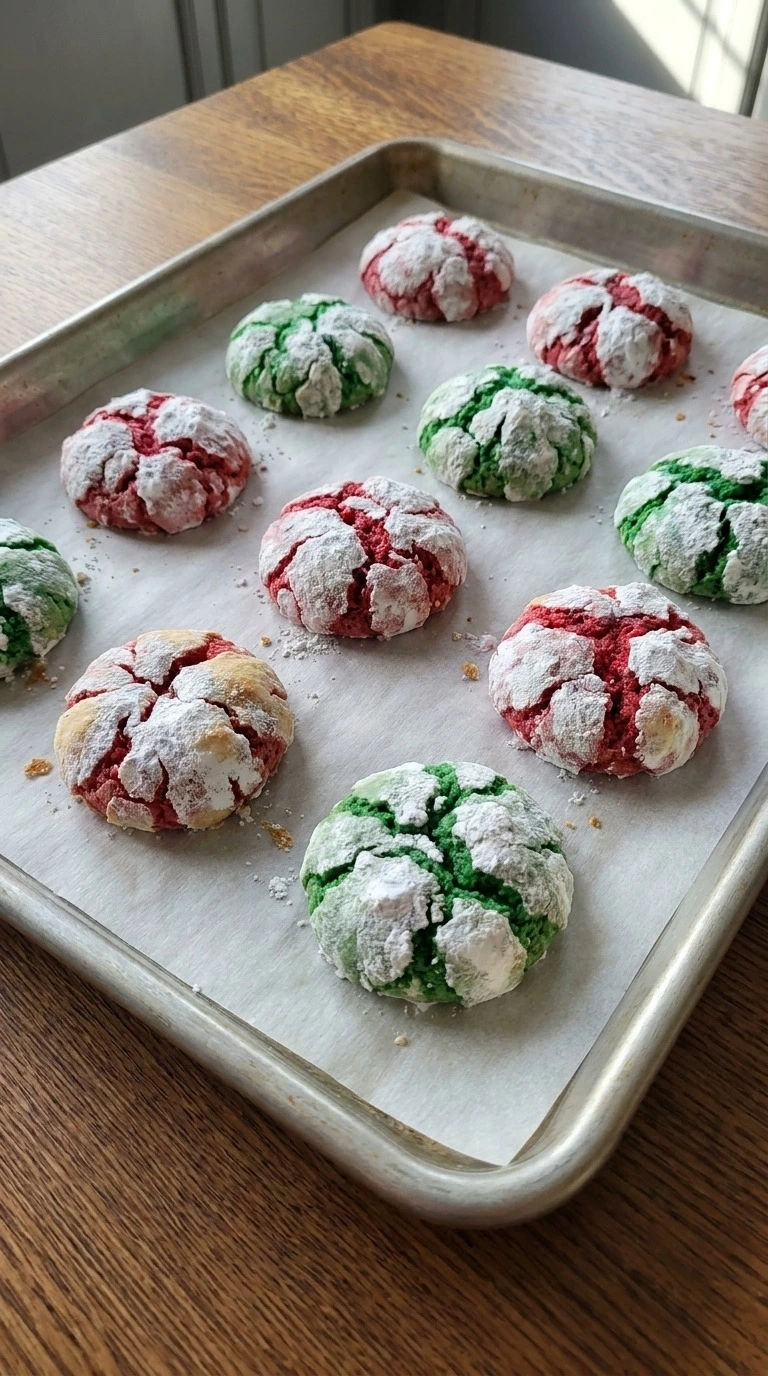
Preheat the oven to 350°F and place a rack near the center. Bake one tray at a time for 10 to 12 minutes so the heat can move evenly around the cookies. Watch the tops after minute 9. The dough will spread and rise while the powdered sugar breaks into uneven white patches.
Christmas Crinkle Cookies should have dry-looking edges and soft centers when you take them out. They shouldn’t turn dark brown underneath. (I’ve found that leaving them in for two extra minutes makes the centers less soft than I want. ) Don’t wait for the tops to become completely firm.
You’ll see deep cracks exposing bright red and green dough beneath the white coating. The cookies should smell buttery and sweet. If you bake past 12 minutes then the centers can lose their soft texture. Pull them while the middles still look slightly puffed because they’ll firm up as they cool.
Tip: Check your oven with a separate thermometer because a 25°F difference can make these small cookies spread too fast or dry out.
Step 5: Cool the cookies and serve on a holiday plate
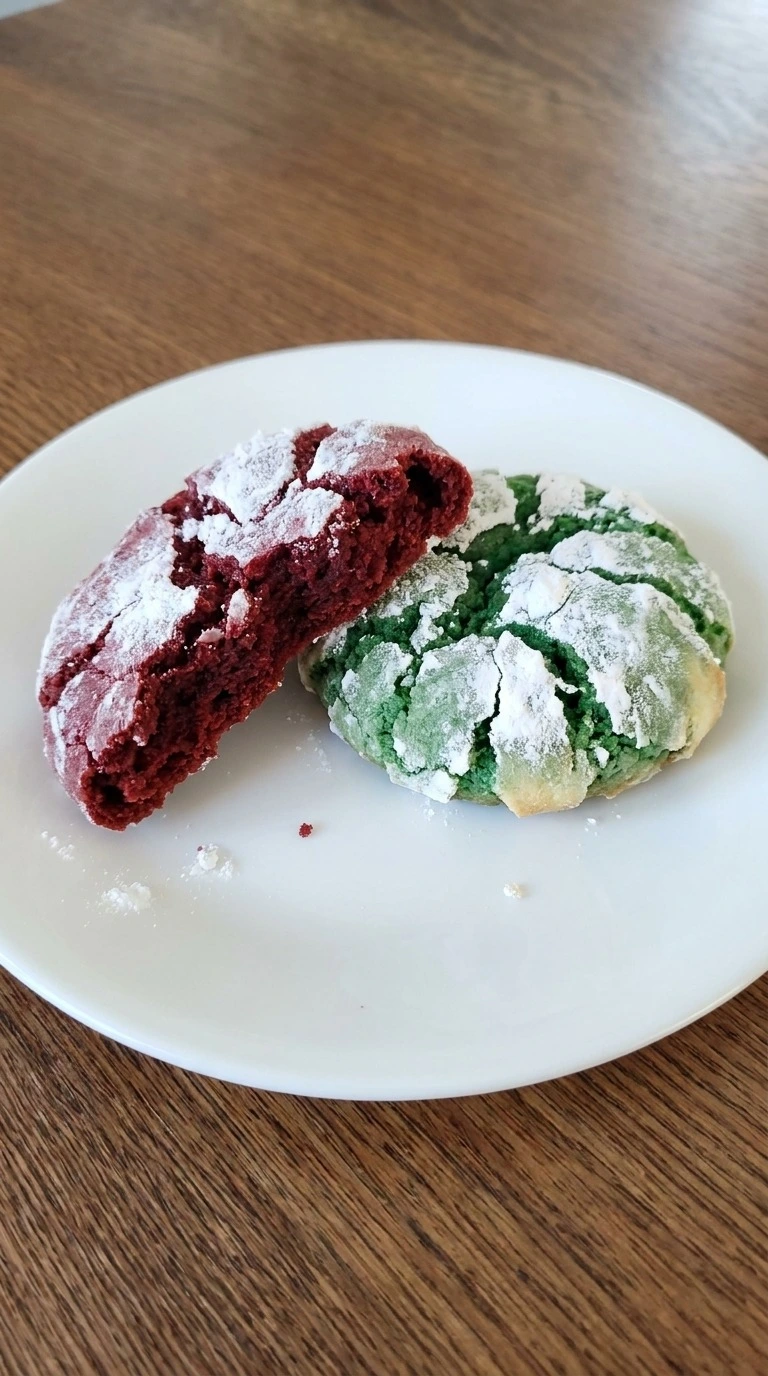
Leave the baked cookies on their trays for 5 minutes before moving them. The centers will still feel soft so lift each cookie gently from underneath. Then transfer all 24 cookies to a cooling rack and leave them for another 10 minutes. Once they’ve cooled enough to hold their shape, place one red cookie and one green cookie on a small white serving plate.
Keep the remaining cookies for a larger holiday tray or gift box. Christmas Crinkle Cookies taste especially good when their centers are still a little soft. Let them cool before stacking them. The white cracks should stay clear and the colorful centers should look tender rather than wet.
Break one cookie open to check for a soft crumb. If you move the cookies too soon then the warm centers may split apart. A short cooling rest helps the crumb set without drying it out.
Tip: For a holiday cookie box, let the cookies cool for at least 30 minutes before packing so trapped warmth doesn’t soften the sugar coating.
Pro Tips
- Spoon the all-purpose flour into your measuring cup and level it with a straight edge. Packing the flour can make 24 cookies dry and dense.
- Keep your unsalted butter near 68°F before creaming it with the granulated white sugar. Melted butter makes the dough harder to shape.
- Use gel food coloring for bright red and green dough. Start with 1/4 teaspoon per color so the mixture doesn’t become too wet.
- Chill the divided dough for 60 minutes before rolling it. If it still sticks badly to your hands then refrigerate it for another 15 minutes.
- Leave about 2 inches between the dough balls on each baking tray. Crowding them can cause the cookies to touch as they spread.
- Use a generous coating of powdered sugar on every dough ball. A thin layer can disappear during baking and leave fewer visible white cracks.
- Start checking the cookies after 10 minutes at 350°F. Remove them when the edges look set but the centers still appear slightly soft.
- For a festive cookie box, pair 12 red cookies with 12 green cookies. Let them cool completely before packing so the powdered sugar stays dry.
- For peppermint Christmas crinkle cookies, replace 1/4 teaspoon of the vanilla extract with 1/4 teaspoon peppermint extract for a fresh holiday flavor.
- For lemon crinkle cookies, add 1 teaspoon finely grated lemon zest to the butter mixture and keep the vanilla extract for a light citrus flavor.
- For orange vanilla holiday cookies, mix 1 teaspoon finely grated orange zest into the dough before dividing it into red and green portions.
- For chocolate Christmas crinkle cookies, replace 1/4 cup of the all-purpose flour with 1/4 cup unsweetened natural cocoa powder. The red and green colors will appear darker and the centers may be slightly firmer.
Storage Instructions
Let your Christmas Crinkle Cookies cool completely before storing them. Place the cookies in an airtight container with parchment paper between layers and keep them at room temperature for up to 4 days. You can refrigerate them for up to 7 days, although the powdered sugar may become less distinct. For longer storage, freeze fully cooled cookies in a sealed freezer-safe container for up to 2 months.
Put parchment between the layers so the cookies don’t stick together. Thaw the cookies inside their closed container for about 1 hour to reduce condensation on the sugar coating. You don’t need to reheat these cookies because they’re best served at room temperature. However, you can warm one cookie in a 250°F oven for 3 to 4 minutes if you prefer a softer center.
Don’t add water or butter because extra moisture can dissolve the powdered sugar. Avoid overheating because the centers can become dry. Discard cookies that develop mold, smell unusual or show signs of spoilage.
Print
Christmas Crinkle Cookies
- Total Time: 1 hour 59 minutes
- Yield: 24 cookies servings 1x
Description
These easy Christmas crinkle cookies bring bright red and green colors to your holiday cookie tray with soft buttery centers and pretty powdered sugar cracks. They’re quick to mix with simple pantry ingredients and make one of the best baking ideas for a Christmas party or homemade gift box. What makes this version different is a short chill and a thick sugar coating that help the cracks stand out. They’re a fun holiday treat to Search focus: christmas crinkle cookies easy.
Ingredients
- 1/2 cup unsalted butter (Softened to about 68°F to 70°F so it creams smoothly with the sugar and gives the cookies a tender buttery texture.)
- 1 cup granulated white sugar (Beaten with the butter to add sweetness and help the dough hold tiny air bubbles.)
- 2 large large eggs (Added one at a time to bind the dough and help the cookies rise without crumbling.)
- 1 teaspoon pure vanilla extract (Mixed into the butter base for a warm vanilla flavor that suits the festive cookies.)
- 2 1/4 cups all-purpose flour (Measured by spooning into the cup and leveling off to provide enough structure without making the cookies dense.)
- 2 teaspoons baking powder (Whisked into the flour to help the dough rise and form cracks during baking.)
- 1/4 teaspoon fine sea salt (Mixed into the dry ingredients to balance the sweetness and bring out the vanilla flavor.)
- 1/4 teaspoon red gel food coloring (Folded into half the dough to give 12 cookies a bright cranberry red color without adding much extra liquid.)
- 1/4 teaspoon green gel food coloring (Folded into the remaining dough to create 12 evergreen green cookies with a festive holiday appearance.)
- 1/2 cup powdered sugar (Sifted and used to coat the chilled dough balls generously so the white crust splits into snowy cracks during baking.)
Instructions
- Place 1/2 cup softened unsalted butter and 1 cup granulated white sugar in a large mixing bowl. Beat them together for 2 to 3 minutes until the mixture looks pale and fluffy. The butter should be soft at about 68°F to 70°F but shouldn’t look melted. Next add 2 large eggs one at a time and beat for about 30 seconds after each addition. Pour in 1 teaspoon pure vanilla extract and mix for another 15 seconds. Scrape the sides of the bowl so all the butter blends into the eggs and sugar. Don’t rush this part. The mixture should look creamy and slightly thick with tiny air bubbles across the surface. You’ll notice a light vanilla smell as everything blends. If the butter gets too warm then the dough may spread too far during baking. Keep the butter cool enough to hold air because those tiny pockets help the cookies stay tender.
- In a separate bowl whisk 2 1/4 cups all-purpose flour with 2 teaspoons baking powder and 1/4 teaspoon fine sea salt for 30 seconds. Then add the dry blend to the butter mixture in two batches. Fold with a rubber spatula until you can’t see loose flour. This takes about 1 to 2 minutes. Divide the dough into two equal portions. Mix 1/4 teaspoon red gel food coloring into one portion and 1/4 teaspoon green gel food coloring into the other. Fold each just until the color looks mostly even. Don’t knead the dough for too long. Both portions should feel soft and slightly tacky but hold their shape. Small color streaks are fine. Cover and chill at about 38°F for 60 minutes. If you skip this rest then the cookies can spread into thin discs. Cold dough holds its shape because the butter firms up before baking.
- Take both dough portions from the refrigerator after their 60-minute chill. The dough should feel firm enough to scoop without sticking badly. Divide each color into 12 pieces and roll each piece between your palms into a ball about 1 inch wide. You’ll have 24 balls in total. Pour 1/2 cup powdered sugar into a shallow bowl and coat each ball generously. Roll each one through the sugar and press gently so the white layer clings to the dough. Keep the balls round instead of flattening them. Then arrange them on two baking trays lined with parchment paper and leave about 2 inches between each ball. You’ll see a thick snowy coating with little patches of red and green peeking through. The dough should still feel cool. If shaping takes longer than 15 minutes and the balls turn soft then chill them for another 10 minutes. A firm center and thick sugar shell help the cracks stand out.
- Preheat the oven to 350°F and place a rack near the center. Bake one tray at a time for 10 to 12 minutes so the heat can move evenly around the cookies. Watch the tops after minute 9. The dough will spread and rise while the powdered sugar breaks into uneven white patches. Christmas Crinkle Cookies should have dry-looking edges and soft centers when you take them out. They shouldn’t turn dark brown underneath. (I’ve found that leaving them in for two extra minutes makes the centers less soft than I want.) Don’t wait for the tops to become completely firm. You’ll see deep cracks exposing bright red and green dough beneath the white coating. The cookies should smell buttery and sweet. If you bake past 12 minutes then the centers can lose their soft texture. Pull them while the middles still look slightly puffed because they’ll firm up as they cool.
- Leave the baked cookies on their trays for 5 minutes before moving them. The centers will still feel soft so lift each cookie gently from underneath. Then transfer all 24 cookies to a cooling rack and leave them for another 10 minutes. Once they’ve cooled enough to hold their shape, place one red cookie and one green cookie on a small white serving plate. Keep the remaining cookies for a larger holiday tray or gift box. Christmas Crinkle Cookies taste especially good when their centers are still a little soft. Let them cool before stacking them. The white cracks should stay clear and the colorful centers should look tender rather than wet. Break one cookie open to check for a soft crumb. If you move the cookies too soon then the warm centers may split apart. A short cooling rest helps the crumb set without drying it out.
Notes
Pro Tips:
- Spoon the all-purpose flour into your measuring cup and level it with a straight edge. Packing the flour can make 24 cookies dry and dense.
- Keep your unsalted butter near 68°F before creaming it with the granulated white sugar. Melted butter makes the dough harder to shape.
- Use gel food coloring for bright red and green dough. Start with 1/4 teaspoon per color so the mixture doesn’t become too wet.
- Chill the divided dough for 60 minutes before rolling it. If it still sticks badly to your hands then refrigerate it for another 15 minutes.
- Leave about 2 inches between the dough balls on each baking tray. Crowding them can cause the cookies to touch as they spread.
- Use a generous coating of powdered sugar on every dough ball. A thin layer can disappear during baking and leave fewer visible white cracks.
- Start checking the cookies after 10 minutes at 350°F. Remove them when the edges look set but the centers still appear slightly soft.
- For a festive cookie box, pair 12 red cookies with 12 green cookies. Let them cool completely before packing so the powdered sugar stays dry.
Storage: Let your Christmas Crinkle Cookies cool completely before storing them. Place the cookies in an airtight container with parchment paper between layers and keep them at room temperature for up to 4 days. You can refrigerate them for up to 7 days, although the powdered sugar may become less distinct. For longer storage, freeze fully cooled cookies in a sealed freezer-safe container for up to 2 months. Put parchment between the layers so the cookies don’t stick together. Thaw the cookies inside their closed container for about 1 hour to reduce condensation on the sugar coating. You don’t need to reheat these cookies because they’re best served at room temperature. However, you can warm one cookie in a 250°F oven for 3 to 4 minutes if you prefer a softer center. Don’t add water or butter because extra moisture can dissolve the powdered sugar. Avoid overheating because the centers can become dry. Discard cookies that develop mold, smell unusual or show signs of spoilage.
- Prep Time: 20 minutes
- Cook Time: 24 minutes
- Category: Dessert
- Cuisine: American
Nutrition
- Serving Size: 1 serving
Frequently Asked Questions
Yes, you can prepare the red and green dough up to 48 hours before baking. Keep each color tightly covered in the refrigerator at 40°F or below so the dough doesn’t dry out. When you’re ready to bake, let it sit for 5 to 10 minutes if it’s too firm to scoop. Then roll the balls and coat them in powdered sugar just before they go into the 350°F oven.
Flat cookies with very small cracks usually mean the dough was too warm or the baking powder wasn’t fresh. Chill the dough for a full 60 minutes and check that your baking powder is still active. Also make sure the oven reaches 350°F before baking. A thick layer of powdered sugar helps the cracks stand out as the cookies expand.
Store the cooled cookies in an airtight container at room temperature for up to 4 days. Keep the container in a cool and dry spot away from direct sunlight. You can refrigerate them for up to 7 days if your kitchen is warm. The powdered sugar may absorb some moisture in the fridge, but the cookies should still taste good.
Yes, a gluten-free 1-to-1 baking flour blend is the simplest option. Replace the 2 1/4 cups all-purpose flour with the same weight of the gluten-free blend and choose one containing xanthan gum. Chill the dough for about 75 minutes because gluten-free mixtures may need more time to firm up. The cookies can be more delicate and slightly crumbly, so let them cool before moving them.
Yes, double every ingredient to make approximately 48 cookies instead of 24. You’ll need 4 1/2 cups all-purpose flour and 1 cup unsalted butter along with double the remaining ingredients. Divide the colored dough into four manageable portions if your mixing bowl is small. Bake one tray at a time at 350°F for 10 to 12 minutes so each batch receives even heat.
Yes, roll the colored dough into 24 balls and freeze them in a single layer until firm. Then transfer them to a freezer-safe container and keep them frozen for up to 2 months. Don’t add powdered sugar before freezing because moisture can dissolve the coating. Thaw the balls overnight in the refrigerator and coat them just before baking at 350°F for approximately 10 to 12 minutes.
These soft vanilla cookies taste lovely with warm milk or hot chocolate. For a holiday dessert tray, serve them alongside Vintage Christmas Cookies and Soft Peanut Butter Cookies. Allow the crinkle cookies to cool for at least 30 minutes before arranging them with other treats. Their bright colors and snowy cracks look especially festive next to golden butter cookies.
Final Thoughts
Whenever I bake Christmas Crinkle Cookies for the holidays, I love seeing everyone reach for the red and green ones first. They’ve become one of those sweet treats I keep coming back to because the soft centers and snowy cracks make them feel special without much extra work.
If you’re looking for christmas cookies easy enough to make with the family then give this recipe a try and let me know how yours turned out. And if you’re collecting easy christmas cookies simple enough for a busy December, make sure to bookmark this page.
You can also try my Vintage Christmas Cookies or Butter Pecan Cookies for your next holiday cookie tray. The same batch covers christmas cookies sugar cookie, gluten free christmas cookies and christmas crinkle cookies easy without a single change.