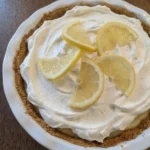
This Easy No Bake Cheesecake recipe is an easy creamy dessert that comes together so quickly in the refrigerator! With a buttery cookie crust a smooth tangy filling and a soft cloud of whipped cream on top.
We love warm days because it means that easy treats like this Easy No Bake Cheesecake are back on the table. Simple desserts especially those that feel light and creamy after dinner are my favorite kinds of recipes.
Ingredients
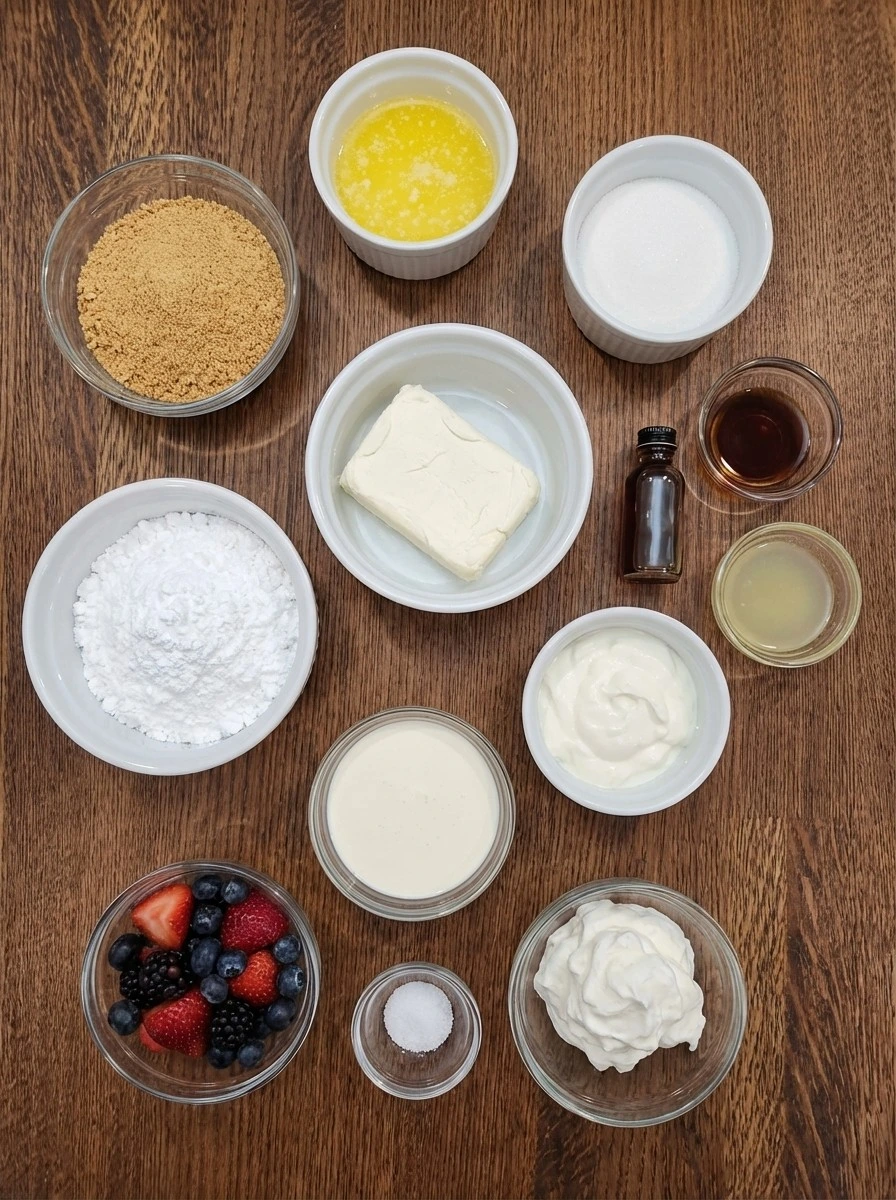
Here’s what I use for this recipe and you can always make substitutions if you prefer.
- graham cracker crumbs: forms the buttery base
- granulated sugar: lightly sweetens the crust
- unsalted butter melted: binds the crumbs and deepens the golden color
- cream cheese softened: creates the rich tangy filling
- powdered sugar: sweetens the filling smoothly
- vanilla extract: adds warm flavor
- fresh lemon juice: brightens the filling
- heavy whipping cream cold: whips into a light airy texture
- sour cream: makes the filling silky and slightly tangy
- pinch of salt: balances the sweetness
- whipped cream for topping: finishes the cheesecake softly
- fresh berries: adds color and a fresh garnish
- extra graham cracker crumbs: scattered on top for texture
Tools You’ll Need
- mixing bowl: for the crust and the filling stages
- round pie dish or springform pan: holds the crust and cheesecake neatly
- measuring cups and spoons: for accurate ingredient portions
- spatula: helps fold and spread the filling gently
Instructions
Step 1: Break and measure the crust ingredients
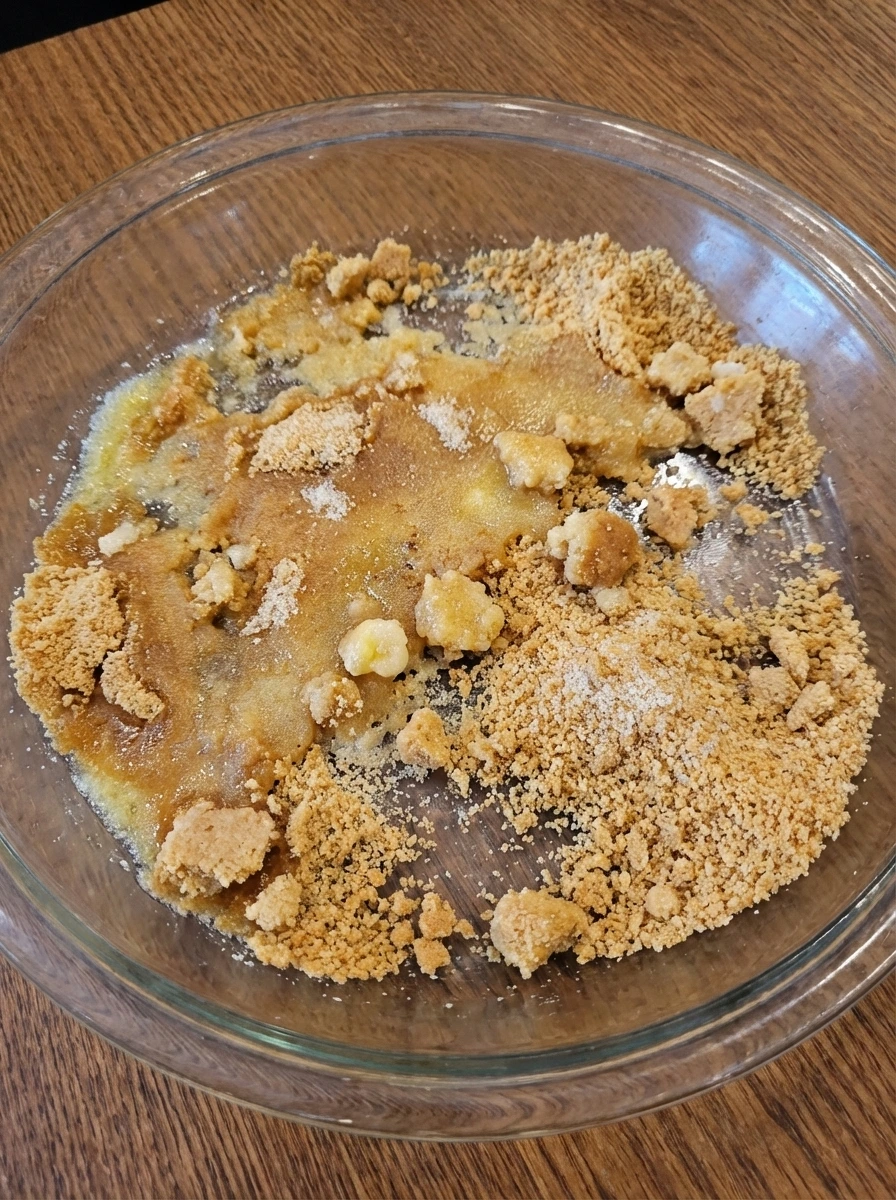
Add the graham crackers to a bowl and crush them until the texture looks like loose sandy crumbs with a few slightly larger bits still mixed in for a homemade feel. Measure in the sugar and pour the melted butter over the top so the pale crumbs begin to darken in uneven patches. Stir just until the dry crumbs start to look coated and slightly glossy. The mixture should look shaggy at first and then more evenly damp with little clumps forming naturally throughout.
Tip: Stop mixing once the crumbs hold together when pressed so the crust stays tender instead of greasy.
Step 2: Press the crust into the pan
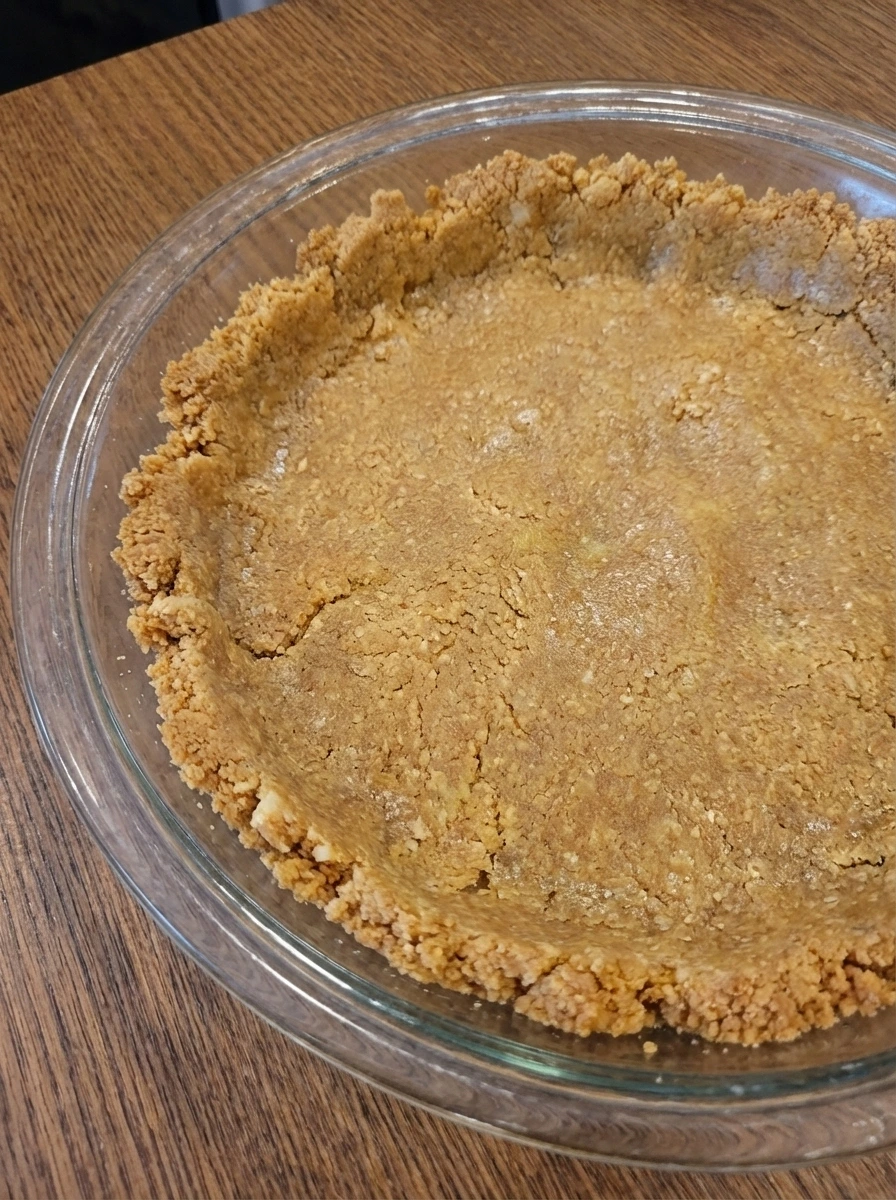
Transfer the buttery crumbs into the dish and press them across the bottom and slightly up the sides. The surface should look compact yet still rustic with a few rough edges and a little variation in thickness around the rim. As the crumbs settle they take on a deeper golden look from the butter and become more unified. Chill the crust so it firms up and holds its shape for the creamy filling.
Tip: Leave a few tiny ridges and crumbly spots for a natural homemade finish.
Step 3: Soften and season the cream cheese base
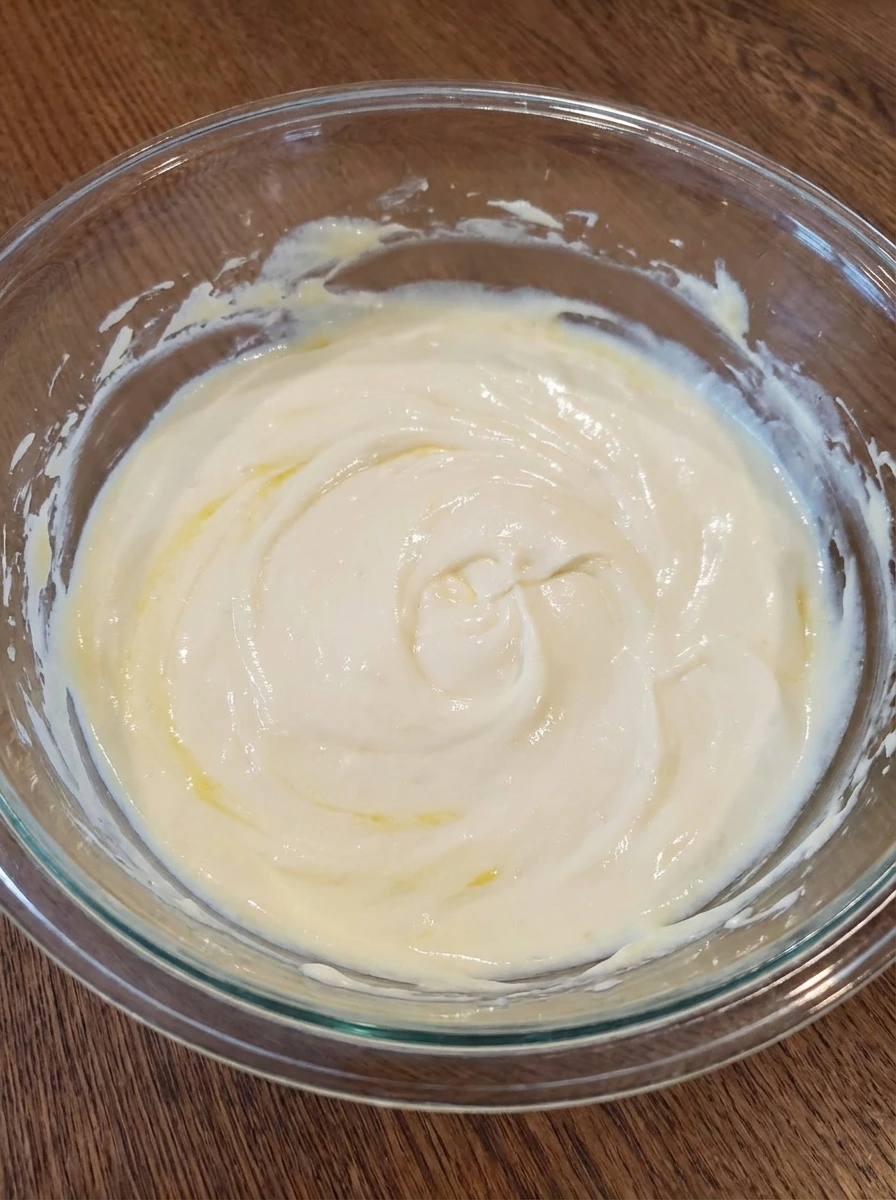
Place the softened cream cheese in a bowl and add the powdered sugar and vanilla and lemon juice and salt. Start mixing until the blocks loosen and the texture changes from thick and lumpy to smoother ribbons with a soft sheen. Fold in the sour cream and keep mixing until the filling looks creamy and pale with only a few tiny streaks disappearing as it comes together. The mixture should look richer and more spreadable now.
Tip: Make sure the cream cheese is fully softened so the filling turns silky instead of grainy.
Step 4: Whip the cream until airy
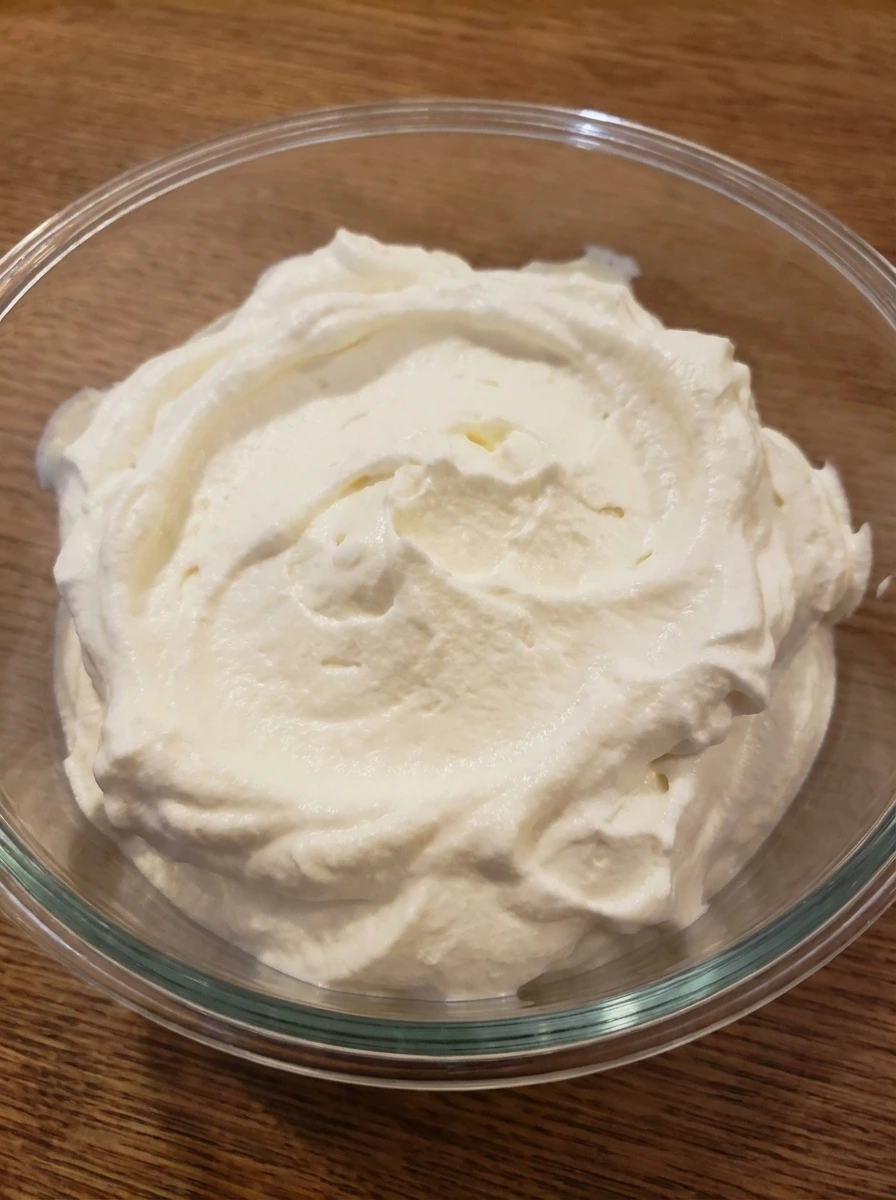
In a separate bowl beat the cold heavy cream until it thickens from liquid to soft billowy folds. Keep going just until the cream holds gentle peaks that lean naturally and look fluffy rather than stiff. The texture should now appear light and full of air with soft ridges left behind after each pass. This is what gives the cheesecake a mousse like softness once folded in.
Tip: Stop at soft to medium peaks so the filling stays light and easy to fold.
Step 5: Fold the filling together
Spoon the whipped cream into the cream cheese mixture in a few additions and fold gently so the denser base slowly lightens. At first the bowl will show white streaks and heavier patches and then the mixture will become evenly thick and cloud like. The finished filling should look smooth and softly mounded with visible swirls that settle slowly. It should feel lighter in color and texture than the cream cheese base did on its own.
Tip: Fold with broad strokes so you keep as much air in the filling as possible.
Step 6: Fill and loosely level the cheesecake
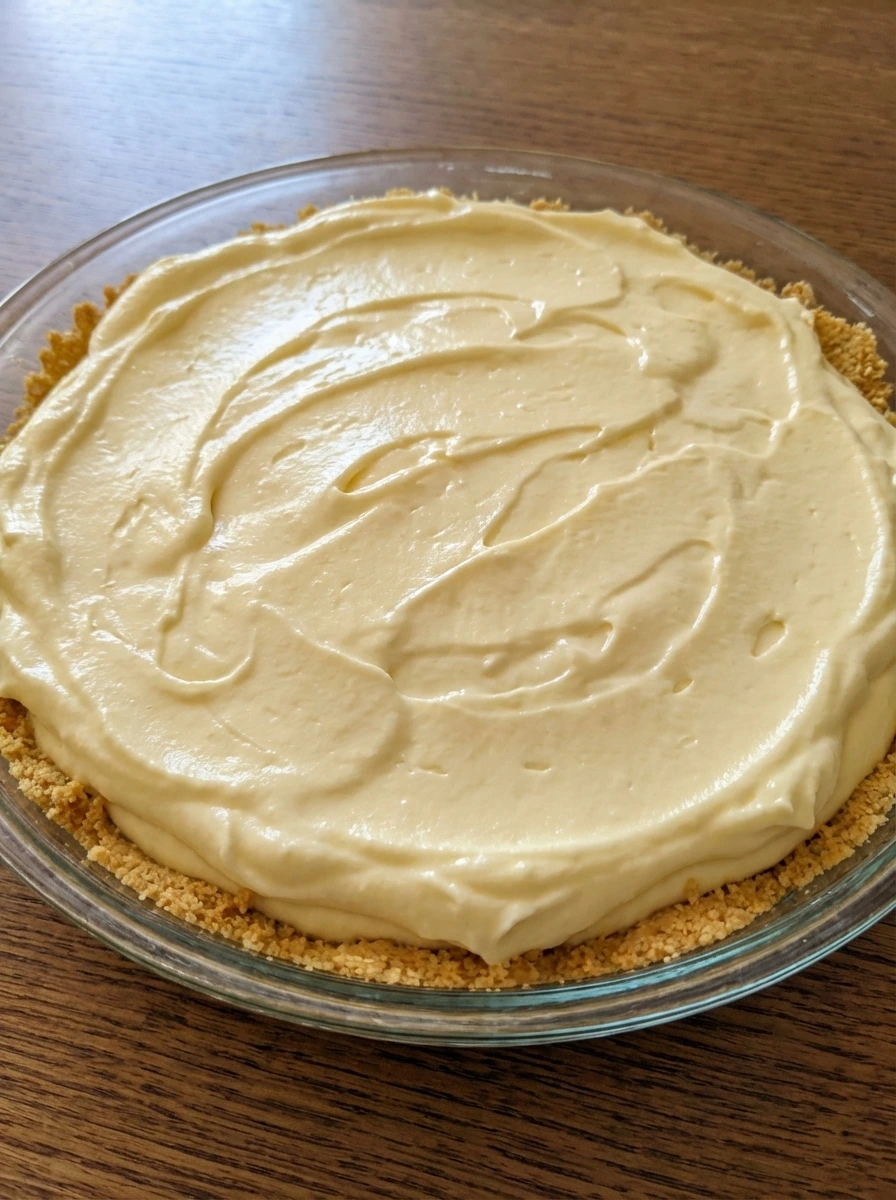
Spoon the filling over the chilled crust in generous dollops rather than one perfect layer. Spread it outward with soft motions so the top looks mostly level yet still keeps casual waves and shallow swoops. The white filling now covers the golden crust with a thick creamy layer and a few natural dips. Tap the dish lightly so the filling settles without losing its soft homemade look.
Tip: Avoid smoothing the top too much because a few gentle swirls make the finished cheesecake look more natural.
Step 7: Chill until set and finish the surface
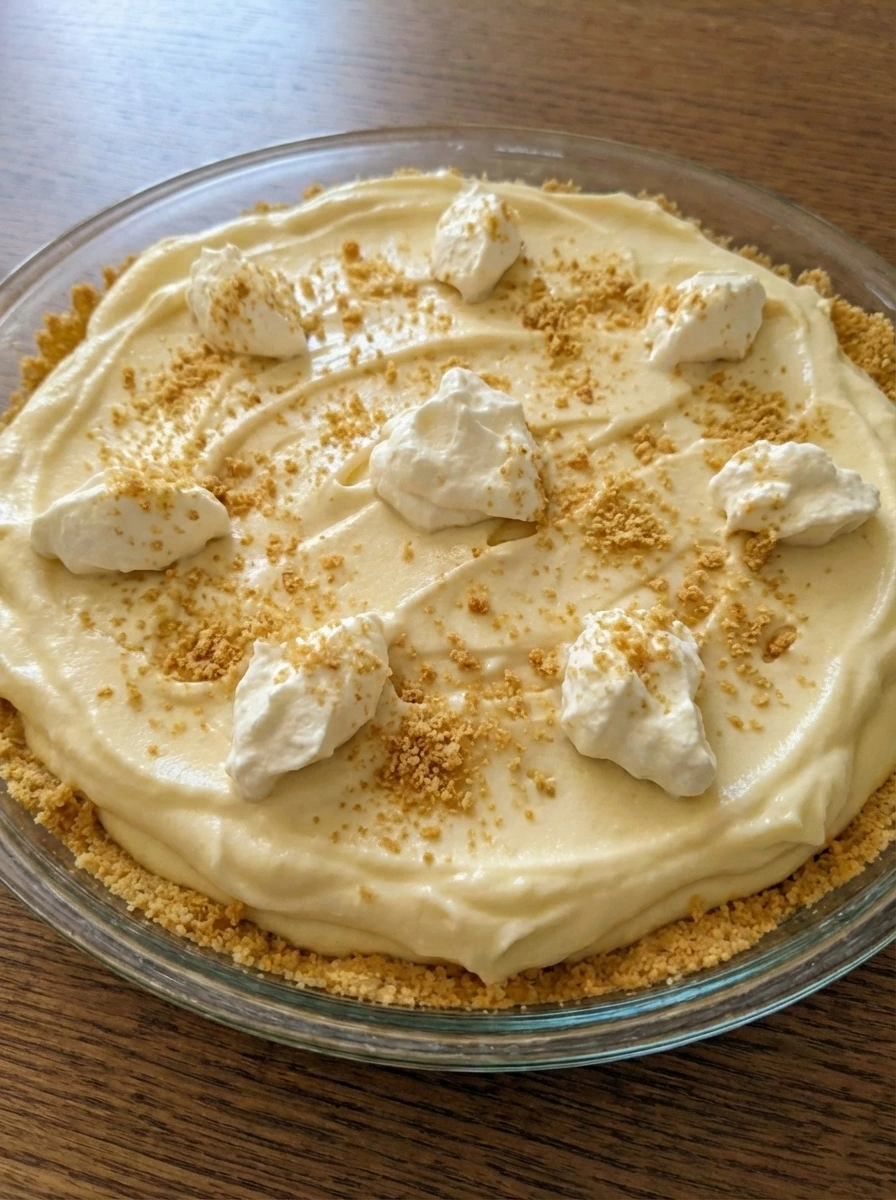
Refrigerate the cheesecake until the filling firms up and the top changes from soft and loose to cleanly set with a gentle wobble in the center. The swirls remain visible although the surface now looks tighter and more sliceable. Scatter extra graham crumbs loosely over the top so a few areas look more golden than others. Add soft spooned dollops of whipped cream with slight variation in size for a relaxed finish.
Tip: A longer chill gives cleaner slices and a more stable creamy texture.
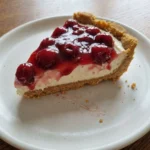
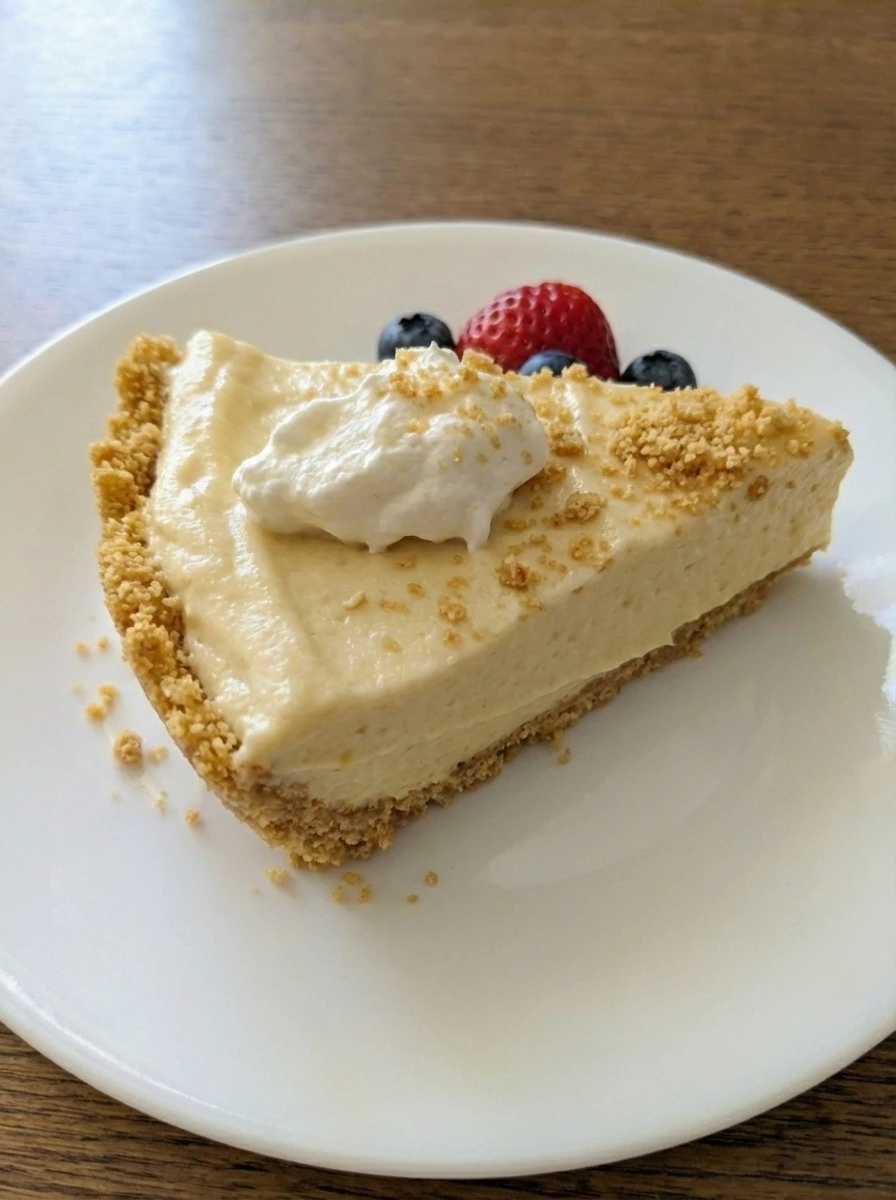
Step 8: Slice and plate the cheesecake
Run a thin blade around the edge and cut a slice so the crust breaks cleanly with a few crumbly edges and the filling shows a smooth creamy cross section. Lift the slice onto a plate where the layers stay defined yet softly relaxed. Add berries and a little extra whipped cream over one side rather than perfectly centered. A few crumbs can fall onto the plate for a more natural plated look.
Tip: Wipe the blade between cuts for neater slices while still keeping that soft homemade texture.
Step 9: Serve the finished cheesecake
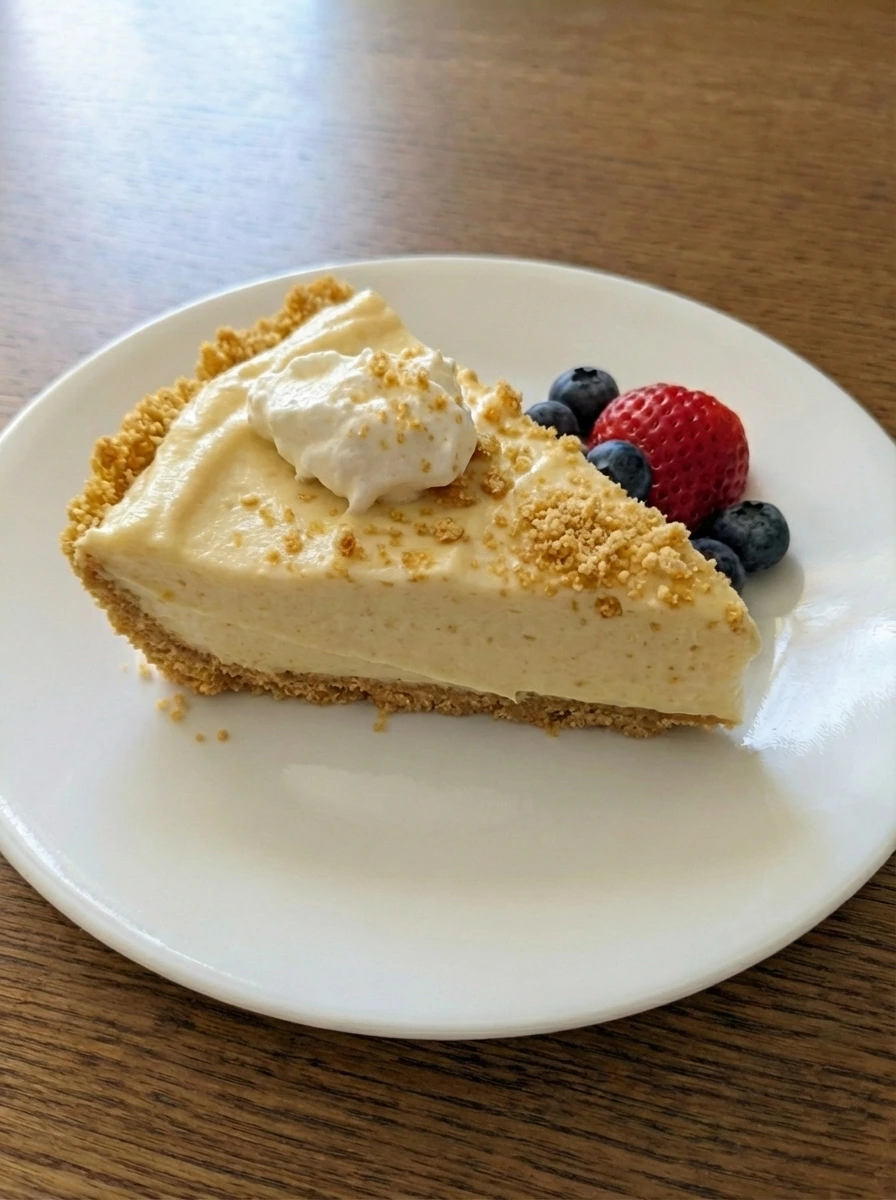
The final plated slice should look fully set and ready to serve with a rich creamy center and a buttery crust that appears deeper golden around the edges from the melted butter. The topping should feel loose and natural with berries tucked into the whipped cream and a few extra crumbs scattered across the plate. Nothing should look too perfect or overly arranged. The contrast of smooth filling and crumbly crust and fresh garnish makes the dessert look homemade and inviting.
Tip: Serve well chilled so the filling stays clean and creamy on the plate.
Pro Tips
- Use full fat cream cheese for the richest and most stable filling.
- Chill the crust before adding the filling so the layers stay defined.
- Fold the whipped cream gently so the texture stays light and airy.
- For the cleanest slices chill the cheesecake overnight before serving.
Storage Instructions
Store the cheesecake covered in the refrigerator for up to 4 days. For longer storage freeze individual slices tightly wrapped and thaw them overnight in the refrigerator before serving.
Frequently Asked Questions
Can I make Easy No Bake Cheesecake ahead of time?
Yes. This cheesecake is even better after several hours in the refrigerator and it slices most cleanly the next day.
Can I use a different crust?
Yes. Vanilla wafer crumbs or digestive biscuit crumbs work well and still give you a buttery firm base.
How do I know when the cheesecake is set?
The top should look firm and the center should have only a slight wobble when gently moved.
Can I freeze leftovers?
Yes. Wrap slices well and freeze them for up to one month and thaw in the refrigerator before serving.
Final Thoughts
If you try this recipe I really hope you love it as much as my family does. It has become one of those desserts we just keep coming back to no matter the season.
Drop a comment below and let me know how yours turned out. And if you are looking for more easy dessert ideas make sure to bookmark this page.
I am always adding new recipes that are simple satisfying and perfect for busy weeknights.
Print
Easy No Bake Cheesecake
- Total Time: 45 minutes
- Yield: 4 servings 1x
Description
This easy no bake cheesecake is one of the best dessert ideas when you need a quick simple treat that still feels special. The creamy filling and buttery crust make it perfect for meal prep and holiday tables and potluck nights and brunch spreads and party desserts. It is a healthy style choice for portion control and make ahead planning while still tasting rich and satisfying for any weeknight sweet craving.
Ingredients
- 2 cups graham cracker crumbs
- 2 tablespoons granulated sugar
- 1/2 cup unsalted butter melted
- 16 ounces cream cheese softened
- 3/4 cup powdered sugar
- 2 teaspoons vanilla extract
- 1 tablespoon fresh lemon juice
- 1 cup heavy whipping cream cold
- 1/2 cup sour cream
- 1 pinch pinch of salt
- 1/2 cup whipped cream for topping
- 1/2 cup fresh berries
- 2 tablespoons extra graham cracker crumbs
Instructions
- Add the graham crackers to a bowl and crush them until the texture looks like loose sandy crumbs with a few slightly larger bits still mixed in for a homemade feel. Measure in the sugar and pour the melted butter over the top so the pale crumbs begin to darken in uneven patches. Stir just until the dry crumbs start to look coated and slightly glossy. The mixture should look shaggy at first and then more evenly damp with little clumps forming naturally throughout.
- Transfer the buttery crumbs into the dish and press them across the bottom and slightly up the sides. The surface should look compact yet still rustic with a few rough edges and a little variation in thickness around the rim. As the crumbs settle they take on a deeper golden look from the butter and become more unified. Chill the crust so it firms up and holds its shape for the creamy filling.
- Place the softened cream cheese in a bowl and add the powdered sugar and vanilla and lemon juice and salt. Start mixing until the blocks loosen and the texture changes from thick and lumpy to smoother ribbons with a soft sheen. Fold in the sour cream and keep mixing until the filling looks creamy and pale with only a few tiny streaks disappearing as it comes together. The mixture should look richer and more spreadable now.
- In a separate bowl beat the cold heavy cream until it thickens from liquid to soft billowy folds. Keep going just until the cream holds gentle peaks that lean naturally and look fluffy rather than stiff. The texture should now appear light and full of air with soft ridges left behind after each pass. This is what gives the cheesecake a mousse like softness once folded in.
- Spoon the whipped cream into the cream cheese mixture in a few additions and fold gently so the denser base slowly lightens. At first the bowl will show white streaks and heavier patches and then the mixture will become evenly thick and cloud like. The finished filling should look smooth and softly mounded with visible swirls that settle slowly. It should feel lighter in color and texture than the cream cheese base did on its own.
- Spoon the filling over the chilled crust in generous dollops rather than one perfect layer. Spread it outward with soft motions so the top looks mostly level yet still keeps casual waves and shallow swoops. The white filling now covers the golden crust with a thick creamy layer and a few natural dips. Tap the dish lightly so the filling settles without losing its soft homemade look.
- Refrigerate the cheesecake until the filling firms up and the top changes from soft and loose to cleanly set with a gentle wobble in the center. The swirls remain visible although the surface now looks tighter and more sliceable. Scatter extra graham crumbs loosely over the top so a few areas look more golden than others. Add soft spooned dollops of whipped cream with slight variation in size for a relaxed finish.
- Run a thin blade around the edge and cut a slice so the crust breaks cleanly with a few crumbly edges and the filling shows a smooth creamy cross section. Lift the slice onto a plate where the layers stay defined yet softly relaxed. Add berries and a little extra whipped cream over one side rather than perfectly centered. A few crumbs can fall onto the plate for a more natural plated look.
- The final plated slice should look fully set and ready to serve with a rich creamy center and a buttery crust that appears deeper golden around the edges from the melted butter. The topping should feel loose and natural with berries tucked into the whipped cream and a few extra crumbs scattered across the plate. Nothing should look too perfect or overly arranged. The contrast of smooth filling and crumbly crust and fresh garnish makes the dessert look homemade and inviting.
Notes
Pro Tips:
- Use full fat cream cheese for the richest and most stable filling.
- Chill the crust before adding the filling so the layers stay defined.
- Fold the whipped cream gently so the texture stays light and airy.
- For the cleanest slices chill the cheesecake overnight before serving.
Storage: Store the cheesecake covered in the refrigerator for up to 4 days. For longer storage freeze individual slices tightly wrapped and thaw them overnight in the refrigerator before serving.
- Prep Time: 15 minutes
- Cook Time: 30 minutes
- Category: Dessert
- Cuisine: American
Nutrition
- Serving Size: 1 serving